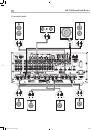
26
27
English
RSX-1560 Surround Sound Receiver
26
27
English
RSX-1560 Surround Sound Receiver
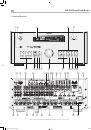
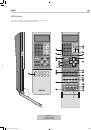
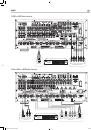
VOLUME Knob
=
VOLUME Button
Q
The large rocker button on the remote and the large rotary control on
the front panel provide the master VOLUME control, adjusting the output
level of all channels simultaneously.
MUTE Buttons
e
R
Push the MUTE button once to turn the sound off. An indication appears
in the front panel and on-screen displays. Press the button again to
restore previous volume levels.
Note:
Pressing the volume buttons on the remote also cancels the
muting function.
LIGHT Button
C
Press this button on the side of the remote to turn the backlighting on for
using the remote in a dark room.
DEVICE/INPUT Buttons
4w
A
The numeric buttons on the front panel plus the MULTI INPUT button are
used to select source inputs for listening/viewing.
These buttons are duplicated on the remote, except that the MULTI INPUT
button is labeled EXT and the remote buttons have two functions:
Short press:
A short press of any button changes the device that the
remote operates, but does not change the receiver’s input selection.
Long press:
A longer press changes the remote control device and
changes the source input for listening/viewing in the main room.
Note:
A long press of the EXT button changes the input to the
7.1 channel analog MULTI INPUT. Pressing the AUD button only
changes the remote device; there is no input source associated
with this button.
D-SLT Button
Y
Press this button to change the digital input associated with the current
source input.
SEL Button
t
REC Button
J
Press the front-panel SEL button or the remote control REC button to select
the desired zone for additional changes such as changing the input,
adjusting the volume, or turning a re-mote zone on or off. Repeatedly
press the button until the desired zone appears in the front panel:
RECORD > ZONE 2 > ZONE 3 > ZONE 4. Once the desired zone
appears, you have 10 seconds to make the desired change. Change the
input selection by pressing an INPUT button. When ZONES 2–4 appear,
you can also adjust the volume, or turn the zone on or off by pressing
the ZONE button.
Note:
The RR-1061 remote control can be set to send individual
IR commands for each zone. Please refer to the setup manual
supplied with the RR-1061 to program this function.
A long press of the SEL or REC button is used to cancel the PARTY mode
and return all zones to their last previously selected inputs.
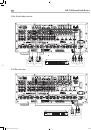
ZONE Button
r
U
Either of these buttons serve as a standby button for the currently-selected
remote zone, toggling the zone on or off. Select the desired zone using
the front-panel SEL or remote control REC button as described above.
UP/DOWN Buttons
T
These two buttons on the remote are used to move the cursor up or
down to select lines in the OSD menus. These buttons are also used
in conjunction with the TONE button to make CONTOUR/TONE
adjustments.
+/– Buttons
T
These two buttons on the remote are used to change settings on a
selected line in the OSD menus. Also used for selecting options in some
surround modes.
Speaker Selection Buttons
E
These three buttons on the remote are used to select a speaker or group
of speakers for temporary level adjustments. In addition, the C button
is used in conjunction with the UP/DOWN buttons for temporary
adjustment of group delay/lip synch.
EQ Button
K
This button on the remote is used to turn on and off the Cinema EQ
feature, a high-cut filter useful for older movie soundtracks.
LF/HF Knobs
5
These two front panel rotary controls are used to make temporary
adjustments to the tone or contour settings, boosting or cutting high
frequencies (HF) and low frequencies (LF) of the speaker or speakers
selected in the Contour Setup menu.
Note:
Permanent contour adjustments can be made using the
Contour Setup menu.
TONE Button
X
This button on the remote is used for temporary Contour adjustments.
It toggles between high frequency (HF) and low frequency (LF) modes.
Once a mode is selected, the UP/DOWN buttons are used to make the
adjustments to the speaker or speakers selected in the Contour Setup
menu.
Note:
Permanent contour adjustments can be made using the
Contour Setup menu.
Surround Mode Buttons
q
W
Five buttons on the remote (2CH, PLC, PLM, 5CH, 7CH) and four
buttons on the front panel (2CH, DOLBY PLIIx Mode, DTS/Neo 6, DSP)
allow direct selection of certain surround modes. The function of these
buttons varies depending on the type of recording being played. See the
Manually Selecting Surround Modes section for detailed information.
SUR+ Button
V
This button on the remote is used in conjunction with the +/– buttons
for manual selection of surround modes and features. See the Manually
Selecting Surround Modes section for information.
DYN Button
L
Use the DYN button on the remote to select the dynamic range control
setting in Dolby Digital surround mode.
RSX-1560 English v2.indd 27
29/9/08 15:16:01