Инструкция для ROTEL RSX-1560

(скачивание инструкции бесплатно)
Формат файла: PDF
Доступность: Бесплатно как и все руководства на сайте. Без регистрации и SMS.
Дополнительно: Чтение инструкции онлайн
background image

50

51

English

RSX-1560 Surround Sound Receiver

50

51

English

RSX-1560 Surround Sound Receiver

outputs may be assigned to each Zone and can send a turn-on signal 
to remote components whenever the Zones are activated. For example, 
Zone 2 could use 12V Triggers 1, 3 and 6; Zone 3, 12V Triggers 2 and 
3; Zone 4, 12V Triggers 5 and 6.

1.  Press the +/– buttons on the remote to change the first position from 

blank to 1 (activating TRIGGER 1 for that zone).

2.  Press the ENT button on the remote to move to the next position.

3.  Repeat until all six positions are set as desired. A final press of the 

ENT button confirms the selection.
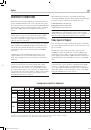
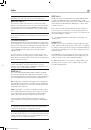
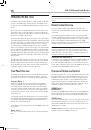
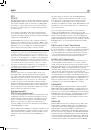
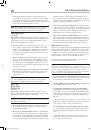
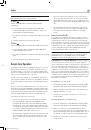
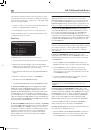
Default Setup

���������������������

�����������

��������������������������

�����������������������������

���������

�������������������

�����

�������������������

�������������������

�������������������

�������������

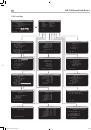
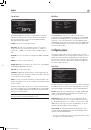
The DEFAULT SETUP menu provides access to six functions:

•  Set the tuning function for North American or European frequencies.

•  Redirect the Front channel amplifiers or the Center Back channel 

amplifiers to power remote speakers in Zone 2, 3 or 4, or redirect the 
Center Back channel amplifiers to ‘Front’ for bi-amping.

•  Restore all features and settings to the original FACTORY DEFAULT 

settings.

•  Memorize a custom group of settings as a USER DEFAULT.

•  Activate the memorized USER DEFAULT settings.

•  Set a NEW PASSWORD for the memorized USER DEFAULT settings.

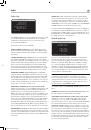
To change the TUNER setting:

 Place the highlight on the TUNER 

SETTING line using the UP/DOWN buttons and use the +/– buttons 
to change the setting to N. AMERICA or EUROPE. Then, move the 
highlight to the FACTORY DEFAULT line and change the setting to YES 
as described above. The screen will change to a confirmation screen. 
Press the ENTER button to proceed with resetting the FACTORY DEFAULT 
settings and changing the TUNER SETTING. To return to the MAIN menu 
without resetting the FACTORY DEFAULT and TUNER settings, change the 
entry to NO and press the ENTER button.

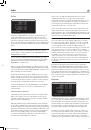
To change the REDIRECT setting:

 Place the highlight on the REDIRECT 

line using the UP/DOWN buttons and use the +/– buttons to change the 
setting from REDIRECT: No to REDIRECT: Front>Zone 2, Front>Zone 3 
or Front>Zone 4, CB>Zone 2, CB>Zone 3 or CB>Zone 4 (for powering 
speakers in one of the remote Zones 2, 3 or 4), or CB>Front (for bi-
amping front speakers). If you choose to redirect the internal front 
channel amplifiers, then you will need a separate stereo amplifier to 
drive your front speakers.

Note:

 Changing the default TUNER SETTING or REDIRECT 

SETTING can only be done at the same time as restoring the 

FACTORY DEFAULT settings. Therefore, we recommend selecting 

your default TUNER and REDIRECT settings and resetting to the 

FACTORY DEFAULT settings as the first step in configuring the unit, 

before you change or memorize any other configuration settings.

To restore the FACTORY DEFAULT settings:

 Place the highlight 

on the FACTORY DEFAULT line using the UP/DOWN buttons and use 
the +/– buttons to change the setting to YES. Press the ENTER button 
to proceed with resetting the FACTORY DEFAULT settings with re-
confirmation screen. The unit will power off (to Standby Mode) and then 
on, with the factory settings restored. To return to the MAIN menu without 
resetting the FACTORY DEFAULT settings, change the entry to NO and 
press the ENTER button.

Note:

 Resetting to factory default settings will erase all stored 

settings including delay settings, speaker settings, balance settings, 

input settings and more. You will lose ALL system configuration 

settings. Be certain that you wish to do so before resetting the 

factory defaults.

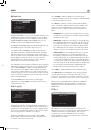
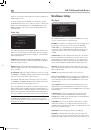
To memorize USER DEFAULT settings:

 Many of the current 

configuration settings can be stored as a USER DEFAULT, which can be 
activated at any time from this menu screen.To save the current settings 
as a USER DEFAULT:

1.  Place the highlight on the SET USER DEFAULT line using the UP/

DOWN buttons and use the +/– buttons to change the setting to YES. 

2.  Press the ENTER button to go to confirmation screen where a 

password must be entered. The default password is 8888. If the 
entered password is correct, the current settings will be saved as the 
new USER DEFAULT settings. 

3.  To return to the MAIN menu without saving changes, change all 

entries on the screen to NO and press ENTER.

Note:

 If there is insufficient memory to store a USER DEFAULT 

configuration file, the SET USER DEFAULT option will not be 

available.

To activate memorized USER DEFAULT settings:

 After you have 

stored a USER DEFAULT configuration file, you can activate those settings 
at any time by placing the highlight on the USER DEFAULT line using the 
UP/DOWN buttons. Use the +/– buttons to change the setting to YES. 
Press the ENTER button to proceed with activating the USER DEFAULT 
settings. To return to the MAIN menu without activating the USER 
DEFAULT settings, change the entry to NO and press the ENTER button.

To return to the MAIN menu without activating the USER DEFAULT 
settings, change the entry to NO and press the ENTER button.

To change the password:

 The password programmed at the factory is 

0000. If you wish to change the password:

1.  Place the highlight on the SET NEW PASSWORD line using the UP/

DOWN buttons. Use the +/– buttons to change the setting to YES. 
Press the ENTER button to proceed to the PASSWORD screen. 

RSX-1560 English v2.indd   50

29/9/08   15:16:21

1
2
3
4
5
6
7
8
9
10
11
12
13
14
15
16
17
18
19
20
21
22
23
24
25
26
27
28
29
30
31
32
33
34
35
36
37
38
39
40
41
42
43
44
45
46
47
48
49
50
51
52
53
54
Оглавление инструкции
  • Страница 1 из 55
    RSX-1560 Surround Sound Receiver Owner’s Manual RSX-1560 English v2.indd 1 Register your product at www.Rotel.com/register 29/9/08 15:13:46
  • Страница 2 из 55
    RSX-1560 Surround Sound Receiver 2 > 10 cm > 4 in > 10 cm > 10 cm > 4 in > 4 in > 10 cm > 4 in Rotel products are designed to comply with international directives on the Restriction of Hazardous Substances (RoHS) in electrical and electronic equipment and the disposal of Waste Electrical and
  • Страница 3 из 55
    English 3 Notice Important Safety Instructions The COMPUTER I/O connection should be handled by authorized persons only. WARNING: There are no user serviceable parts inside. Refer all servicing to qualified service personnel. FCC Information This equipment has been tested and found to comply with
  • Страница 4 из 55
    RSX-1560 Surround Sound Receiver 4 1: Controls and Connections � �� � � � � � � � � �� � � � � � � �� � � � �� �� �� � *8 � 7* � � � �� � � � � � � � * Please note: when installing in a rack-mounting system, secure the unit to the rack RSX-1560 English v2.indd 4 29/9/08 15:14:03
  • Страница 5 из 55
    English 5 2: RR-1061 Remote This remote control may be supplied with alternative Rotel products. As a result some of the buttons may not apply to this particular model. ����� ����� � � � � � � � � � �� �� ����� ��� ��� � ���������� ���� � ��� ��� ����� ��� ���� ����� ���� � � ��� ��� ������ �� � �
  • Страница 6 из 55
    6 RSX-1560 Surround Sound Receiver 3: Connecting the Speakers ��������� ����������� CAUTION RSX-1560 English v2.indd 6 29/9/08 15:14:16
  • Страница 7 из 55
    English 7 4: Digital Video Connections ���� ��� ������� ���� ��������������������� ������������ ������� ���� ��������������������� RSX-1560 English v2.indd 7 29/9/08 15:14:26
  • Страница 8 из 55
    RSX-1560 Surround Sound Receiver 8 5: TV Analog Connections ���� ����� � ��������� ����� ������� �� ���� �� ������������������ ���� ������������� ������������ 6: DVD Player Analog Connections ��������� ����� � ������� �� ������������� RSX-1560 English v2.indd 8 �� ������������������ ���� �� �����
  • Страница 9 из 55
    English 9 7: DVD-A or SACD Player Connections ������� ������ ��� ������ ������ ������� ��������������������������� 8: Cable, Satellite, or HDTV Analog Connections ����� ������� ������������� RSX-1560 English v2.indd 9 ���� ������ ������� ��������� ����� � �� �� ������������������ �������������
  • Страница 10 из 55
    RSX-1560 Surround Sound Receiver 10 9: Video Recorder Analog Connections ������� ��������� ������� �������� ��������� ����� ���� ����� ���� �������� ������ ������ ����� ����� 10: CD Player Connections ����� ������� ���� ������ ������������� RSX-1560 English v2.indd 10 29/9/08 15:15:15
  • Страница 11 из 55
    English 11 11: Audio Recorder Connections ����� ���� ����� �������� ���� ������ ��� ������ ����� ������� 12: AM and FM Antennae Connections RSX-1560 English v2.indd 11 29/9/08 15:15:33
  • Страница 12 из 55
    RSX-1560 Surround Sound Receiver 12 13: On-Screen Menus ���������������������� ������� ������������ ����������������� ��������������������� ������������������������������� ����������������������� ���������������� ��������������������������� ��������������������������� ������������������� �
  • Страница 13 из 55
    English 13 Contents Boxed numbers refer to RSX-1560 illustration. Circled letters refer to RR-1061 illustration. FCC Information 3 Caution 3 Important Safety Instructions . . . . . . . . . . . . . . . . . . . . . . . . . . . . . . . . . . . . . . . 3 1: Controls and Connections 4 2: RR-1061 Remote
  • Страница 14 из 55
    RSX-1560 Surround Sound Receiver 14 PIP Button POP Button Basic Operations . . . . . . . . . . . . . . . . . . . . . . . . . . . . . . . . . . . . . . . . . . . . . . . Power and Standby On/Off 2gTT Volume Adjustments =Q Muting the Sound eR Selecting Inputs . . . . . . . . . . . . . . . . . . . . .
  • Страница 15 из 55
    English 15 About Rotel Getting Started Our story began nearly 50 years ago. Over the decades, we have received hundreds of awards for our products and satisfied hundreds of thousands of people who take their entertainment seriously – like you! Thank you for purchasing the Rotel RSX-1560 Surround
  • Страница 16 из 55
    RSX-1560 Surround Sound Receiver 16 Surround features Unpacking • Seven built-in amplifier channels, each delivering 100 watts (all channels driven). Remove the unit carefully from its packing. Find the remote control and other accessories. Save the box as it will protect the product if you move or
  • Страница 17 из 55
    English 17 OVERVIEW OF CONNECTIONS When making signal connections, connect LEFT channels to LEFT channel jacks and RIGHT channels to RIGHT channel jacks. All RCA-type connections on this product follow these standard color codes: Although the rear panel may look daunting, connecting the unit to
  • Страница 18 из 55
    RSX-1560 Surround Sound Receiver 18 This Rotel receiver provides upscaling and downscaling for the various video formats. Composite Video or S-Video video signals can be upscaled to 480p/576p, 720p, 1080i and 1080p on HDTV Component or HDMI monitors by choosing the appropriate output setting in the
  • Страница 19 из 55
    English 19 Three sets of inputs, labeled COMPONENT VIDEO IN 1–3, accept Component video signals from source components. • Use the scaler setting of the receiver’s ‘VIDEO OUT FORMAT’ in the VIDEO/HDMI menu to match the native resolution of the TV monitor. High Definition TV Monitor Outputs vn
  • Страница 20 из 55
    RSX-1560 Surround Sound Receiver 20 Note: When using digital connections, you may also want to make the analog audio input connections described previously. The analog connection is necessary to record to an analog recorder in some circumstances or for ZONE 2–4 operation. Digital Outputs [ The
  • Страница 21 из 55
    English Note: Memorized settings and video labels are preserved indefinitely, even if the unit is disconnected from AC power. Master Power Switch g The large rocker switch on the rear panel is a master power switch. When it is in the OFF position, power to the unit is completely off. When it is in
  • Страница 22 из 55
    RSX-1560 Surround Sound Receiver 22 MAKING CONNECTIONS Make sure that you connect the right channel to the R input jack and the left channel to the L input jack. CD Player o� Cable, Satellite, or HDTV Tuner iolcb Connect the digital output of the CD player to any of the Optical or Coax digital
  • Страница 23 из 55
    English connect one of the OPTICAL OUT or COAXIAL OUT connections to the digital input of the recorder. No video connections are required for an audio recording device. Video Recorder psl; 23 HDMI 1–4 inputs on the receiver. This cable sends the video signal from the player along with a digital
  • Страница 24 из 55
    RSX-1560 Surround Sound Receiver 24 cables. If the standard definition TV does not have S-Video connectors, use a Composite Video connection. 3. Connect the center channel speaker to binding posts labeled “CENTER.” S-Video Analog connection: Connect an S-Video cable to the SVIDEO MON OUT output on
  • Страница 25 из 55
    English Amplifiers f To hook up optional power amplifiers, connect an audio cable from each PREOUT jack to the input of the amplifier channel that will power the corresponding speaker. In a full home theater system, you will need to make as many as seven different connections in addition to the
  • Страница 26 из 55
    RSX-1560 Surround Sound Receiver 26 OPERATING THE RSX-1560 Considering its large number of features, settings, and options, this Rotel receiver is remarkably easy to operate. The key to operating the unit is its system of On-Screen Displays (OSD) which guide you through various choices. The
  • Страница 27 из 55
    English VOLUME Knob = VOLUME Button Q The large rocker button on the remote and the large rotary control on the front panel provide the master VOLUME control, adjusting the output level of all channels simultaneously. MUTE Buttons eR Push the MUTE button once to turn the sound off. An indication
  • Страница 28 из 55
    RSX-1560 Surround Sound Receiver 28 MENU/OSD Button S Push this button on the remote to turn on the OSD menu system. If the menu system is already visible, push this button to cancel the display. Press and hold the button to turn off the front-panel display. PIP Button POP Button ENTER Button T
  • Страница 29 из 55
    English Front Panel: Rotate the front-panel VOLUME knob clockwise to increase the volume, counterclockwise to decrease. Remote: Press the VOL UP button to increase the volume; press the VOL DOWN button to decrease. When you adjust the volume, the setting is shown on the SDTV monitor and/or the
  • Страница 30 из 55
    RSX-1560 Surround Sound Receiver 30 Party Mode: Selecting the Same Input for all Outputs rtJU You may wish to have the same input for listening, recording, and all of the remote zones. The receiver makes this configuration (called Party Mode) easy by linking the inputs for recording and remote zones
  • Страница 31 из 55
    English DTS 5.1 DTS 96/24 DTS® (Digital Theater Systems) is an alternative digital format competing with Dolby Digital in both movie theaters and home theater markets. The basic functions of the DTS system are similar to those of Dolby Digital (for example, 5.1 discrete channels), however the
  • Страница 32 из 55
    32 DTS-HD Master Audio and DTS-HD High Resolution Audio Like Dolby’s TrueHD, DTS-HD Master Audio is an advanced lossless audio codec which is an optional sound format for Blu-ray discs, again delivering the original recorded sound ‘bit-for-bit’. It is also an optional format for HD-DVD disc
  • Страница 33 из 55
    English default surround mode for each input using the INPUT SETUP menu (see the Setup section of this manual). Combined with the auto-detection of Dolby Digital 5.1 and DTS, this default surround setting makes operation of the receiver surround modes totally automatic. For example, if you set
  • Страница 34 из 55
    34 EX decoding and may be the better 7.1 channel options for nonSurround EX discs. Selecting DD 5.1 forces the center back channel processing off for conventional 5.1 channel playback. You can also repeatedly press the DOLBY PLIIx Mode button on the front panel until the desired center back channel
  • Страница 35 из 55
    English • To select DSP multichannel modes for 2-channel digital recordings. You can also step through the DSP options (MUSIC 1-4, 5CH, 7CH) by repeatedly pressing the DSP button on the front panel. Directly select 5CH mode by pressing the 5CH button on the remote. Directly select 7CH mode by
  • Страница 36 из 55
    RSX-1560 Surround Sound Receiver 36 Dynamic Range L Cinema EQ K Dolby Digital recordings are capable of wide dynamic range (the difference between the softest and loudest sounds). In some cases, this may tax amplifiers and/or speakers. In other cases, you may want to reduce the dynamic range when
  • Страница 37 из 55
    English BAND Buttons -I Press the BAND button to toggle between AM and FM reception. An indicator in the front-panel display confirms your choice and the currently tuned station frequency is shown. TUNING Buttons =P The TUNING buttons (labeled CH UP/DOWN on the remote control) provide three
  • Страница 38 из 55
    RSX-1560 Surround Sound Receiver 38 TUNE Button F PRESET Button G P-TUN Button Z These remote control buttons are used to change between FREQUENCY tuning mode and PRESET tuning mode. In frequency tuning mode, the TUNING buttons (CH UP/DOWN on the remote ) advance to the next station frequency. In
  • Страница 39 из 55
    English Note: If the currently tuned station is broadcasting PTY data, a PTY indicator lights in the front-panel display. TP Button Searches for an RDS station broadcasting traffic information programming: 1. Press the TP button. The tuner attempts to find an RDS station broadcasting the traffic
  • Страница 40 из 55
    RSX-1560 Surround Sound Receiver 40 To change Zone 2, 3 or 4 volume: 1. Press the front panel SEL or remote REC button repeatedly until the desired zone status appears in the OSD and front panel displays. 2. Within 10 seconds, adjust the volume control on the front panel or remote to change the
  • Страница 41 из 55
    English System Status ���������������������� ������� ������������ ����������������� ��������������������� ������������������������������� ����������������������� ���������������� ��������������������������� ��������������������������� 41 Main Menu ������������������������������ �
  • Страница 42 из 55
    42 RSX-1560 Surround Sound Receiver 2. Press the ENT button on the remote to confirm that letter and move to the next position. Note: Default surround modes are stored independently for the analog and digital inputs for each source. 3. Repeat steps 1 and 2 until all eight characters (including blank
  • Страница 43 из 55
    English Multi Input Setup �������������������� �������������������������� ������������������������������ ����������������������� � ������������������ ��������������������������� ����������������� ������������ When the MULTI INPUT source is selected on the INPUT SETUP menu, the available options
  • Страница 44 из 55
    44 In DTS Neo:6 mode, there will only be one choice available on the submenu: selecting CINEMA or MUSIC modes. Use the +/– buttons on the remote to change the settings. • Select CINEMA to optimize the DTS Neo:6 decoding for movie soundtracks. • Select MUSIC to optimize the DTS Neo:6 decoding for
  • Страница 45 из 55
    English Speaker Setup �������������������������������� � �������������������� ����������������������������� �������������������� ��������������������� ������������������ �������������������� � ����������� The SPEAKER SETUP menu is used to configure the receiver for use with your specific loudspeakers
  • Страница 46 из 55
    46 Note: When a speaker is set to LARGE on the SPEAKER SETUP menu or on this menu, the crossover setting is not available since, by definition, a LARGE speaker plays full-range with no bass redirection to the subwoofer and no crossover. Likewise, the OFF setting for the subwoofer crossover is not
  • Страница 47 из 55
    English Test Tone �������������������� �������������������� �������������������� ����������������������������� �������������������� �������������������� �������������������� �������������������� �������������������� ����������� This menu uses filtered pink noise test tones to set equal volume levels
  • Страница 48 из 55
    RSX-1560 Surround Sound Receiver 48 meters) in 1 foot (0.3m) increments with each increment equivalent to an additional delay of 1ms. To change a setting, place the highlight on the desired line using the UP/DOWN buttons and use the +/– buttons to increase or decrease the delay. To return to the
  • Страница 49 из 55
    English from affecting any other zone in any way, even when the receiver is in zone mode following a change to a zone. The discrete option does not affect the control of the zones from the front panel buttons in any way. Note: The DISCRETE function is not available on all models and is dependent on
  • Страница 50 из 55
    50 outputs may be assigned to each Zone and can send a turn-on signal to remote components whenever the Zones are activated. For example, Zone 2 could use 12V Triggers 1, 3 and 6; Zone 3, 12V Triggers 2 and 3; Zone 4, 12V Triggers 5 and 6. 1. Press the +/– buttons on the remote to change the first
  • Страница 51 из 55
    English 51 2. Enter the four digits of the old password by pressing the +/– buttons to select the first letter of the new password, then pressing ENTER to move to the second character. Repeat until the old password is entered. Successful entry of the old password will jump to the ENTER NEW PASSWORD
  • Страница 52 из 55
    52 • Check that the proper video source is selected for each input. RSX-1560 Surround Sound Receiver Clicking or popping sounds when switching inputs. Also with Blu-ray, but depending on the monitor being used to view the picture, you may also be able to enjoy new video enhancements such as Deep
  • Страница 53 из 55
    English 53 Specifications Audio FM Tuner Continuous Amplifier Power (seven channels driven) Usable Sensitivity 100 watts/ch (20-20k Hz, <0.05% THD, 8 ohms) Continuous Amplifier Power 200 watts (1kHz, <1.0% THD, 4 ohms, DIN) Total Harmonic Distortion <0.05% Intermodulation Distortion (60Hz:7kHz) <0.05%
  • Страница 54 из 55
    The Rotel Co. Ltd. 10-10 Shinsen-Cho Shibuya-Ku Tokyo 150-0045 Japan Rotel of America 54 Concord Street North Reading, MA 01864-2699 USA Phone: +1 978-664-3820 Fax: +1 978-664-4109 Rotel Europe Dale Road Worthing, West Sussex BN11 2BH England Phone: + 44 (0)1903 221 761 Fax: +44 (0)1903 221 525
  • Страница 55 из 55