Инструкция для ARCHOS Mobile DVR AV 700 TV

(скачивание инструкции бесплатно)
Формат файла: PDF
Доступность: Бесплатно как и все руководства на сайте. Без регистрации и SMS.
Дополнительно: Чтение инструкции онлайн
background image

77

77

 22.4  Where is the Recording Saved? 

 22.4  Where is the Recording Saved? 

 The default location for audio recordings is the folder called  Music . This can be changed though. For example, 
you click on the Music icon in the main menu and then you choose  Browse Hard Drive . Notice that there is the 
 Launch Audiocorder  action icon. Each time you use this button to start the Audiocorder application instead of the 
AudioCorder button on the main menu, you set the recording default location to the current folder. For example, 
let’s say you have a folder called / Music/Vinyls/Soul . If you go to this folder and then make a recording using 
the action icon, you will set the default record location to this folder. Now, all your recordings you make with the 
Audiocorder icon will be saved in the folder  /Music/Vinyls/Soul . 

 22.5  Audio Editing 

 22.5 Audio 

Editing 

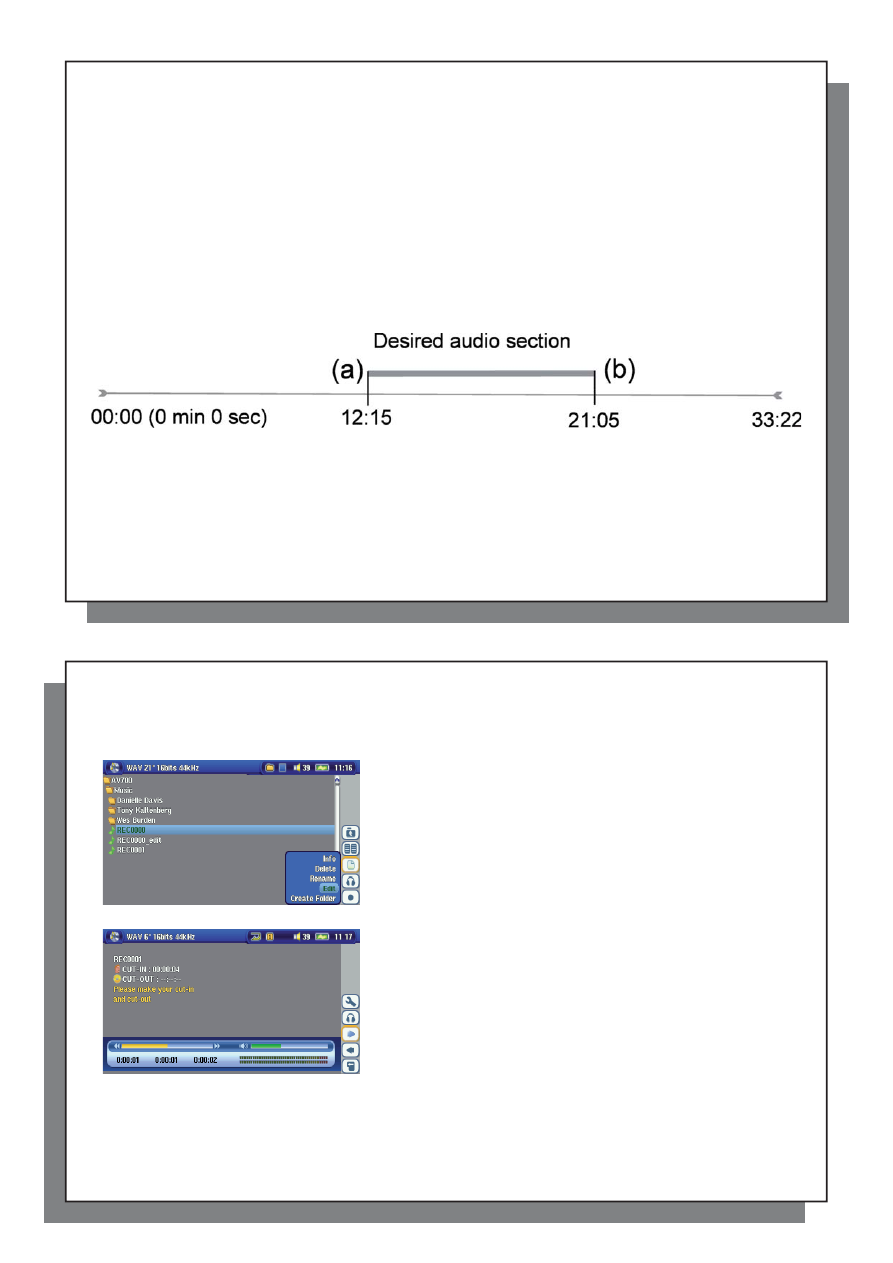
 Audio fi les (analog recordings only) can be modifi ed by deleting the sections you do not wish included. If you 
would like to edit an audio recording, you have the possibility to cut the fi le down to the specifi c part you want to 
keep. In the example below, you have recorded a lecture of 33 minutes and 22 seconds in length. You would like 
to cut out and save just one particular important section from 12 minutes and 15 seconds to 21 minutes and 5 
seconds. The diagram below illustrates the situation. 


To keep just this section (cropping it), you will: 

 • Locate 

this 

fi le via  Browse hard disk  in the Music application. 

 •  From the action icons, select the  File Management  action icon and then select  Edit . 

 •  In the edit mode, set the  Cut In point  (12:15 in our example). This will remove the part of the fi le BEFORE the 
desired segment. 

 •  Now set a  Cut Out point  (21:05 in our example. Please note: As you have cut part of the fi le, this position will 
actually be earlier in the fi le now). 

78

78

 •  Validate and Save the edit. The fi le will be saved with the word ”edit” appended to the fi le name in the same 
folder as the original. 

 •  If you do not want to save your modifi cations, click the STOP/ESC button and select OK. 

 Highlight the fi le to edit and select the  File Management  action icon. 
Choose  Edit . Only fi les which have been created with the AV 700 TV 
recording function will show  Edit  in the fi le menu. Files created from 
CDs or downloaded cannot be edited. Once you enter the edit mode, 
the audio fi le will play in a continuous loop so that you will be able to 
hear the changes to the edit as you make them. 

 Use the fast-reverse and fast-forward buttons (LEFT/RIGHT buttons) 
to locate the points you want the new fi le to start and end. These are 
the  Cut In  and  Cut Out  points. Once you have set these points, you 
can save the edit. In this example, a new fi le   REC0001_Edit  will be 
made. Your original fi le is left untouched. You will notice that your Cut 
In and Cut Out times are marked just below the fi le name. 

1
2
3
4
5
6
7
8
9
10
11
12
13
14
15
16
17
18
19
20
21
22
23
24
25
26
27
28
29
30
31
32
33
34
35
36
37
38
39
40
41
42
43
44
45
46
47
48
49
50
51
52
53
54
55
Оглавление инструкции
  • Страница 1 из 56
    1 ARCHOS™ MOBILE TV & RECORDER ® AV 700 TV Mobile TV & Recorder / Video Player & Recorder / Music Player & Recorder / Photo Viewer / USB 2.0 Hard Drive English Language User Manual User Manual for ARCHOS™ AV 700 TV series Version 1.2 Please visit www.archos.com to download the most recent manual
  • Страница 2 из 56
    3 Table of Contents 1 INTRO – Buttons and Connections 1.1 2 7 Remote Control Description 9 INTRO – First Time Usage 2.1 2.2 2.3 2.4 2.5 2.6 2.7 3 10 Plugging in the AC Adapter Turning on the AV 700 TV Shutting off the AV 700 TV and Battery saving features Changing the Interface Language Foreign
  • Страница 3 из 56
    5 16 BROWSER – Using the Browser 16.1 16.2 16.3 52 Navigating the Directory Structure File and Folder Operations Using the Virtual Keyboard 53 54 57 17 Connecting/Disconnecting the AV 700 TV to/from your PC 17.1 17.2 17.3 58 USB Connection Type (‘Hard Drive’ or ‘Windows Device’) Connecting the AV
  • Страница 4 из 56
    7 1 INTRO – Buttons and Connections a Move UP (also increases volume during media playback) b Move DOWN (also decreases volume during media playback) c Move LEFT (also plays previous song or fast reverse through song or video) d Move RIGHT (also plays next song or fast forward through song or
  • Страница 5 из 56
    9 1.1 Remote Control Description Standby / Wake Up Switch between Built-in & External Video This group of buttons acts as the navigation and acceleration buttons on the left of the AV 700 TV and the Play & Stop buttons on the right side. Action icon select and execute buttons Numeric entry: to
  • Страница 6 из 56
    11 2.4 Changing the Interface Language The AV 700 TV interface can be set to English (default), French, Spanish, German, or Russian. • Using the UP action button, highlight the Settings icon (showing a wrench) and then click the center SELECT action button. • Highlight the Display icon and click
  • Страница 7 из 56
    13 3 TV – Watching Digital TV 3.1 Tuning Digital TV on the AV 700 TV Before you can use your AV 700 TV to watch Digital TV for the first time, you will need to tune it to receive the available programs in your area. You may also need to do this when you enter a different coverage area, for instance
  • Страница 8 из 56
    15 Note: you can use the AV 700 TV as a Digital TV tuner at home and connect the AV 700 TV to your home antenna using the supplied Antenna Adapter Cable (IMPORTANT: use only the ARCHOS™ supplied cable, and connect only to a regular aerial antenna outlet, not a cable TV service outlet). Signal
  • Страница 9 из 56
    17 3.3 Digital TV Action Icons Hide Text Overlay Select this icon to shut off the On Screen Display (the status bar, action icons and other overlaid informational graphics). Video Format Change the way the image is displayed on the built-in LCD screen of your AV 700 TV or on your TV: Auto Maximized
  • Страница 10 из 56
    19 3.4 Watching Digital TV in your Car* 2 For best reception, it is advised to place the antennas in opposite directions (the front of the antennas, with the shortest element, must not be directed towards metal parts), one on each side of the vehicle (front and back, or left and right). OF AN TE NN
  • Страница 11 из 56
    21 4 TV – Recording Digital TV 4.1 Recording Digital TV with the AV 700 TV The AV 700 TV allows you to record your favorite TV programs very easily. While you’re watching TV, all you have to do is select the Start Recording action icon and the AV 700 TV will instantly start recording the program
  • Страница 12 из 56
    23 5 VIDEO – Playing Video Files Click on the Video icon in the main menu, highlight the desired video file, and then click on PLAY/GO. The thumbnail images on the right side will show you a frame from the highlighted video file (center) as well as a frame from the file above and the file below the
  • Страница 13 из 56
    25 Auto Format Default mode. Adjusts the video size to best adapt to the built-in screen or television. Maximized Image Enlarge the image to fill the screen (LCD or TV). Sides may get slightly cut in this mode. Full Picture Format The entire picture will always be seen on the television and the
  • Страница 14 из 56
    27 7 VIDEO – Recording Video Files It is possible to record external video with your AV 700 TV. To do so, you will need the optional Docking Pod, which will give you a permanent and instant connection to your home entertainment system and allow you to record from your satellite receiver, cable box,
  • Страница 15 из 56
    29 8.1 Installing the PC Software If your video file is not an MPEG-4 Simple Profile .avi file of the proper size, you will need to re-encode it using the following utilities. For the AV 700 TV, you will need to create an AVI file that is MPEG-4 Simple Profile with a resolution up to 720 x 576
  • Страница 16 из 56
    31 8.2 Using MPEG-4 Translator Here you see the image of the main MPEG-4 Translator program. When you first run the program, if the required codec has not been installed yet. You should download the codec and install it on your computer. If the Virtual dub program has not been installed, you will
  • Страница 17 из 56
    33 9 MUSIC – Playing Music Files When you click on the music icon in the main screen, you will be sent directly to the ARCLibrary. From here you can choose to either browse your music by the file system (Browse hard drive) or by music characteristics (Album, Artist, title, Genre, Year). Use the
  • Страница 18 из 56
    35 9.2 Play Screen Icons Status Stopped Blinks while Playing a track Current track is paused Recording a track Play Order (no icon) Play once Repeat playing Shuffle (Random) track selection Play Mode AV 700 TV is currently playing from a Playlist Folder: Play all tracks in the current directory
  • Страница 19 из 56
    37 9.4 Playing Through your Stereo System To play your music through your stereo system, you can use the supplied AV cable as shown below. You can also connect the optional docking pod audio outputs (red and white plugs of the cable connected to AV Out) to your stereo system inputs. Playing through
  • Страница 20 из 56
    39 10 1 0 MUSIC – Putting Music onto your AV 700 TV Your Archos™ product is a certified PlaysForSure™ digital device which means that wherever you find music for sale on the Internet with this symbol, you can be certain that it will ‘Play for sure’ on your AV 700 TV*. The AV 700 TV is designed to
  • Страница 21 из 56
    41 10.3 Transferring your CD collection to the AV 700 TV The process of transferring music from a CD into music files for your AV 700 TV is known as ‘ripping’. It is actually a re-encoding process, taking the CDA (CD Audio) format and converting it to WMA or MP3 format which the AV 700 TV can read.
  • Страница 22 из 56
    43 when highlighting a folder, artist, or album. All the contents of the folder, artist, or album will be added (that is, appended) or inserted before the selected song in the current Playlist. You can jump back and forth between the browser and the Playlist by selecting the Focus buttons. A
  • Страница 23 из 56
    45 12 MUSIC – Recording Music It is possible to record sound with your AV 700 TV. To do so, you will need the optional Docking Pod, which will give you a permanent and instant connection to your home entertainment system and allow you to record from any standard analog line source (HiFi system,
  • Страница 24 из 56
    47 14 1 4 PHOTO – Viewing Photos The AV 700 TV series support the viewing of JPEG (.jpg) and Bitmap (.bmp) image formats. Progressive JPEG images are not supported. The AV 700 TV will resize the image to fit on the built-in screen or on a television screen if you choose the television output. When
  • Страница 25 из 56
    49 14.2 Viewing a slideshow By clicking on the action icon Play a Slideshow, the AV 700 TV will present each picture in the current folder for a set amount of time and then go on to the next picture. You can set the amount of time that each picture stays on the screen under the action icon Photo
  • Страница 26 из 56
    51 15 1 5 GAMES – Playing Mophun® Games Please verify the availability of this feature on the ARCHOS™ website: www.archos.com. 51 52 16 1 6 BROWSER – Using the Browser The browser is used to navigate the file system on the AV 700 TV. The file system is FAT32, the same type of file system that is
  • Страница 27 из 56
    53 16.1 Navigating the Directory Structure To navigate the directory structure you will use: ENTER: Open the highlighted folder (directory) or Play the highlighted file. ESC/STOP: Go back to the main menu. Go to the parent directory (go back up one level). Example: Go from folder AV 700
  • Страница 28 из 56
    55 Copying and Moving Files and Folders By using the unique ARCHOS™ double browser system, you can copy or move files from one location in the file structure to another (1000 files per folder maximum). You simply select the Open a new panel action button, and a second browser panel will open. The
  • Страница 29 из 56
    57 16.3 Using the Virtual Keyboard It is recommended that you create folders and rename files or folders from your computer when it is connected to the AV 700 TV. The computer keyboard is much easier to use. However, at times when you are not near your computer and need to enter text directly with
  • Страница 30 из 56
    59 Windows® XP Please verify* that you have Windows® XP and it is updated it to at least, Service Pack 1. You must also have Windows Media® Player 10 (WMP10) installed on your computer. This way, you can take advantage of connecting it as a ‘Windows Device’. Connect it to your PC as enumerated
  • Страница 31 из 56
    61 Hard Drive Mode & Macintosh® Drag the AV 700 TV hard drive icon towards the trashcan, the trashcan will become a big arrow as shown in the screen shot to the left. Drop the hard drive icon onto the arrow. The hard drive icon will disappear from the desktop. You can now safely unplug the USB
  • Страница 32 из 56
    63 19 1 9 SETTINGS From the main screen, select the Settings action icon to reveal the menu items for various settings. 19.1 Sound Settings If you would like to customize the sound quality, you can adjust the Bass, Treble, and other audio settings to suit your particular taste. Normally you will do
  • Страница 33 из 56
    65 Repeat & Shuffle Normal Plays your songs one after the other and then stops after the last song. Repeat Continuously plays through the current set of songs (Artist, Album, folder, or Playlist). Shuffle Randomly play through the current set of songs (Artist, Album, folder, or Playlist). Intro
  • Страница 34 из 56
    67 19.5 Appearance settings Setting Description Wallpaper On, Off. When set to On, the selected picture (next item) will be displayed as the AV 700 TV screen background. Picture name This option will display the names of the JPEG images in the AV 700 TV’s System folder that can be used for screen
  • Страница 35 из 56
    69 Parameter ARCLibrary Description Off: From the Music icon, you will just browse music files in the folder Music. On: (Only in USB Port mode ‘Hard drive’) Browse music via its tag characteristics but the ARCLibrary must be updated manually. Automatic: ARCLibrary is automatically updated when the
  • Страница 36 из 56
    71 ‘Hard Drive’ or ‘Windows Device’? If your AV 700 TV is seen as a hard drive, then you simply need to drag the Update_AV700TV.AOS file onto this icon, and Windows® will place the file into the top most directory (root) of the AV 700 TV. It should not be placed inside any folder within your AV 700
  • Страница 37 из 56
    73 22 Recording Audio with the Optional Docking Pod/Travel Kit With the AV 700 TV series, you do not need a computer to create digital music files. It is capable of recording from any standard analog line source (ex: HiFi system, Boombox, CD Player, etc) into a standard Windows® .WAV format, either
  • Страница 38 из 56
    75 22.3 Recording Procedure Before the actual audio recording begins, there is a pre-recording screen which will allow you to adjust your recording settings. 1. On the main screen, select AudioCorder then click on ENTER. 2. In the pre-recording screen, adjust the recording level* by clicking on the
  • Страница 39 из 56
    77 22.4 Where is the Recording Saved? The default location for audio recordings is the folder called Music. This can be changed though. For example, you click on the Music icon in the main menu and then you choose Browse Hard Drive. Notice that there is the Launch Audiocorder action icon. Each time
  • Страница 40 из 56
    79 23 2 3 Recording External Video with the Optional Docking Pod/Travel Kit 23.1 Docking Pod Cable Connections By installing the TV Docking Pod, you have an easy way to connect and disconnect your AV 700 TV to or from your home entertainment system. Simply connect the pod’s multi-connect plug to
  • Страница 41 из 56
    81 • You should be able to use your television system as you normally do. The TV docking pod is merely passing through the video and audio to your television. • Europe: If you don’t see the video, check to make sure you used the correct SCART IN and OUT adapters. 4) Connection: Connect the AV 700
  • Страница 42 из 56
    83 Connecting it to the TV Docking Pod Plug the connector end of the Infrared Emitter to the far right jack on the back of the TV Docking Pod. This emitter will act as your remote control for your scheduled recordings. Sticking it onto your device and Setting the IR Emitter code Now that you know
  • Страница 43 из 56
    85 Television Front TV Television Back Archos Adapter/Charger 85 86 23.2 Travel Kit Cable Connections If you are using the optional multi-connect adapter (can be purchased from the ARCHOS™ web site) and an AV cable, you should plug the AV cable into the AV In side of the adapter, and then plug the
  • Страница 44 из 56
    87 23.3 Recording Video Files from External Sources With your optional TV docking pod properly connected to a VCR, cable box, or satellite receiver, you can make recordings from these devices. See the relevant chapter for instructions on connecting the optional TV docking pod to your television
  • Страница 45 из 56
    89 Source Composite, S-Video, Auto. You can choose which video input you want the AV 700 TV to use. Normally, with a good video signal, you can set it to Auto, and the AV 700 TV will scan the two TV docking pod inputs to see which one is receiving video (AV In or S-Video). Format Auto, 4:3, 5:3,
  • Страница 46 из 56
    91 Example 2: You have recorded a television program but would like to remove certain sections before the program started, parts during the program, and the program afterwards because you had recorded a little extra. In this case, you would make a Start mark (a) at time 00:00 and then forward to
  • Страница 47 из 56
    93 23.7 Copy Protection The AV 700 TV video recording system is designed to respect the Macrovision® copyright protection system. If the source of your video is copy protected, the AV 700 TV will record in protected mode. You will see a ”P” icon on the recording screen (not during playback)
  • Страница 48 из 56
    95 • If the end time is earlier than the start time, then it is assumed that you start recording on the start date, and the recording ends on the following day at the end time. • Once a scheduled recording has been made, or the date of a recording has been passed, without the recording having been
  • Страница 49 из 56
    97 23.8.3 Setting the Infrared Emitter Code This is a one time step to set your AV 700 TV to send the correct infrared codes to control your video cassette recorder, cable box, or satellite receiver. This is done so that the AV 700 TV, via the TV docking pod, can turn on and off your video device
  • Страница 50 из 56
    99 out which code works with your device. In the example screen, you see the code V009. If this code does not work when doing the Test: channel select, advance it to the next code and then test to see if that next code works. 3. Test channel select: When you press the Test channel select button
  • Страница 51 из 56
    101 Problem: (Hard Drive mode) What do I do if I try to disconnect via the green arrow but keep getting “The device ‘Generic Volume’ cannot be stopped now. Try stopping the device again later.” Answer: Shut off any program that might be accessing data on the AV 700 TV, including Windows® Explorer.
  • Страница 52 из 56
    103 Windows® ME Running Scan-Disk (Error Checking) – HARD DRIVE mode only • Quit all running applications. • Properly connect the AV 700 TV to your computer as explained in the chapter Connecting/disconnecting the AV 700 TV to/from your PC. • Make sure external AC adapter is powering the AV 700 TV.
  • Страница 53 из 56
    105 Power source Rechargable Lithium-Ion battery External: AC charger/adapter. Use ONLY the specified Archos adapter/charger supplied with this product. Physical Dimensions Approx.: 10,7 x 20,9 x 1,9 cm – 4.2” x 8.2” x 0.8” Weight: 590g – 20.8 oz Temperature Range 5 °C to 35 °C running ; -20 °C to
  • Страница 54 из 56
    107 WARNING To prevent fire or shock hazard, do not expose the unit to rain or moisture. Use of this product is for personal use only. Copying CDs or loading music, video, or picture files for sale or other business purposes is or may be a violation of copyright law. Copyrighted materials, works of
  • Страница 55 из 56
    109 Worldwide Offices United States & Canada Europe & Asia ARCHOS™ Inc. ARCHOS™ S.A. 7951 E Maplewood 12, rue Ampère Greenwood Village, CO 80111 USA 91430 Igny France Phone: 1 303-962-3350 Phone: +33 (0) 169 33 169 0 Fax: 1 303-962-3365 Fax: +33 (0) 169 33 169 9 United Kingdom Germany ARCHOS™ (UK)
  • Страница 56 из 56