English
9
CAUTION
1.
If liquid leaking from the battery gets into your
eyes, do not rub your eyes and wash them well
with fresh clean water such as tap water and
contact a doctor immediately.
If left untreated, the liquid may cause eye-problems.
2.
If liquid leaks onto your skin or clothes, wash well
with clean water such as tap water immediately.
There is a possibility that this can cause skin
irritation.
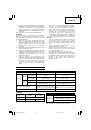
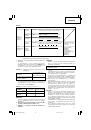
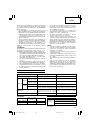
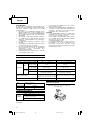
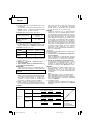
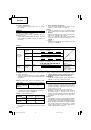
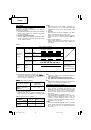
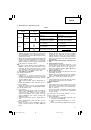
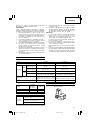
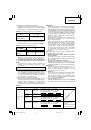
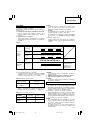
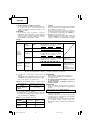
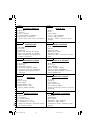
SPECIFICATIONS
POWER TOOL
Model
DS14DFL
DS18DFL
No-load speed (Low/High)
0 – 400 / 0 – 1200 min
–1
0 – 400 / 0 – 1200 min
–1
Wood
Drilling
(Thickness 18mm)
30 mm
38 mm
Metal
Steel: 12 mm
Steel: 13 mm
(Thickness 1.6mm)
Machine screw
6 mm
6 mm
Driving
Wood screw
8 mm (diameter)
×
75 mm (length)
8 mm (diameter)
×
75 mm (length)
(Requires a pilot hole)
(Requires a pilot hole)
BCL1415 Li-ion 14.4 V (1.5 Ah 4 cells)
BCL1815 Li-ion 18 V (1.5 Ah 5 cells)
Rechargeable battery
BCL1430 Li-ion 14.4 V (3.0 Ah 8 cells)
EBM1830 Li-ion 18 V (3.0 Ah 10 cells)
EBL1430 Li-ion 14.4 V (3.0 Ah 4 cells)
Weight
1.6 kg
1.7 kg
Capacity
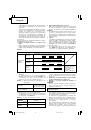
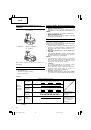
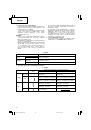
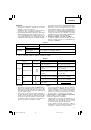
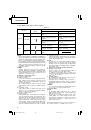
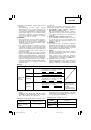
STANDARD ACCESSORIES
Standard accessories are subject to change without
notice.
OPTIONAL ACCESSORIES (sold separately)
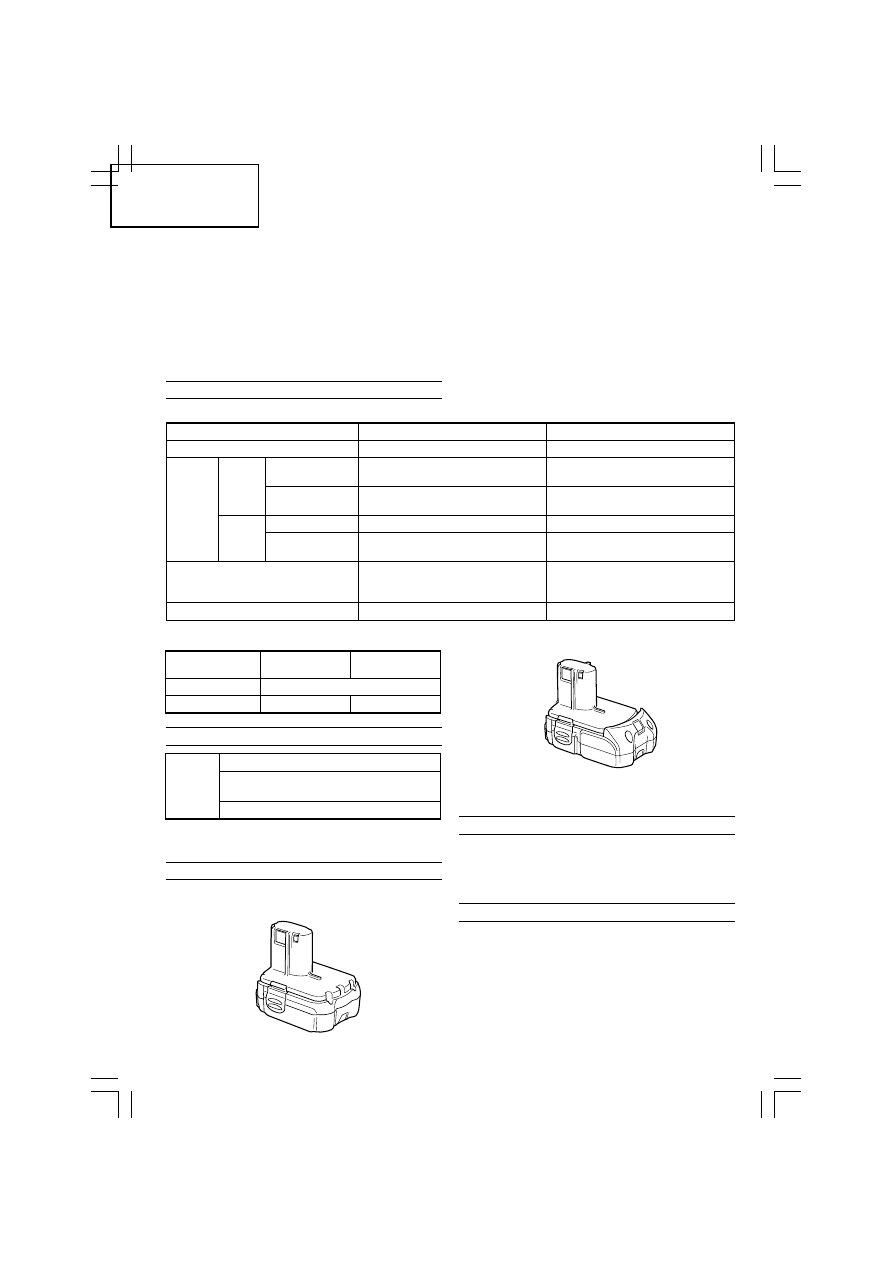
1. Battery (BCL1415, BCL1430, EBL1430)
(For DS14DFL)
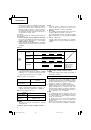
CHARGER
Model
UC18YGL / UC18YRL
UC18YGL2
/ UC18YFL
Charging voltage
7.2 – 18V
Weight
0.6 kg
0.4 kg
1
Plus driver bit (No. 2
×
65L) ........... 1
DS14DFL
2
Charger (UC18YGL or UC18YRL or
UC18YFL or UC18YGL2) ....................... 1
DS18DFL
3
Plastic case ............................................ 1
2. Battery (BCL1815, EBM1830) (For DS18DFL)
Optional accessories are subject to change without
notice.
APPLICATIONS
䡬
Driving and removing of machine screws, wood
screws, tapping screws, etc.
䡬
Drilling of various metals.
䡬
Drilling of various woods.
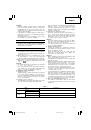
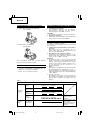
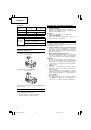
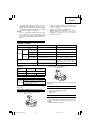
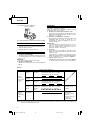
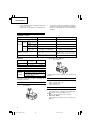
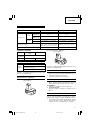
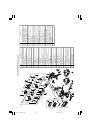
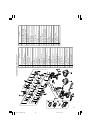
BATTERY REMOVAL/INSTALLATION
1. Battery removal
Hold the handle tightly and push the battery latch
to remove the battery (see
Figs. 1
and
2
).
CAUTION
Never short-circuit the battery.
2. Battery installation
Insert the battery while observing its polarities (see
Fig. 2
).
3.
If you find rust, foul odor, overheating, discolor,
deformation, and/or other irregularities when using
the battery for the first time, do not use and return
it to your supplier or vendor.
01Eng_DS14DFL_EE
4/30/10, 15:24
9
 1
1
 2
2
 3
3
 4
4
 5
5
 6
6
 7
7
 8
8
 9
9
 10
10
 11
11
 12
12
 13
13
 14
14
 15
15
 16
16
 17
17
 18
18
 19
19
 20
20
 21
21
 22
22
 23
23
 24
24
 25
25
 26
26
 27
27
 28
28
 29
29
 30
30
 31
31
 32
32
 33
33
 34
34
 35
35
 36
36
 37
37
 38
38
 39
39
 40
40
 41
41
 42
42
 43
43
 44
44
 45
45
 46
46
 47
47
 48
48
 49
49
 50
50
 51
51
 52
52
 53
53
 54
54
 55
55
 56
56
 57
57
 58
58
 59
59
 60
60
 61
61
 62
62
 63
63
 64
64
 65
65
 66
66
 67
67
 68
68
 69
69
 70
70
 71
71
 72
72
 73
73
 74
74
 75
75
 76
76
 77
77
 78
78
 79
79
 80
80
 81
81
 82
82
 83
83
 84
84
 85
85
 86
86
 87
87
 88
88
 89
89
 90
90
 91
91
 92
92
 93
93
 94
94
 95
95
 96
96
 97
97
 98
98
 99
99
 100
100
 101
101
 102
102
 103
103
 104
104
 105
105
 106
106