-
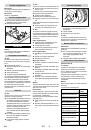
5
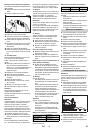
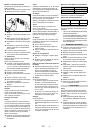
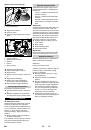
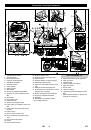
Set the key switch at the operator con-
sole to "0" and remove the key.
The steering position should point to-
wards the front.
Swivel the seat to the front.
Remove screw of seat stopper.
Pull out the plug of the seat contact
switch and push it back through the
opening.
Unlock the driver seat and pull it up-
ward.
Hang out the support for the seat brack-
et and tilt the seat bracket towards the
front.
Lift battery cover.
Clamp off the minus pole of the battery.
Clamp off the remaining cables from the
battery.
Remove the batteries.
Dispose of the used batteries according
to the local provisions.
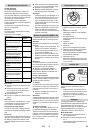
Note
Press the emergency-stop button to imme-
diately deactivate all functions and turn the
key switch to the "0" position.
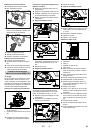
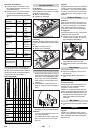
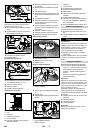
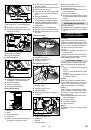
Four floor boards of the pallet are fas-
tened with screws. Unscrew these
boards.
Place the boards on the edge of the pal-
let. Place the boards in such a way that
they lie in front of the four wheels of the
machine. Fasten the boards with
screws.
Slide the four support beams included
in the packaging under the ramp.
Only BR 120/250...: Remove front
transport eyelets from the palette.
Remove the wooden bars in front of the
wheels.
Release emergency-stop button by
turning.
Set main switch to “1”.
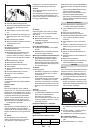
Press the drive direction switch and
slowly move the machine down from
the ramp.
Set main switch to “0”.
Release the park brake (see "Pushing
the appliance").
One person must sit on the seat and ac-
tivate the brake pedal during the push-
ing if necessary.
Push down the appliance through the
ramp from the pallet.
Re-tighten the screws of the park brake.
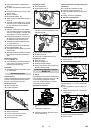
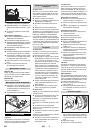
The sweep brushes must be installed be-
fore the initial operation (see "Maintenance
work").
The brushes are mounted.
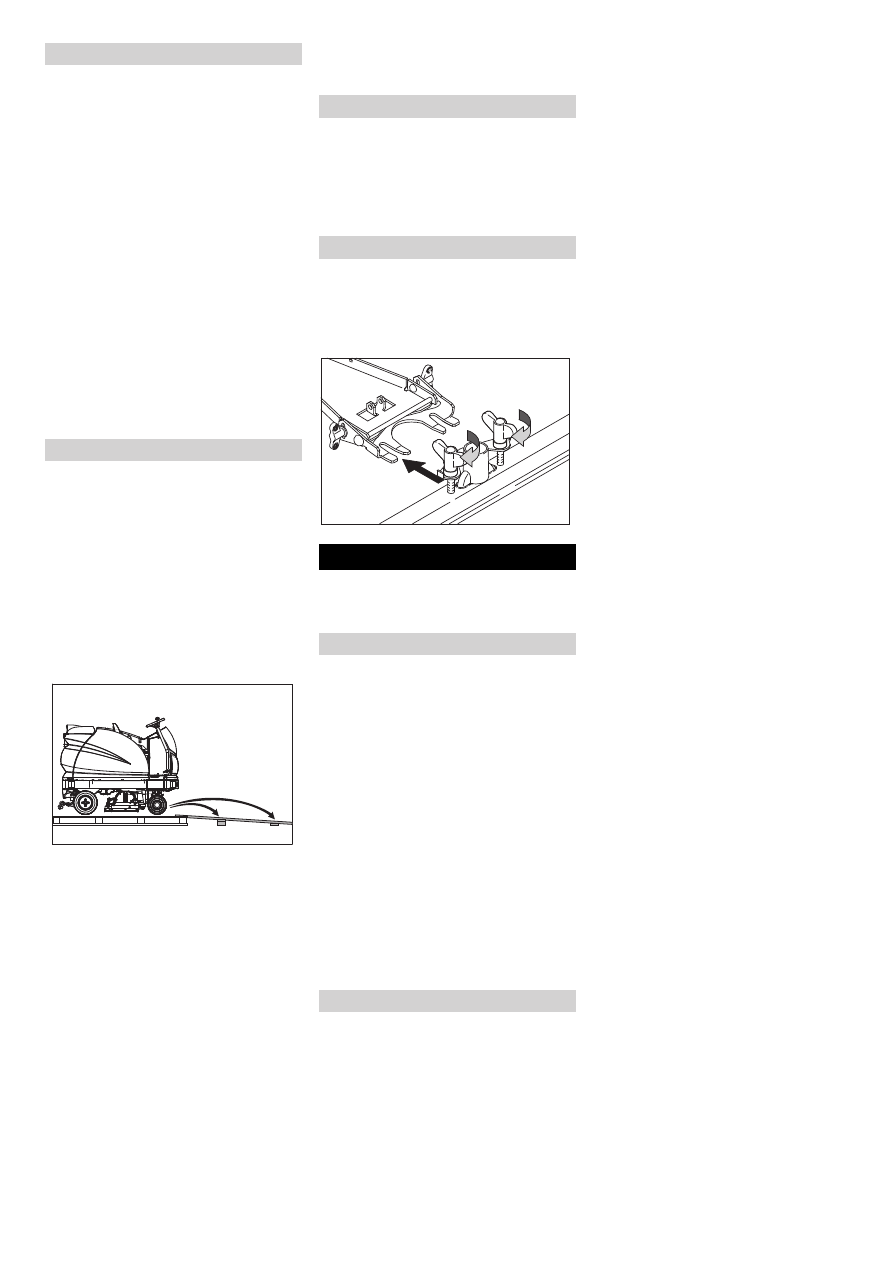
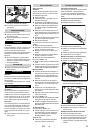
Insert the vacuum bar into the vacuum
bar suspension in such a manner that
the profiled sheet is positioned above
the suspension.
Tighten the wing nuts.
Insert the suction hose.
Note
Press emergency-stop switch to immedi-
ately switch off all functions of the machine.
Danger
Danger of accident. The immobilizing brake
must always be checked first on an even
surface before starting the machine.
Take the seating position.
Release emergency-stop button by
turning.
Set main switch to “1”.
Select direction of travel.
Gently depress drive pedal.
The brake must get released and you must
be able to hear it (the control lamp for im-
mobilizing brake on the console switches
off). The machine must roll slightly on a
plane surface. When the pedal is released,
the brake falls in in an audible manner.
Switch off the machine and call the after-
sales service if the above-mentioned
events do not occur.
Danger
Danger of accident. If the machine does not
brake, then proceed as follows:
If the machine does not come to a halt
on a ramp with a gradient of 2% when
you release the drive pedal, then the
emergency-stop button may be
pressed for safety reasons only if the
mechanical functioning of the immobi-
lizing brake has been checked properly
before commissioning the machine.
Press the brake pedal if the machine
does not brake properly.
Switch off the machine only after it
comes to a complete halt (on an even
surface) and call up the aftersales serv-
ice!
Further, follow all warning instructions
for braking.
Danger
Danger of tipping if gradient is too high.
The gradient in the direction of travel
should not exceed 15%.
Danger of tipping when driving round
bends at high speed.
Danger of slipping on wet floors.
Drive slowly when cornering.
Danger of tipping on unstable ground.
Only use the machine on sound surfac-
es.
Danger of tipping with excessive sideways
tilt.
The gradient perpendicular to the direc-
tion of travel should not exceed 15%.
Danger
Increased risk of accident on account of tilt-
ing sweeper for BR/BD... RI models. Be ex-
tra careful while driving reverse and pay
attention to the swiveling movement while
steering the sweeper.
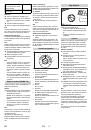
Move the seat adjustment lever away
from the seat and hold it.
Then push the seat forwards or back-
wards.
Release the seat adjustment lever and
lock the seat in place.
Loosen the wing nut to adjust the steer-
ing wheel.
Position the steering wheel.
Tighten the wing nuts.
Release emergency-stop button by
turning.
Sit on the seat and set main switch to
“1”.
Set the drive direction using the drive
direction button at the operator console.
Determine the driving speed by press-
ing the drive pedal.
Stop the machine: Release driving ped-
al; press brake, if necessary.
Note
The drive direction can also be changed
during the drive. You can thus clean very
dirty surfaces by driving back and forth a
couple of times.
In case of overloading, the drive motor au-
tomatically switches off after a certain peri-
od. A fault message is displayed on the
console. The concerned unit gets switched
off if the controls get overheated.
Allow machine to cool down at least for
15 minutes.
Turn the key switch to "0", wait for a few
seconds and then turn it to "1".
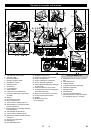
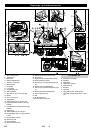
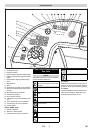
Removing the batteries
Unloading
With battery installed
Without battery
Installing the Brushes
BD model
BR model
Installing the Vacuum Bar
Operation
Check immobilizing brake
Driving
Ajdust the seat
Adjusting the steering wheel
Drive the machine
Overload
20
EN
 1
1
 2
2
 3
3
 4
4
 5
5
 6
6
 7
7
 8
8
 9
9
 10
10
 11
11
 12
12
 13
13
 14
14
 15
15
 16
16
 17
17
 18
18
 19
19
 20
20
 21
21
 22
22
 23
23
 24
24
 25
25
 26
26
 27
27
 28
28
 29
29
 30
30
 31
31
 32
32
 33
33
 34
34
 35
35
 36
36
 37
37
 38
38
 39
39
 40
40
 41
41
 42
42
 43
43
 44
44
 45
45
 46
46
 47
47
 48
48
 49
49
 50
50
 51
51
 52
52
 53
53
 54
54
 55
55
 56
56
 57
57
 58
58
 59
59
 60
60
 61
61
 62
62
 63
63
 64
64
 65
65
 66
66
 67
67
 68
68
 69
69
 70
70
 71
71
 72
72
 73
73
 74
74
 75
75
 76
76
 77
77
 78
78
 79
79
 80
80
 81
81
 82
82
 83
83
 84
84
 85
85
 86
86
 87
87
 88
88
 89
89
 90
90
 91
91
 92
92
 93
93
 94
94
 95
95
 96
96
 97
97
 98
98
 99
99
 100
100
 101
101
 102
102
 103
103
 104
104
 105
105
 106
106
 107
107
 108
108
 109
109
 110
110
 111
111
 112
112
 113
113
 114
114
 115
115
 116
116
 117
117
 118
118
 119
119
 120
120
 121
121
 122
122
 123
123
 124
124
 125
125
 126
126
 127
127
 128
128
 129
129
 130
130
 131
131
 132
132
 133
133
 134
134
 135
135
 136
136
 137
137
 138
138
 139
139
 140
140
 141
141
 142
142
 143
143
 144
144
 145
145
 146
146
 147
147
 148
148
 149
149
 150
150
 151
151
 152
152
 153
153
 154
154
 155
155
 156
156
 157
157
 158
158
 159
159
 160
160
 161
161
 162
162
 163
163
 164
164
 165
165
 166
166
 167
167
 168
168
 169
169
 170
170
 171
171
 172
172
 173
173
 174
174
 175
175
 176
176
 177
177
 178
178
 179
179
 180
180
 181
181
 182
182
 183
183
 184
184
 185
185
 186
186
 187
187
 188
188
 189
189
 190
190
 191
191
 192
192
 193
193
 194
194
 195
195
 196
196
 197
197
 198
198
 199
199
 200
200
 201
201
 202
202
 203
203
 204
204
 205
205
 206
206
 207
207
 208
208
 209
209
 210
210
 211
211
 212
212
 213
213
 214
214
 215
215
 216
216
 217
217
 218
218
 219
219
 220
220
 221
221
 222
222
 223
223
 224
224
 225
225
 226
226
 227
227
 228
228
 229
229
 230
230
 231
231
 232
232
 233
233
 234
234
 235
235
 236
236
 237
237
 238
238
 239
239
 240
240
 241
241
 242
242
 243
243
 244
244
 245
245
 246
246
 247
247
 248
248
 249
249
 250
250
 251
251
 252
252
 253
253
 254
254
 255
255
 256
256
 257
257
 258
258
 259
259
 260
260
 261
261
 262
262
 263
263
 264
264
 265
265
 266
266
 267
267
 268
268
 269
269
 270
270
 271
271
 272
272
 273
273
 274
274
 275
275
 276
276
 277
277
 278
278
 279
279
 280
280
 281
281
 282
282
 283
283
 284
284
 285
285
 286
286
 287
287
 288
288
 289
289
 290
290
 291
291
 292
292
 293
293
 294
294
 295
295
 296
296
 297
297
 298
298
 299
299
 300
300
 301
301
 302
302
 303
303
 304
304
 305
305
 306
306
 307
307
 308
308
 309
309
 310
310
 311
311
 312
312
 313
313
 314
314
 315
315
 316
316
 317
317
 318
318
 319
319
 320
320
 321
321
 322
322
 323
323
 324
324
 325
325
 326
326
 327
327
 328
328
 329
329
 330
330
 331
331
 332
332
 333
333
 334
334
 335
335
 336
336
 337
337
 338
338
 339
339
 340
340
 341
341
 342
342
 343
343
 344
344
 345
345
 346
346
 347
347
 348
348
 349
349
 350
350
 351
351
 352
352
 353
353
 354
354
 355
355
 356
356
 357
357
 358
358
 359
359
 360
360
 361
361
 362
362
 363
363
 364
364
 365
365
 366
366
 367
367
 368
368
 369
369
 370
370
Инструкции и руководства похожие на KARCHER BR 120/250 R I BP PACK


Другие инструкции и руководства из категории Поломоечная машина