English-24
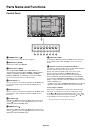
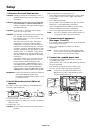
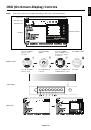
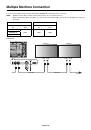
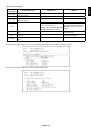
MULTI DISPLAY
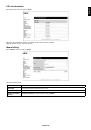
ID CONTROL
Sets the monitor ID number from 1-100 and group ID from A-J. DETECTED MONITORS shows
the number of all monitors which follow in the chain with LAN.
NOTE: Group ID is made of multiple selections.
1
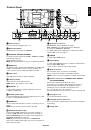
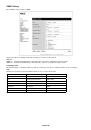
AUTO ID/IP SETTING
When “SET” is selected, AUTO ID/IP SETTING window is shown.
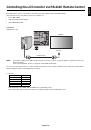
Do not connect network devices between the monitors connected with LAN.
SETTING ITEM
Select an item from [MONITOR ID], [IP ADDRESS] and [ID and IP].
MONITOR ID
ID/IP SETTING
START
When “YES” is set, selected item at SETTING ITEM is set.
MONITOR ID
When “YES” is set, monitor ID numbers are set automatically to the all monitors.
IP ADDRESS
Set the fi rst octet to the third octet at “BASE ADDRESS”.
The fourth octet is automatically set from “1” and counting up till the number of monitors
connected with LAN.
“BASE ADDRESS” is shown when “IP ADDRESS” or “ID and IP” is selected at SETTING ITEM.
ID and IP
Set “MONITOR ID” and “IP ADDRESS”.
DETECTED
MONITORS
This item is shown after “SETTING ITEM” is selected and “ID/IP ADDRESS START” is set to
“YES”.
The number of monitors which MONITOR ID is given is shown.
If the shown number and actual monitor number which MONITOR ID is given are different, select
“RETRY” to recount monitors.
Select “OK” when “FINISH!!” is displayed. If “OK” is not selected after “FINISH!!” is displayed, the
settings that have been made will be invalid and will not be refl ected.
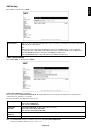
AUTO ID/IP RESET
When “RESET” is selected, AUTO ID/IP RESET window is shown.
RESET ITEM
Select a setting from [MONITOR ID], [IP ADDRESS], and [ID and IP].
MONITOR ID
ID/IP RESET START When “YES” is set, the setting of selected item at RESET ITEM returns to default setting.
When the setting returns to default setting, “FINISH!!” is displayed.
After “ID/IP RESET START” is activated, “MONITOR ID” and “IP ADDRESS” settings will be
individual settings even though monitors are connected with LAN.
NOTE: When the number of monitors connected with LAN was changed, please select the same
item that you selected at “SETTING ITEM” and then run the “AUTO ID/IP RESET”.
COMMAND
TRANSFER
When “ON” is set, command is sent to all the monitors which follow in the chain with LAN.
NOTE: The all monitors connected with LAN should be “ON”. When executing this function in
standby mode or power save mode, “LAN POWER” should be “ON”.
Do not turn off the monitors while AUTO ID/IP SETTING or AUTO ID/IP RESET is activating.
ON
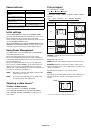
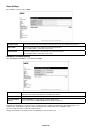
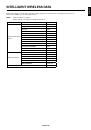
IR LOCK SETTINGS
Prevents the monitor from being controlled by the wireless remote control.
When ACTIVATE is selected, all the settings are activated.
NOTE: IR LOCK SETTINGS is a function intended only to the wireless remote control buttons.
This function does not lock out access to all buttons at the back of the monitor. To return to
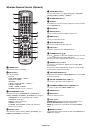
normal operation, press the “DISPLAY” button on the remote control for 5 seconds.
UNLOCK
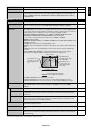
MODE SELECT
Selects the mode UNLOCK, ALL LOCK or CUSTOM LOCK.
UNLOCK
All buttons on the remote control are available for normal operations.
ALL LOCK
Locks all remote control buttons.
CUSTOM LOCK
Selects which buttons to be locked from POWER, VOLUME, and INPUT button.
Except for CUSTOM LOCK settings, other buttons on the remote control are locked.
POWER:
When LOCK is selected, POWER button is locked.
VOLUME: When UNLOCK is selected, sets minimum and maximum volume between VOL.0 to
VOL.100.
VOLUME (+) button and VOLUME (-) buttons are only available from the minimum
volume to the maximum volume you set.
When LOCK is selected, VOLUME (+) button and VOLUME (-) buttons are locked.
INPUT:
When UNLOCK is selected, choose up to three buttons from DVI, DisplayPort, VGA,
HDMI, Y/Pb/Pr, VIDEO*
1
, S-VIDEO*
1
, OPTION*
1
which you prefer to be unlocked.
The unselected buttons are locked. When LOCK is selected, all INPUT buttons are
locked.
*1: This function depends on which option board you use.