SMALTIMENTO DELLE BATTERIE
Contribuite alla salvaguardia dell’ambiente.
Le batterie usate, non vanno buttate tra i rifiuti domestici.
Potete depositarle presso un centro di raccolta di batterie usate o di smaltimento
rifiuti speciali; informatevi presso il vostro comune.
AVVERTENZE PILA 1,5 VOLT
L’inserimento delle batterie deve essere effettuato e supervisionato solo dagli
adulti. Non lasciare che i bambini giochino con le batterie.
• Le pile devono essere sostituite da un adulto.
• Rispettare la polarità +/-
• Non cortocircuitare i morsetti di alimentazione, rischio di fuoco o esplosione.
• Ritirare sempre le pile quando il gioco non é utilizzato per un lungo periodo.
• Non gettare le pile nel fuoco.
• Non cercare mai di ricaricare le pile.
• Gettare le pile scariche negli appositi contenitori per il riciclaggio delle batterie
usate.
Questo prodotto è conforme alla Norma di Sicurezza EN 71e alla Norma di
Sicurezza per i giocattoli elettrici EN 50088; non è conforme alle disposizioni
delle norme di circolazione su strada e pertanto non può circolare su strade
pubbliche.
MANUTENZIONE E CURA
• Controllare regolarmente lo stato del veicolo, in particolare l’impianto elettrico, i
collegamenti delle spine, i cappucci di protezione ed il caricabatterie. In caso di
difetti accertati, il veicolo elettrico ed il caricabatterie non devono essere
utilizzati. Per riparazioni usare solo pezzi di ricambio originali PEG PEREGO.
• La PEG PEREGO non si assume nessuna responsabilità in caso di manomissione
dell’impianto elettrico.
• Non lasciare le batterie o il veicolo vicino a fonti di calore come caloriferi,
caminetti, etc.
• Proteggere il veicolo da acqua, pioggia, neve etc.; usarlo su sabbia o fango
potrebbe causare danni a pulsanti, motori e riduttori.
• Se il veicolo agisce in condizioni di sovraccarico, come su sabbia soffice, fango
o terreni molto sconnessi, l’interruttore di sovraccarico toglierà immediatamente
potenza. L’erogazione di potenza riprenderà dopo alcuni secondi.
• Lubrificare periodicamente (con olio leggero) parti semovibili come cuscinetti,
sterzo etc.
• Le superfici del veicolo possono essere pulite con un panno umido e, se
necessario, con prodotti di uso domestico non abrasivi.
Le operazioni di pulizia devono essere effettuate solo da adulti.
• Non smontare mai i meccanismi del veicolo o i motori, se non autorizzati dalla
PEG PEREGO.
Conforme a EN 50088
Batteria ricaricabile da 12V 7Ah al piombo sigillata.
2 motori da 140 W
SICUREZZA
ATTENZIONE! LA SUPERVISIONE DI UN ADULTO É SEMPRE NECESSARIA.
• Non adatto ai bambini di età inferiore ai 36 mesi per caratteristiche funzionali.
• Non usare il veicolo su strade pubbliche, dove c’è traffico e macchine
parcheggiate, su pendenze ripide, vicino a gradini e scale, corsi d’acqua e
piscine.
• I bambini devono sempre indossare scarpe durante l’uso del veicolo.
• Quando il veicolo è operativo fare attenzione affinché i bambini non mettano
mani, piedi o altre parti del corpo, indumenti o altre cose, vicino alle parti in
movimento.
• Non bagnare mai componenti del veicolo come motori, impianti, pulsanti, etc.
• Vicino al veicolo non usare benzine o altre sostanze infiammabili.
• Il veicolo deve essere usato esclusivamente da un solo bambino.
DIVERTIMENTO SENZA INTERRUZIONI: tenete sempre un set-batterie carico di
ricambio pronto all’uso.
Per la sicurezza del bambino: prima di azionare il veicolo, leggere e seguire
attentamente le seguenti istruzioni.
• ATTENZIONE:
Controllare che tutte le borchie di fissaggio siano ben salde.
2ª VELOCITÁ
Inizialmente si consiglia l’utilizzo della 1ª marcia.
Prima di inserire la 2ª velocità, assicurarsi che il bambino abbia acquisito
dimestichezza con il veicolo.
• 1ª VELOCITÁ (per principianti):
Con entrambe le mani sul volante premere il pedale dell’acceleratore; il veicolo
si mette in moto ad una velocità ridotta di circa 3,2 Km/h.
• 2ª VELOCITÁ (per esperti):
Con entrambe le mani sul volante premere il pedale dell’acceleratore; il veicolo
si mette in moto ad una velocità di circa 6,3 Km/h.
• RETROMARCIA:
Abbassare con una mano la leva del cambio. Posizionare l’altra mano sul
volante e premere con il piede l’acceleratore. Il veicolo procede in retromarcia
ad una velocità di circa 4 Km/h.
ENGLISH
• FRENO:
Per frenare alzare il piede dal pedale acceleratore, il freno entrerà in funzione
automaticamente.
Insegnate al vostro bambino un uso corretto del veicolo per una guida sicura e
divertente.
• Prima di partire assicurarsi che il percorso sia sgombro da persone o cose.
• Guidare con le mani sul volante e guardare sempre la strada.
• Frenare per tempo per evitare scontri.
• Inserire la 2ª velocità solo quando il bambino ha imparato correttamente l’uso
del volante, della 1ª velocità e del freno.
• ATTENZIONE! in prima velocità, il veicolo é dotato di effetto differenziale come
le vere automobili: su terreni lisci e con un solo bambino, le due ruote possono
avere velocità diverse con possibilità di slittamento/rallentamento delle stesse.
IL VEICOLO NON FUNZIONA?
• Verificare che non ci siano cavi scollegati sotto la piastra dell’ acceleratore.
• Controllare il funzionamento del pulsante dell’acceleratore ed eventualmente
sostituirlo.
• Controllare che la batteria sia attaccata all’ impianto elettrico.
IL VEICOLO NON HA POTENZA?
• Caricare le batterie. Se dopo la ricarica il problema persiste far controllare le
batterie ed il caricabatterie da un centro assistenza.
REGOLE PER UNA GUIDA SICURA
PROBLEMI?
MANUTENZIONE E SICUREZZA VEICOLO
•PEG PEREGO® thanks you for choosing this product. For over 50 years, PEG
PEREGO has been taking children for an outing: first with its famous baby
carriages and strollers, later with its pedal and battery operated toy vehicles.
•Read this instruction manual carefully to learn the use of this vehicle and to teach
your child safe and enjoyable driving. Please keep this manual for use as a
reference in the future.
•Our toys conform with the safety requirements provided by the Council of the
EEC, of the T.Ü.V; and the U.S. Consumer Toy Safety Specification F963.
•Peg Perego reserves the right to modify or change their product. Price, literature,
manufacturing processes or locations or any combination of these above
mentioned entities may change at any time for any reason without notice with
impunity.
Years 3-8
PEG PEREGO offers after-sales services, directly or with a network of authorized
service centers for repairs or replacement parts. See the back cover of this
instruction manual for a list of service centers.
ADULT ASSEMBLY REQUIRED.
USE CARE WHEN UNPACKING AS COMPONENTS TO BE ASSEMBLED MAY POSE A
SMALL PARTS/SHARP EDGE HAZARD.
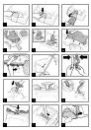
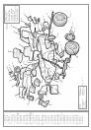
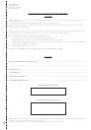
ASSEMBLY
1 • Unscrew the battery compartment cover.
2 • Press the tab as show in the figure.
3 • Release and open up the cover.
4 • Place the bonnet unit on the vehicle's base and insert the four fasteners
(below the headlights) into the corresponding holes.
5 • Before you complete the fitting of the bonnet, make sure that the base of the
gear lever (visible below the dashboard) is as shown in the figure (see detail
E). NOTE: In the small box, the component is fitted incorrectly.
6 • Push down the bonnet unit to complete the fitting. Make sure the unit is
correctly fitted checking the fixing points shown by the arrows. Close the
battery compartment.
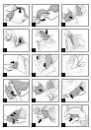
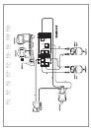
7 • Insert the steering rod holding out the end as shown in the figure (see detail
in figure #8).
8 • Section of the steering rod stroke.
A: wheel steering rod;
B : battery compartment;
C : dashboard.
9 • Join the two parts of the steering wheel.
10 • Insert the steering wheel on the steering rod aligning the corresponding
holes.
11 • Fix the steering wheel with the screw and nut provided. NOTE:The nut fits into
the hexagonal hole, the screw into the round hole.
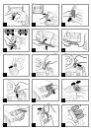
12 • To fit the headlights, insert the rear tabs in the two windscreen holes.
13 • Press till it clicks to complete the fitting.
14 • Before fitting the seat, check that the engine wires are correctly connected.
15 • Install the seat cover as shown in the picture.
16 • Stretch the seat cover and fit it to the backrest.
17 • Complete the installation to the front.
18 • To fit the seat, insert the two rear fasteners bodywork hole sup to the first
notch (see the round inset).
CUSTOMER SERVICE
ASSEMBLY INSTRUCTIONS