Доступность: Бесплатно как и все руководства на сайте. Без регистрации и SMS.
Дополнительно: Чтение инструкции онлайн
6901-170199 <05>
17
OPT
OPT
[28]
[29]
[29]
Страница: (17 из 40)
навигация
1
2
3
4
5
6
7
8
9
10
11
12
13
14
15
16
17
18
19
20
21
22
23
24
25
26
27
28
29
30
31
32
33
34
35
36
37
38
39
40
Оглавление инструкции
Страница 1 из 41 ® LL22 (6901-170199 <05>) Sanus Systems 2221 Hwy 36 West, Saint Paul, MN 55113 USA Customer Service Americas: 800-359-5520 • 651-484-7988 • info@sanus.com Europe, Middle East, and Africa: 31 (0) 40 26 68 619 • sanus.europe@sanus.com Asia Pacific: 86 755 8996 9226 • 800 999 6688 (mainland China
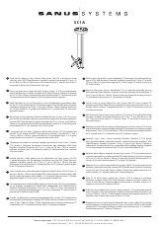
Страница 2 из 41 EN IMPORTANT SAFETY INSTRUCTIONS - SAVE THESE INSTRUCTIONS Thank you for choosing a Sanus Systems VisionMount™ wall mount. The LL22 is designed to mount LCD TVs weighing less than 175 lbs (79 Kg) to a vertical wall. This weight includes the monitor and any accessories. INSTRUÇÕES DE SEGURANÇA
Страница 3 из 41 NO Takk for at du har valgt et Sanus Systems VisionMount™ veggfeste. Med LL22 kan du montere opp til LCD TV-er som veier maksimalt 79 kg til en vertikal vegg. Vekten omfatter skjermen og eventuelt tilbehør. FORSIKTIG: Bruk ikke dette produktet til andre formål enn de som spesifiseres av Sanus
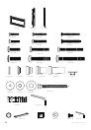
Страница 4 из 41 5mm (3/16 in.) EN Supplied Parts and Hardware Before starting assembly, verify all parts are included and undamaged. If any parts are missing or damaged, do not return the item to your dealer; contact Sanus Systems Customer Service. Never use damaged parts! WARNING! FR Pièces et matériel fournis
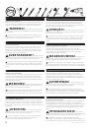
Страница 5 из 41 NO OSTRZEŻENIE! Produkt zawiera małe elementy, które grożą zadławieniem w razie połknięcia. Przechowuj je poza zasięgiem małych dzieci! OPT Zestaw zawiera osprzęt i procedury montażowe dla różnych konfiguracji. OPT Ten symbol nakazuje wybór odpowiedniej konfiguracji. Nie cały osprzęt zostanie
Страница 6 из 41 [01] x 1 [03] x1 [02] x1 M4 x 20mm M4 x 30mm M4 x 40mm [05] x4 [04] x4 M5 x 20mm [06] x4 M5 x 30mm M5 x 40mm [08] x4 [07] x4 M6 x 25mm M6 x 40mm [10] x4 [09] x4 [11] x4 M8 x 25mm M8 x 45mm 4mm M8 x 60mm [14] x4 [13] x4 [16] x4 M6 x 55mm [12] x4 7mm [17] x4 14mm [18] x4 [15] x4 24mm 38mm [20] x4
Страница 7 из 41 EN This page intentionally left blank. FR Page laissée vierge intentionnellement. DE Diese Seite wurde absichtlich leer gelassen. ES Esta página se dejó en blanco intencionalmente. PT Esta página deixada em branco intencionalmente. NL Deze pagina werd leeg gehouden. IT Pagina lasciata
Страница 8 из 41 5mm (3/16 in.) 1 EL EN Wood Stud Mounting CAUTION: Avoid potential injuries or property damage! Do not over-tighten the lag bolts [25]. Tighten the lag bolts [25] only until the washers [24] are pulled against the wall plate [01]. Any material covering the wall must not exceed 16 mm (5/8 in.). FR
Страница 9 из 41 TR Ahşap Saplama Montajı DİKKAT Olası yaralanmalara veya ürünün hasar görmemesine dikkat edin! Cıvataları gereğinden fazla sıkmayın [25]. Cıvataları [25] yalnızca pullar [24] duvar plakasına [01] çekilene kadar sıkıştırın. Duvarın kaplaması 16 mm’yi (5/8 inç) geçmemelidir. JP 木製間柱に取り付け
Страница 11 из 41 EN This page intentionally left blank. FR Page laissée vierge intentionnellement. DE Diese Seite wurde absichtlich leer gelassen. ES Esta página se dejó en blanco intencionalmente. PT Esta página deixada em branco intencionalmente. NL Deze pagina werd leeg gehouden. IT Pagina lasciata
Страница 12 из 41 13mm (1/2 in.) 1-1 IT EN Concrete Block Mounting CAUTION: Avoid potential injuries or property damage! Do not over-tighten the lag bolts [25]. Tighten the lag bolts [25] only until the washers [24] are pulled against the wall plate [01]. Any material covering the wall must not exceed 16 mm (5/8
Страница 13 из 41 JP PL Montaż na ścianie z betonu lub bloczków betonowych OSTROŻNIE Uwaga na możliwość obrażeń i uszkodzenia sprzętu! Wkrętów montażowych [25] nie należy dokręcać za mocno. Śruby [25] należy dokręcać tylko do momentu dociśnięcia podkładek [24] do płyty ściennej [01]. Grubość materiału stanowiącego
Страница 14 из 41 20 cm (8 in.) [01] >15 cm (6 in.) 63.5 mm (2.5 in.) [26] [25] 14 [24] 6901-170199 <05>
Страница 15 из 41 EN This page intentionally left blank. FR Page laissée vierge intentionnellement. DE Diese Seite wurde absichtlich leer gelassen. ES Esta página se dejó en blanco intencionalmente. PT Esta página deixada em branco intencionalmente. NL Deze pagina werd leeg gehouden. IT Pagina lasciata
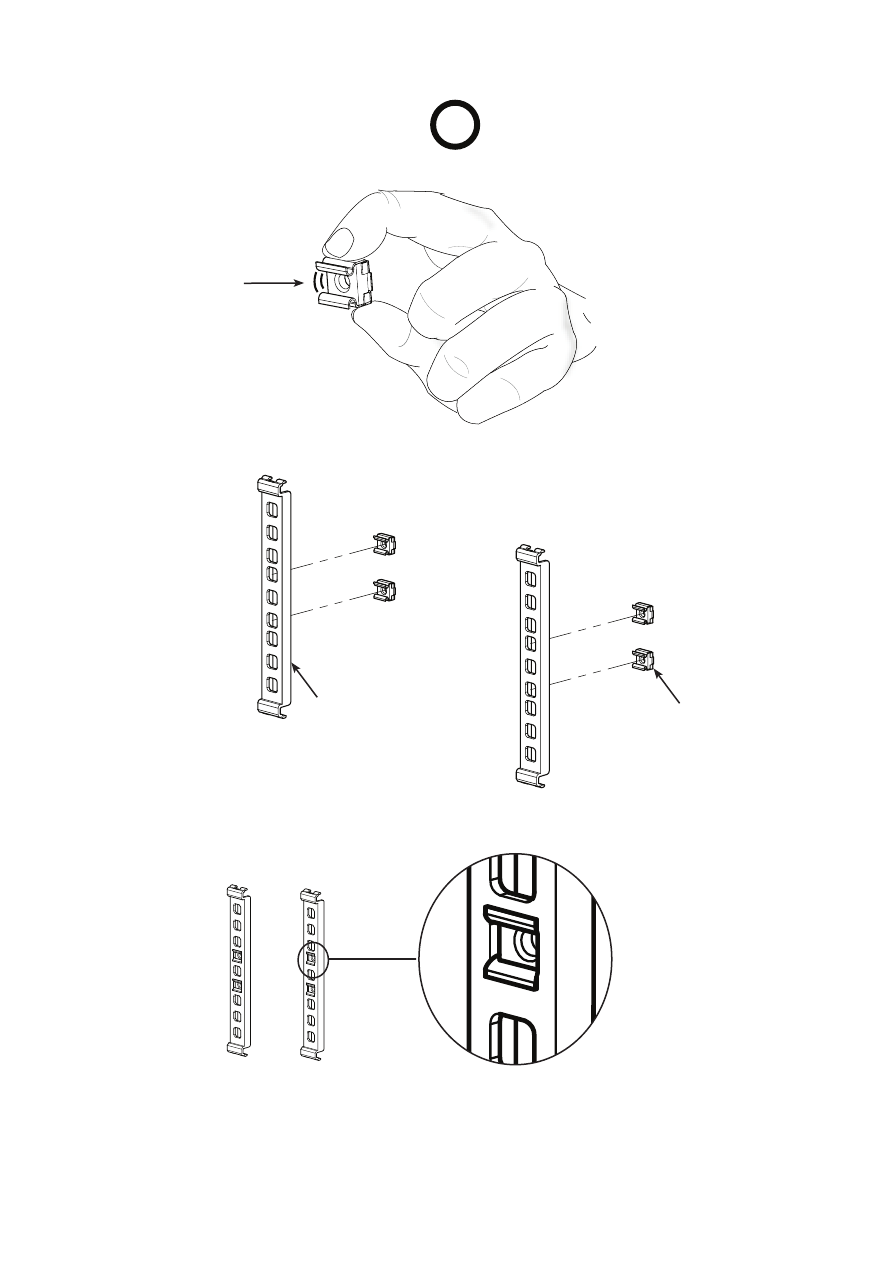
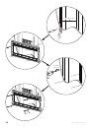
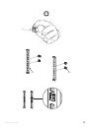
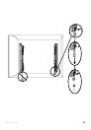
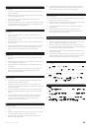
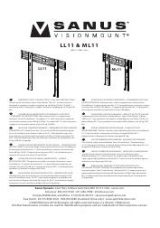
Страница 16 из 41 [32] 2 EN NO Optional Accessory Bracket Mounting. The optional Click Fit Surge Protector Mounting Accessory can support a maximum weight of 3 lbs (1.3 kg). Festebrakett for tilbehør (ekstrautstyr). Monteringstilbehøret for Clik Fitoverspenningsvernet, som leveres som ekstrautstyr, kan bære en vekt
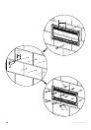
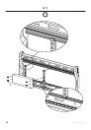
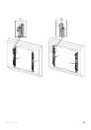
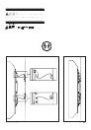
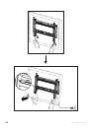
Страница 20 из 41 3 EN DA NOTE: Attach brackets based on monitor hole pattern. For monitors with hole spacing less than 350mm, attach brackets as shown in image [A]. For monitors with hole spacing greater than 350mm, attach brackets as shown in image [B]. BEMÆRK! Fastgør beslag i henhold til hulmønsteret i skærmen.
Страница 21 из 41 A B [02] [03] <350 <350m m mm >350 >350m m mm [03] [02] [03] [02] <350 <350m m mm 6901-170199 <05> >350 >350m m mm 21
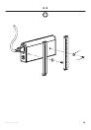
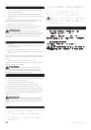
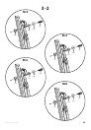
Страница 22 из 41 3-1 ES EN Install Brackets Instale los soportes 1. Determine the bolt diameter for your TV and your TV type. 1. ÙÙ For TVs with a flat/unobstructed back, see 3-2. Antes de instalar los soportes, determine el diámetro de los pernos según el tipo de televisor que tiene: ÙÙ For TVs with an
Страница 23 из 41 IT DA Installare i bracci Montering af beslag 1. Prima di installare i bracci, determinare il diametro corretto per il televisore e per il tipo di televisore: 1. Find diameteren på skruebolten på dit TV, og undersøg TV-typen: ÙÙ Per televisori a dorso piatto/libero, vedere il passo 3-2. ÙÙ Se trin
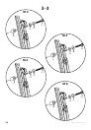
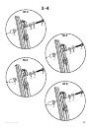
Страница 24 из 41 PL Montaż wsporników ケーブル、くぼみ、突起物を収める余分なスペースが必要な場合、ス ペーサーを利用する取り付けオプション(3-3または3-4を参照してくだ さい。 1. Przed rozpoczęciem montażu wsporników, określić średnicę śruby telewizora i typ telewizora: 2. ブラケットがモニター背面と水平になるようにしてください。 ÙÙ Dla telewizorów z płaskim tyłem/bez przeszkód, patrz punkt 3-2.
Страница 28 из 41 [27] EN For ease in access, lock release tabs should be level with the TV. FR Les pattes de verrouillage devraient être au même niveau que le téléviseur afin de facilité l'accès. DE Für einfachen Zugriff sollten sich die Freigaberiegel auf der Höhe des Fernsehers befinden. ES Para facilitar el
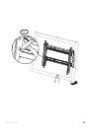
Страница 30 из 41 5 EN EL Hang the TV onto the Wall Plate Αναρτήστε την τηλεόραση πάνω στην πλάκα τοίχου CAUTION: Heavy! You will need assistance with this step. NOTE: For clarity, wall plate sides are not shown here. FR Suspendez le téléviseur sur la plaque murale ATTENTION : ΠΡΟΣΟΧΗ: Βαρύ! Θα χρειαστείτε βοήθεια
Страница 32 из 41 6 EN PT Cable management Tratamento dos cabos ÙÙ Release the lock and ClickStand by pulling the lock release tabs down approximately 1inch (25.4 mm). ÙÙ Solte a trava e o ClickStand abaixando as lingüetas de liberação da trava aproximadamente 25,4 mm. ÙÙ Gently pull the TV away from the wall and
Страница 33 из 41 ÙÙ NO Kabeltilkobling Po przeprowadzeniu kabli delikatnie odciągnąć telewizor od ściany i przesunąć Click Stands w górę, wychodząc z pozycji do kablowania. Powoli i delikatnie ustawić telewizor w pozycji wyjściowej. ÙÙ Utløs låsen og ClickStand ved å trekke låsutløsermekanismene ned ca. 25,4 mm (1
Страница 36 из 41 [27] 7 EN DA Height and Level Adjustments Justering af højde og niveau FR SV Réglage de la hauteur et mise à niveau Justering av höjd och nivå DE RU Höhenverstellung Настройка уровня и высоты ES Ajuste de altura y nivelación PT Ajustes de altura e nível PL Regulacja wysokości i poziomu CS Doladění
Страница 38 из 41 8 EN DA Optional padlock not included. Valgfri hængelås medfølger ikke. FR SV Verrou facultatif non compris. Valfritt hänglås medföljer inte. DE RU Optionales Vorhängeschloss ist nicht im Lieferumfang enthalten. Дополнительно поставляемый висячий замок не в комплект не входит. ES PL Cerrojo
Страница 39 из 41 EN This page intentionally left blank. FR Page laissée vierge intentionnellement. DE Diese Seite wurde absichtlich leer gelassen. ES Esta página se dejó en blanco intencionalmente. PT Esta página deixada em branco intencionalmente. NL Deze pagina werd leeg gehouden. IT Pagina lasciata
Страница 40 из 41 EN Milestone AV Technologies and its affiliated corporations and subsidiaries (collectively, “Milestone”), intend to make this manual accurate and complete. However, Milestone makes no claim that the information contained herein covers all details, conditions, or variations. Nor does it provide for