6901-170199 <05>
20
3
EN
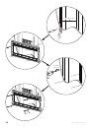
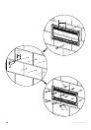
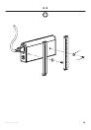
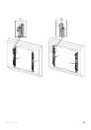
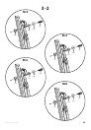
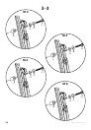
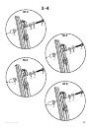
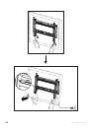
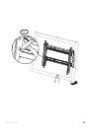
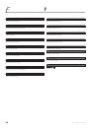
NOTE: Attach brackets based on monitor hole pattern. For monitors with
hole spacing less than 350mm, attach brackets as shown in image [A]. For
monitors with hole spacing greater than 350mm, attach brackets as shown
in image [B].
FR
REMARQUE : Attacher les pattes de fixation selon la configuration de trous
du moniteur. Pour les moniteurs ayant un espacement entre trous inférieur à
350 mm, attacher les pattes de fixation tel qu’illustré sur l’image [A]. Pour les
moniteurs ayant un espacement entre trous supérieur à 350 mm, attacher les
pattes de fixation tel qu’illustré sur l’image [B].
DE
HINWEIS: Bringen Sie die Halterungen nach den Bohrungen am Bildschirm
an. Für Monitore mit einem Lochabstand von weniger als 350 mm befestigen
Sie die Halterungen wie in Abbildung [A] dargestellt. Für Monitore mit einem
größeren Lochabstand als 350 mm befestigen Sie die Halterungen wie in
Abbildung [B] dargestellt.
ES
NOTA: Coloque los soportes según el patrón de orificios del monitor. En los
monitores con una separación entre orificios inferior a 350 mm, coloque
los soportes como se muestra en la imagen [A]. En los monitores con una
separación entre orificios superior a 350 mm, coloque los soportes como se
muestra en la imagen [B].
PT
NOTA: Fixar os suportes com base no padrão de furacão do monitor. Para
monitores com espaço entre furos inferior a 350mm, fixar suportes conforme
mostrado na figura [A]. Para monitores com espaço entre furos superior a
350mm, fixar suportes conforme mostrado na figura [B].
NL
LET OP Bevestig de beugels op basis van het gatpatroon van het
beeldscherm. Voor beeldschermen met een gatpatroon dat kleiner is dan
350 mm, bevestigt u de beugels zoals afgebeeld [A]. Voor beeldschermen
met een gatpatroon dat groter is dan 350 mm, bevestigt u de beugels zoals
afgebeeld [B].
IT
NOTA: montare le staffe in base alla configurazione dei fori di montaggio
dello schermo. Per schermi con distanza tra i fori inferiore a 350 mm, montare
le staffe come illustrato nell’immagine [A]. Per schermi con distanza tra i fori
superiore a 350 mm, montare le staffe come illustrato nell’immagine [B].
EL
ΣΗΜΕΙΩΣΗ: Προσαρτήστε τους βραχίονες με βάση το σχήμα της οπής
της οθόνης. Για οθόνες με απόσταση οπών μικρότερη από 350mm,
προσαρτήστε τους βραχίονες όπως φαίνεται στην εικόνα [Α]. Για οθόνες με
απόσταση οπών μεγαλύτερη από 350mm, προσαρτήστε τους βραχίονες
όπως φαίνεται στην εικόνα [Β].
NO
MERK: Fest brakettene i henhold til skjermens hullmønster. Når det
gjelder skjermer med en avstand mellom hullene på under 350 mm, festes
brakettene som vist i figur [A]. Når det gjelder skjermer med hullavstand på
over 350 mm, festes brakettene som vist i figur [B].
DA
BEMÆRK! Fastgør beslag i henhold til hulmønsteret i skærmen. På skærme,
hvor afstanden mellem hullerne er under 350 mm, skal du fastgøre
beslagene som vist på billede [A]. På skærme, hvor afstanden mellem
hullerne er over 350 mm, skal du fastgøre beslagene som vist på billede [B].
SV
OBS! Montera fästena baserat på skärmens hålmönster. För skärmar med
hålintervall under 350 mm, montera fästena enligt bilden [A]. För skärmar
med hålintervall över 350 mm, montera fästena enligt bilden [B].
RU
ПРИМЕЧАНИЕ. Прикрепите кронштейны в соответствии со схемой
отверстий монитора. В случае если расстояние между отверстиями
меньше 350 мм, прикрепите кронштейны так, как это показано на
рисунке [A]. В случае если расстояние между отверстиями больше 350
мм, прикрепите кронштейны так, как это показано на рисунке [B].
PL
UWAGA: Należy zamocować wsporniki zgodnie z otworami monitora.
W monitorach z rozstawem otworów mniejszym niż 350 mm należy
zamocować wsporniki w sposób pokazany na rysunku [A]. W monitorach z
rozstawem otworów większym niż 350 mm należy zamocować wsporniki w
sposób pokazany na rysunku [B].
CS
UPOZORNĚNÍ: Připevněte konzoly v souladu s rozložením montážních
otvorů monitoru. U monitorů s rozestupem otvorů menším než 350 mm
připevněte konzoly podle obrázku [A]. U monitorů s rozestupem otvorů
větším než 350 mm připevněte konzoly podle obrázku [B].
TR
NOT: Monitör delik desenine dayalý destekleri takýn. Delik açýklýðý 350
mm’den küçük olan monitörler için [A] resminde gösterildiði gibi destekleri
takýn. Delik açýklýðý 350 mm’den büyük olan monitörler için [B] resminde
gösterildiði gibi destekleri takýn.
JP
注記:モニターの穴パターンに合わせてブラケットを取り付けてくださ
い。穴間隔が350mm以下のモニターの場合、図
[A]のようにブラケット
を取り付けてください。穴間隔が350mm以上のモニターの場合、図
[B]
のようにブラケットを取り付けてください。
MD
注意:根据显示器螺孔距离连接托架。螺孔间距小于 350mm 的显示器,
按图
[A] 所示连接托架。螺孔间距大于 350mm 的显示器,按图 [B] 所
示连接托架。