6901-170199 <05>
32
EN
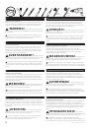
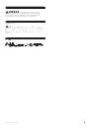
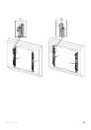
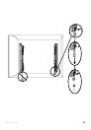
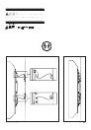
Cable management
Ù
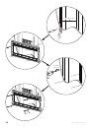
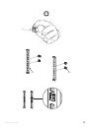
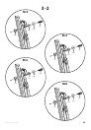
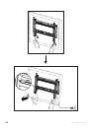
Release the lock and ClickStand by pulling the lock release tabs down
approximately 1inch (25.4 mm).
Ù
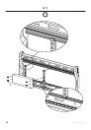
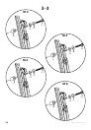
Gently pull the TV away from the wall and back, allowing the
ClickStands to rest on the wall mount, as shown.
Ù
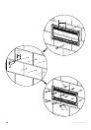
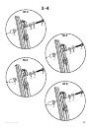
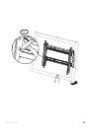
With Click Stands in the wiring position, route cables from your TV to
their power source.
Ù
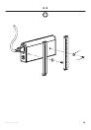
When cabling is complete, gently pull the TV away from the wall and
flip the Click Stands up out of cabling position. Slowly and gently move
the TV into home position.
FR
Gestion des câbles
Ù
Déverrouillez le ClickStand en tirant les pattes de verrouillage vers le
bas à environ 25,4 mm (1 pouce).
Ù
Éloignez doucement le téléviseur du mur et vers l'arrière afin de
permettre au ClickStands de demeurer sur le support mural, comme
illustré.
Ù
Avec Click Stands en position de câblage, acheminez les câbles de votre
téléviseur à la source d'alimentation en courant.
Ù
Lorsque le raccordement des câbles est terminé, tirez doucement
pour éloigner le téléviseur du mur et faites basculer le Click Stands
vers le haut en position normale. Déplacez lentement et doucement le
téléviseur en position
DE
Kabelführung
Ù
Geben Sie die Verriegelung und die ClickStand-Ständer frei, indem Sie
die Freigaberiegel etwa 2,5 cm nach unten ziehen.
Ù
Ziehen Sie das TV-Gerät vorsichtig von der Wand weg, sodass die
ClickStand-Ständer wie abgebildet auf der Wandhalterung aufliegen.
Ù
Wenn sich die ClickStand-Ständer in der Verkabelungsposition
befinden, führen Sie die Kabel von Ihrem TV-Gerät zur Stromquelle.
Ù
Ziehen Sie das TV-Gerät nach der Verkabelung vorsichtig von der
Wand weg und bewegen Sie die ClickStand-Ständer nach oben aus der
Verkabelungsposition. Bringen Sie das TV-Gerät langsam und vorsichtig
in die Ausgangsstellung.
ES
Organización de cables
Ù
Libere el sistema de bloqueo y el mecanismo ClickStand jalando las
lengüetas hacia abajo 25,4 mm (1 pulgada) aproximadamente.
Ù
Con cuidado separe el televisor de la pared y vuélvalo a acercar de
modo que los mecanismos ClickStand apoyen en el soporte mural, tal
como se indica en la ilustración.
Ù
Con los mecanismos ClickStand en la posición de cableado, organice
los cables desde el televisor hasta la fuente de alimentación.
Ù
Una vez organizados los cables, separe el televisor de la pared con
cuidado y levante los mecanismos ClickStand. Lenta y cuidadosamente,
coloque el televisor en su lugar.
PT
Tratamento dos cabos
Ù
Solte a trava e o ClickStand abaixando as lingüetas de liberação da trava
aproximadamente 25,4 mm.
Ù
Com cuidado, puxe a TV para longe da parede e retorne-a à posição
permitindo que os ClickStands descansem no suporte de parede,
conforme mostrado.
Ù
Com os ClickStands na posição de fiação, roteie os cabos da TV para a
fonte de alimentação.
Ù
Quando o cabeamento estiver concluído, puxe a TV para longe da
parede com cuidado e vire os ClickStands para cima e para fora da
posição de cabeamento. Devagar e com cuidado, mova a TV para a
posição inicial.
NL
Kabelbeheer
Ù
Ontgrendel het slot en de ClickStand door de ontgrendelingsklepjes
circa 25,4 mm (1 inch) omlaag te trekken.
Ù
Trek de tv voorzichtig weg van de muur en weer terug, zodat de
ClickStand op de wandbevestiging rust, zoals in de afbeelding wordt
getoond.
Ù
Leid de kabels met de ClickStand in de bekabelingspositie van de tv
naar de voedingsbron.
Ù
Wanneer de bekabeling is voltooid, trekt u de tv voorzichtig weg van
de muur en kantelt u de ClickStand omhoog uit de bekabelingspositie.
Plaats de tv langzaam en voorzichtig in de standaardpositie.
IT
Gestione dei cavi
Ù
Rilasciare il blocco e ClickStand spingendo le linguette di rilascio del
bloccaggio verso il basso di circa 25,4 mm (1 pollice).
Ù
Allontanare delicatamente il televisore dalla parete e dal retro,
consentendo ai ClickStand di rimanere sul supporto a parete, come
illustrato.
Ù
Con ClickStand in posizione di cablaggio, dirigere i cavi dal televisore
verso la sorgente di alimentazione.
Ù
Quando il cablaggio è completato, allontanare delicatamente il
televisore dalla parete e spostare ClickStand in alto, fuori dalla posizione
di cablaggio. Spostare lentamente e con delicatezza il televisore in
posizione home.
EL
Διαχείριση καλωδίων
Ù
Απασφαλίστε την κλειδαριά και το ClickStand τραβώντας τις προεξοχές
απασφάλισης κλειδαριάς προς τα κάτω περίπου 25.4 mm (1 inch).
Ù
Τραβήξτε απαλά την τηλεόραση από τον τοίχο και πίσω, επιτρέποντας
στο ClickStands να σταθεί στη βάση τοίχου, όπως φαίνεται.
Ù
Με το Click Stands στη θέση καλωδίωσης, περάστε τα καλώδια από την
τηλεόραση στην πηγή τροφοδοσίας.
Ù
Όταν ολοκληρωθεί η καλωδίωση, τραβήξτε απαλά την τηλεόραση
μακριά από τον τοίχο και γυρίστε το Click Stands προς τα πάνω μακριά
από τη θέση καλωδίωσης. Αργά και προσεκτικά μετακινήστε την
τηλεόραση στην αρχική θέση.
6