6
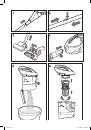
Using the brush attachments
Turbo brush for floors/carpets (1)
The turbo brush can be used to vacuum floors, rugs and carpets
with long or short pile, and is ideal for picking up animal fur. The
cylindrical brush with hard bristles rotates under the action of the
air current and its bristles effectively remove animal fur and loose
carpet and rug fibers.
Note: Never use the turbo brush to clean rugs with fringe and
pile of 15 mm or more, because the rotating brush can cause
damage to such rugs. Do not run the turbo brush over power
cords and turn off the vacuum cleaner immediately after you
are done using it.
Universal brush attachment (23)
1. For cleaning furniture upholstery.
2. With attached brush: for cleaning furniture, curtains, books,
floor-lamps, shelves, and to remove dust from plants.
Attachment for hard-to-reach places (24)
For cleaning radiators, crevices, corners and between sofa
pillows.
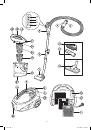
USAGE INSTRUCTIONS
Before using the vacuum, pull the power cord out to the desired
length and insert the plug into an outlet. The yellow mark on the
power cord warns you when to stop pulling. Never pull the power
cord past the red mark.
Always make sure the dust container and filter unit are attached
before turning on the vacuum cleaner.
1. Press the on/off button (10) to turn on the vacuum cleaner.
2. Use the buttons on the hose handle to select the desired suc-
tion power
b LOW
c MID
d HIGH
Press the (a) - STOP button to temporarily turn off the vacuum
cleaner.
3. When finished cleaning, press the (a) - STOP button, and then
press the on/off button (10) to turn off the vacuum cleaner
completely.
4. Press the power cord-winding button (7) and hold the winding
cord with your hand to prevent damage.
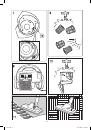
SERVICE
1. Removing the dust collection bin (6) and removing dust
and trash (Fig. 5)
• Grasp the dust collection bin handle (14) and, pressing the
lock button (15) away from yourself, remove the dust collec-
tion bin (14) by lifting upwards.
Note: Do not press the button (16) when removing the dust
collection bin, when the button (16) is pressed, button (15) is
blocked.
• Open the lower lid (21) of the dust collection bin by pressing
the lock (22).
• Remove the dust and trash from the dust collection bin.
Note:
- it is recommended that you empty the dust collection bin af-
ter each use.
- the full dust collection bin indicator (9) will light to remind you
when it is time to empty the bin.
2. Taking apart the dust collection bin
(Fig. 6).
• Turn off the vacuum cleaner and disconnect it from electri-
cal power, remove the duct collection bin, empty the dust and
trash and then close the lower lid.
• While holding the bottom, turn the dust collection bin lid (17)
clockwise to the “open” position and remove.
• Rotate the filter block (19, 20) counter-clockwise to the
“open” position and remove (Fig. 7).
• Remove the preliminary screen filter (19) from the main HEPA
filter (20).
3. Cleaning the filters (fig. 8)
Keep the filters (19, 20) clean, as the operational effectiveness of
you vacuum cleaner depends on it. Clean the filters no less fre-
quently than three to four times a year and if they get really dirty
– then more often. Filter replacement is done when necessary.
• Turn off the vacuum and disconnect it from electrical power,
remove the bin (6), remove the trash and dust from it, remove
the filters (19, 20).
• Clean the preliminary screen filter (19) from dust and grime.
• Wash the НЕРА-filter (20) under a stream of luke-warm water
(fig 7). Do not use a washing machine to clean the filter.
• Dry the НЕРА-filter (20). Do not use a hair dryer to dry the
filters.
• Wash and dry the dust collector bin (fig. 10).
Assembling the dust collection bin:
-
place the preliminary screen filter (19) onto the main НЕРА
filter (20)
- install the filter block (19, 20) onto the dust collection bin lid
(17) so that the lip on the НЕРА filter is located near the block-
ing device (18), rotate the filter block clockwise to the “close”
position (Fig. 7).
- Match the “I” symbol on the bin lid (17) and the
symbol in
the lower part of the dust collection bin, and then rotate the
upper lid (17) counter-clockwise to the “open” position until it
locks (Fig. 6).
Note: if the filter block (15, 16) is not installed or installed im-
properly, the blocking system (19) will not activate and the con-
tainer lid (17) will not close (Fig.7).
- put the dust collection bin in place (6) by lightly pressing on
the handle (15) for complete security.
4. Removing the exhaust filter (Fig. 9).
• Remove the exhaust filter lid (11) by pressing down on the
locking button.
• Remove the filter (12), wash it under a stream of water, allow
to dry and replace.
• Replace the exhaust filter lid (11).
5. Cleaning the turbo-brush
Remove the turbo brush from the telescoping pipe, remove
any hair and string that have been wound around the cylindrical
brush. If the cylindrical brush does not rotate while vacuuming:
- open the lid from the underside of the turbo-brush and clean
the wings from hair and string.
6. Vacuum cleaner housing
• Wipe the housing with a damp cloth.
• Do not allow water or other liquid to get inside the housing of
the vacuum cleaner.
• Never use solvents or abrasive cleaning products to clean the
surface of the vacuum cleaner
TECHNICAL DATA
Power source:
220 V ~ 50 Hz
Power consumption:
2000 W
Suction power:
400 W
Dust container capacity:
1.1 l
Noise level:
92 dB
Specifications subject to change without prior notice.
MINIMUM SERVICE LIFE - 5 YEARS
GUARANTEE
Details regarding guarantee conditions can be obtained from the
dealer from whom the appliance was purchased. The bill of sale
or receipt must be produced when making any claim under the
terms of this guarantee.
This product conforms to the EMC-Requirements
as laid down by the Council Directive 89/336/EEC
and to the Law Voltage Regulation (73/23 EEC)
ENGLISH
1835.indd 6
1835.indd 6
05.10.2009 13:06:58
05.10.2009 13:06:58