
5
it can cause no danger to persons and fasten it
firmly in place to avoid it from tipping over, which
may cause damage or fuel spillage.
F) ENVIRONMENTAL PROTECTION
Environmental protection should be a priority of
considerable importance when using the ma
-
chine, for the benefit of both social coexistence
and the environment in which we live. Try not to
cause any disturbance to the surrounding area.
• Scrupulously comply with local regulations
and provisions for the disposal of oils, petrol,
damaged parts or any elements which have a
strong impact on the environment; this waste
must not be disposed of as normal waste,
it must be separated and taken to specified
waste disposal centres where the material will
be recycled.
• Scrupulously comply with local regulations
and provisions for the disposal of waste ma
-
terials.
• At the time of decommissioning, do not pollute
the environment.
OPERATING INSTRUCTIONS
NOTE - The images corresponding to the
references are found from page v of this
manual.
1. PREPARE THE MACHINE
The machine can be used as both a blower and
a vacuum collector; for both of these uses it is
necessa ry to correctly arrange the appropriate
accesso ries included with the equipment.
WARNING!
Unpacking and completing
the assembly should be done on a flat and
stable surface, with enough space for moving
the machine and its packaging, always mak
ing use of suitable equipment.
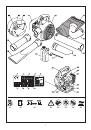
1.1 USE AS A BLOWER (Fig. 1)
– Remove the screw (1) and its washers (2).
– Align the first blower tube compartment
(3) with the protrusion (4) of the air outlet,
push the tube and turn it 90° clockwise, in or
-
der to per manently fix it in place.
– Fix the tube (3) to the air outlet using the
screw (1) and its washers (2).
– Align the second blower tube compartment (5)
with the protrusion (6) of the first tube, push
the tube and turn it 90° clockwise, in order to
permanently fix it in place; now use the screw
(7) and relative washers to fasten the tube (5)
in place.
NOTE
The machine is correctly as sembled when
the flat part of the blower chute is pointed towards
the ground.
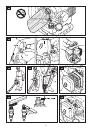
1.2 USE AS A VACUUM COLLECTOR
(Fig. 2)
– Remove the screw (1) and its washers (2).
– Align the housing of the tube fitting bag
(3) with the protrusion (4) of the air outlet,
push the tube and turn it 90° anticlockwise, in
or der to permanently fix it in place.
NOTE
The machine is correctly as sembled when
the tube’s terminal chute is pointed downwards
and to the left of the ope rator.
– Fix the tube (3) to the air outlet using the
screw (1) and its washers (2).
– Loosen the knob (5) and open the protection
grille (6).
– Align the first vacuum tube compartment
(7) with the protrusion (8) of the inlet, push
the tube and turn it 90° clockwise, in or der to
permanently fix it in place.
– Align the second vacuum tube compartment
(9) with the protrusion (10) of the first tube,
push the tube and turn it 90° clockwise, in or-
der to permanently fix it in place.
NOTE
The machine is correctly as sembled when
the rounded part of the chute is pointed towards
the ground.
– Insert the tube fitting end chute (3) in the spe
-
cific bag (11) and close the opening with the
supplied Velcro strap (12).
– Hang the bag over your shoulder and adjust
height using the strap.
2. PREPARING TO WORK
2.1 CHECKING THE MACHINE
Before starting work please:
– check that all the screws on the machine are
tightly fastened;
– when used as a vacuum collector, make sure
the bag is integral, well-closed and that the
zipper works correctly;
– check that the air filter is clean;
– check that the handgrips are well fastened;
 1
1
 2
2
 3
3
 4
4
 5
5
 6
6
 7
7
 8
8
 9
9
 10
10
 11
11
 12
12
 13
13
 14
14
 15
15
 16
16
 17
17
 18
18
 19
19
 20
20
 21
21
 22
22
 23
23
 24
24
 25
25
 26
26
 27
27
 28
28
 29
29
 30
30
 31
31
 32
32
 33
33
 34
34
 35
35
 36
36
 37
37
 38
38
 39
39
 40
40
 41
41
 42
42
 43
43
 44
44
 45
45
 46
46
 47
47
 48
48
 49
49
 50
50
 51
51
 52
52
 53
53
 54
54
 55
55
 56
56
 57
57
 58
58
 59
59
 60
60
 61
61
 62
62
 63
63
 64
64
 65
65
 66
66
 67
67
 68
68
 69
69
 70
70
 71
71
 72
72
 73
73
 74
74
 75
75
 76
76
 77
77
 78
78
 79
79
 80
80
 81
81
 82
82
 83
83
 84
84
 85
85
 86
86
 87
87
 88
88
 89
89
 90
90
 91
91
 92
92
 93
93
 94
94
 95
95
 96
96
 97
97
 98
98
 99
99
 100
100
 101
101
 102
102
 103
103
 104
104
 105
105
 106
106
 107
107
 108
108
 109
109
 110
110
 111
111
 112
112
 113
113
 114
114
 115
115
 116
116
 117
117
 118
118
 119
119
 120
120
 121
121
 122
122
 123
123
 124
124
 125
125
 126
126
 127
127
 128
128
 129
129
 130
130
 131
131
 132
132
 133
133
 134
134
 135
135
 136
136
 137
137
 138
138
 139
139
 140
140
 141
141
 142
142
 143
143
 144
144
 145
145
 146
146
 147
147
 148
148
 149
149
 150
150
 151
151
 152
152
 153
153
 154
154
 155
155
 156
156
 157
157
 158
158
 159
159
 160
160
 161
161
 162
162
 163
163
 164
164
 165
165
 166
166
 167
167
 168
168
 169
169
 170
170
 171
171
 172
172
 173
173
 174
174
 175
175
 176
176
 177
177
 178
178
 179
179
 180
180
 181
181
 182
182
 183
183
 184
184
 185
185
 186
186
 187
187
 188
188
 189
189
 190
190
 191
191
 192
192
 193
193
 194
194
 195
195
 196
196
 197
197
 198
198
 199
199
 200
200
 201
201
 202
202
 203
203
 204
204
 205
205
 206
206
 207
207
 208
208
 209
209
 210
210
 211
211
 212
212
 213
213
 214
214
 215
215
 216
216
 217
217
 218
218
 219
219
 220
220
 221
221
 222
222
 223
223
 224
224
 225
225
 226
226
 227
227
 228
228
 229
229
 230
230
 231
231
 232
232
 233
233
 234
234
 235
235
 236
236
 237
237
 238
238
 239
239
 240
240
 241
241
 242
242
 243
243
 244
244
 245
245
 246
246
 247
247
 248
248
 249
249
 250
250
 251
251
 252
252
 253
253
 254
254
 255
255
 256
256
 257
257
 258
258
 259
259
 260
260
 261
261