
7
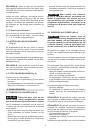
3.1.1 Cold starting
A “cold” start of the engine means starting it af
-
ter at least 5 minutes from when it was switched
off or after refuelling.
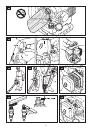
To start the engine (Fig. 4):
1. Set the switch (1) to position «I».
2. Operate the starter, moving lever (2) to
«CHO KE».
3. Press the primer device button (3) 7 to 10 ti-
mes to prime the carburettor.
4. Hold the machine firmly with one hand on the
hand grip (6), in order not to lose control of the
ma chine during starting.
5. Pull the starter rope slowly for 10 - 15 cm un
-
til you feel some resistance, then tug it hard a
few times until you hear the engine turn over.
IMPORTANT
To avoid breaking the star ter rope,
do not pull the whole length of it or let it slide along
the edge of the cable guide hole. Release the
starter gradually, to avoid letting it fly back uncon
-
trollably.
6. Pull the starter rope again, fully turning the
throttle (4) until the engine starts as normal.
7. When the engine is started, disconnect the
starter by turning the lever (2) to «RUN».
8. Let the engine run idle for at least 2–3 minutes
before using the machine.
IMPORTANT
If the starter rope is pulled re-
peatedly with the choke on, it may flood the en-
gine and make starting difficult.
If you have flooded the engine, remove the spark
plug and gently pull the handle on the starter
ro pe to eliminate any excess fuel; then dry the
spark plug electrodes and replace it on the en-
gine.
3.1.2 Hot starting
When hot starting (immediately after stopping
the engine), follow the procedure indicated
above in points 1 - 4 - 5 - 6.
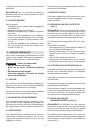
3.2 ADJUSTING THE SPEED (Fig. 4)
Rotor rpm must be proportionate to the type of
work and is regulated by the throttle (4) on the
up per handgrip.
The throttle trigger can be kept in place using the
lock lever (5).
IMPORTANT
Avoid using the engine at full pow-
er for the first 6–8 working hours.
3.2 STOPPING THE ENGINE (Fig. 4)
To stop the engine:
– Return the release lever up (5).
– Release the throttle control (4).
– Set the switch (1) to position «O».
4. OPERATING MODES
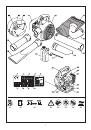
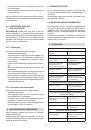
4.1 USE AS A BLOWER (Fig. 5)
WARNING!
The machine must al ways be
firmly gripped with your right hand on the up
per handgrip during work.
Engine speed should be adjusted to the type of
ma terial to be removed:
– use the engine at low speed for lightweight ma-
terial and small bushes on the lawn;
– use the engine at average speed to move
grass and lightweight leaves on pavement or
solid ground;
– use the engine at high speed for heavier mate
-
rials like fresh snow or voluminous dirt.
WARNING!
Always pay the utmost atten
tion to prevent removed material or dust from
injuring people or animals or damaging prop
erty. Always assess wind direction and never
work against the wind.
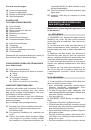
4.2 USE AS A VACUUM COLLECTOR (Fig. 6)
WARNING!
The machine must al ways
be firmly held with both hands during work.
Place your left hand on the upper handgrip
and your right hand on the lower handgrip
so that the bag is on the righthand side of
the operator.
When used as a vacuum collector, it is best to
use the en gine at average/high speed.
During collection, keep the rounded end of the
tu be a few centimetres off the ground.
The bag also works as a filter simi lar to a com
-
mon home vacuum. For this reason it is best that:
– it is always free to expand and the support
strap not tangled;
– it is not fully filled;
– collected objects that could jeopardise integ
-
rity are promptly removed.
To empty the bag:
– switch the engine off;
– open the zipper (1) and empty the bag without
disconnecting it from the fitting tube.
 1
1
 2
2
 3
3
 4
4
 5
5
 6
6
 7
7
 8
8
 9
9
 10
10
 11
11
 12
12
 13
13
 14
14
 15
15
 16
16
 17
17
 18
18
 19
19
 20
20
 21
21
 22
22
 23
23
 24
24
 25
25
 26
26
 27
27
 28
28
 29
29
 30
30
 31
31
 32
32
 33
33
 34
34
 35
35
 36
36
 37
37
 38
38
 39
39
 40
40
 41
41
 42
42
 43
43
 44
44
 45
45
 46
46
 47
47
 48
48
 49
49
 50
50
 51
51
 52
52
 53
53
 54
54
 55
55
 56
56
 57
57
 58
58
 59
59
 60
60
 61
61
 62
62
 63
63
 64
64
 65
65
 66
66
 67
67
 68
68
 69
69
 70
70
 71
71
 72
72
 73
73
 74
74
 75
75
 76
76
 77
77
 78
78
 79
79
 80
80
 81
81
 82
82
 83
83
 84
84
 85
85
 86
86
 87
87
 88
88
 89
89
 90
90
 91
91
 92
92
 93
93
 94
94
 95
95
 96
96
 97
97
 98
98
 99
99
 100
100
 101
101
 102
102
 103
103
 104
104
 105
105
 106
106
 107
107
 108
108
 109
109
 110
110
 111
111
 112
112
 113
113
 114
114
 115
115
 116
116
 117
117
 118
118
 119
119
 120
120
 121
121
 122
122
 123
123
 124
124
 125
125
 126
126
 127
127
 128
128
 129
129
 130
130
 131
131
 132
132
 133
133
 134
134
 135
135
 136
136
 137
137
 138
138
 139
139
 140
140
 141
141
 142
142
 143
143
 144
144
 145
145
 146
146
 147
147
 148
148
 149
149
 150
150
 151
151
 152
152
 153
153
 154
154
 155
155
 156
156
 157
157
 158
158
 159
159
 160
160
 161
161
 162
162
 163
163
 164
164
 165
165
 166
166
 167
167
 168
168
 169
169
 170
170
 171
171
 172
172
 173
173
 174
174
 175
175
 176
176
 177
177
 178
178
 179
179
 180
180
 181
181
 182
182
 183
183
 184
184
 185
185
 186
186
 187
187
 188
188
 189
189
 190
190
 191
191
 192
192
 193
193
 194
194
 195
195
 196
196
 197
197
 198
198
 199
199
 200
200
 201
201
 202
202
 203
203
 204
204
 205
205
 206
206
 207
207
 208
208
 209
209
 210
210
 211
211
 212
212
 213
213
 214
214
 215
215
 216
216
 217
217
 218
218
 219
219
 220
220
 221
221
 222
222
 223
223
 224
224
 225
225
 226
226
 227
227
 228
228
 229
229
 230
230
 231
231
 232
232
 233
233
 234
234
 235
235
 236
236
 237
237
 238
238
 239
239
 240
240
 241
241
 242
242
 243
243
 244
244
 245
245
 246
246
 247
247
 248
248
 249
249
 250
250
 251
251
 252
252
 253
253
 254
254
 255
255
 256
256
 257
257
 258
258
 259
259
 260
260
 261
261