Инструкция для BEST Salina White

(скачивание инструкции бесплатно)
Формат файла: PDF
Доступность: Бесплатно как и все руководства на сайте. Без регистрации и SMS.
Дополнительно: Чтение инструкции онлайн
background image

6

c)

  Reduces the motor speed until reaching minimum. If pressed for 2”, the motor is switched off.


If pressed for 2” when the Filter Alarm is active, the HOUR counter is reset.

d)

  Starts the motor and increases the speed until reaching maximum

e)

  Activates/deactivates the sensor (AUTOMATIC or MANUAL mode).


In automatic mode the sensor is active and the LED L2 is on. The LEDs L1 indicate the running speed.

L1)

  The 4 GREEN LEDs signal the running speed.

L2)

  When the LED is GREEN it indicates AUTOMATIC mode. When it is off, it indicates MANUAL mode. When the 

LED is RED, it indicates the Filter Alarm.

fiLter aLarm: 

Displayed for 30” when the motor is off:

After 30h of operation, the LED L2 turns RED. It indicates that the grease filters need to be cleaned.

After 120h of operation, the LED L2 turns RED and flashes; It indicates that the grease filters need to be cleaned and 

the charcoal filters replaced. After cleaning the grease filters (and/or replacing the charcoal filters), restart the hour 

counter (RESET) by pressing the key 

e

 during display of the filter alarm.

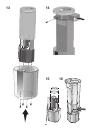
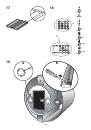
gas sensor sensitiVitY:

The sensitivity of the sensor can be modified to suit your requirements. To modify the sensitivity, the appliance must be 

in manual mode (i.e. the LED L2 must be off); If not, press the key 

e

. Modify the sensitivity by simultaneously pressing 

the keys D and E. The set sensitivity is indicated by the 4 green LEDs. By means of buttons 

c

(-) and 

d

(+) the desired 

sensitivity is set (Fig. 18/S). Store the “new” sensitivity by pressing the key 

e

.

attention: to preVent damaging tHe sensor, do not use siLicone products near tHe Hood!
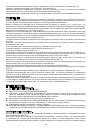
 

Grease filter

: pay special attention to the grease filter - it must be cleaned at regular intervals, when the grease 

filter alarm is shown. Instructions about the Filter Alarm are included in the Conttrols paragraph. Disassembly of the 

grease filter: push the handle outwards and pull the filter downwards (Fig. 3). Wash the filter with neutral detergent.


Charcoal filters

: Using the appliance as a Filtering Version requires the replacement of the charcoal fat regular 

intervals, when the charcoal filter alarm shows. Instructions about the Filter Alarm are included in the Controls paragraph. 

Disassembly of the charcoal filter: remove the grease filter by pushing the handle outwards and pulling it down (Fig.3); 

Then remove the carbon filter after removing the two filter stops (Fig. 17).

 Lighting

Halogen lamps. To replace the halogen lamps, open the cover by prising in the slots (Fig. 22). Replace with lamps of 

the same type. 

warning: do not touch the new lamp with bare hands.

Neon. Remove the neon lamp guard by opening it out on the 2 sides (Fig. 19B); turn the neon lamp 90° on its own 

axis and remove it. Replace with a neon lamp of the same type.

FRANCAIS

description


cette hotte est équipée d’un système automatique (advanced sensor control) pour gérer toutes les 

fonctions de la hotte. grace à l’advanced sensor control, l’air de la cuisine reste pure et sans odeur, et celui, 

sans intervention de la part de l’utilisateur. L’asc detècte toutes les vapeurs, odeurs et fumes émanantes de 

la cuisson. L’asc, peut aussi, capter une présence de gaZ anormale dans la pièce.


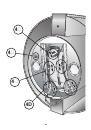
L’appareil peut être en version recyclage ou en version aspirante.


Dans la version 

à recyclage

 l’air et les vapeurs convoyés par l’appareil sont épurés par les filtres à charbon et 

remis en circulation. ATTENTION: Dans  la version recyclage il faut utiliser un filtre à charbon et un déflecteur d’air 

(Fig.1A) qui, placé sur la partie supérieure de la structure, permet le recyclage de l’air dans la pièce.


Dans la version 

aspirante

, les vapeurs  et les odeurs de la cuisine sont convoyées directement à l’extérieur par 

un tuyau d’évacuation à travers le plafond (Fig. 2).


instaLLation


ATTENTION: Il faut au moins 3 personnes pour monter cet appareil; il est conseillé de confier les opérations 

d’installation à des spécialistes. en outre, nous vous conseillons de suivre scrupuleusement toutes les phases 

de montage et de vous assurer, lorsque vous aurez terminé, que l’appareil est solidement fixé.


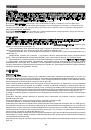
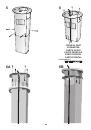
Avant d’effectuer les opérations de montage, pour une maniabilité plus aisée de l’appareil, il faut extraire le filtre à 

graisse

 : pousser la poignée vers l’extérieur, puis tirer le filtre vers le bas (Fig. 3).


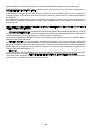
Démonter également le cadre métallique en déposant les 4 vis de fixation (Fig. 4), débrancher la connexion de la 

commande (Fig.4C), des lampes halogènes (Fig.4D) et des néons (Fig.4E).


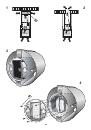
Séparer la partie supérieure de la structure télescopique de la partie inférieure, en déposant les 4 vis de fixation 

et les 4 rondelles (Fig. 5).


Conditions essentielles requises pour le montage : – Prévoir l’alimentation électrique à l’intérieur du tuyau télesco

-

pique – Si votre appareil doit être installé en version Aspirante, prévoir le trou d’évacuation de l’air.

1
2
3
4
5
6
7
8
9
10
11
12
13
14
15
16
17
18
19
20
21
22
23
24
25
26
27
28
Оглавление инструкции
  • Страница 1 из 29
    bedienungsanweisung mit montageanweisungen instructions for INSTALLATION AND use instructions pour l’INSTALLATION ET L’UTILISATION AANWIJZING VOOR GEBRUIK EN INSTALLATIE istruzioni per l’INSTALLAZIONE E L’uso INSTRUCCIONES PARA INSTALACIÓN Y USO INSTRUÇõES DE INSTALAÇÃO Y UTILIZAÇÃO РУКОВОДСТВО ПО
  • Страница 2 из 29
    DEUTSCH Monteurhinweis Bevor das Gerät montiert wird ist eine Funktionsprüfung (Lüftung und Beleuchtung) vorzunehmen. Ebenso muss die Geräteoberfläche auf ästhetische Mängel bzw. Beschädigungen der Oberflächen überprüft werden. Wenn dabei ein Defekt erkennbar ist, darf das Gerät nicht montiert
  • Страница 3 из 29
    erhaltene Block wird am Oberteil der Teleskopstruktur befestigt (Abb. 9), der bereits an der Decke befestigt worden ist (mit den zuvor abgenommenen 4 Schrauben und 4 Unterlegscheiben). Die Höhe der Teleskopstruktur wird mit Hilfe der vier Schrauben (Abb. 9) eingestellt, wobei darauf zu achten ist,
  • Страница 4 из 29
    ausgetauscht werden müssen. Nach der Reinigung den Fettfiltern (und/oder dem Austausch der Kohlenfilter) ist zur Rückstellung des Stundenzählers die Taste E (RESET) während der Anzeige des Filteralarms zu drücken. SENSIBILITÄT DES GAS-SENSORS: Die Sensibilität des Gas-Sensors kann entsprechend den
  • Страница 5 из 29
    ASSEMBLY Ducting version: Using the specific drilling template, make holes for fixing to the ceiling in the vertical part of your cooking top; observe all indications for the final positioning of the appliance. Bear in mind that one of the two axes of the template must correspond with the axis of
  • Страница 6 из 29
    C) Reduces the motor speed until reaching minimum. If pressed for 2”, the motor is switched off. If pressed for 2” when the Filter Alarm is active, the HOUR counter is reset. D) Starts the motor and increases the speed until reaching maximum E) Activates/deactivates the sensor (AUTOMATIC or MANUAL
  • Страница 7 из 29
    Pour obtenir des conditions optimales, vous devez, pour ce qui concerne la version aspirante, employer un tuyau d’évacuation qui ait: une longueur suffisante, le moins de courbes possible (l’angle maximum des courbes ne doit pas dépasser 90°), soit fait d’une matière approuvée par la loi (qui peut
  • Страница 8 из 29
    N’oubliez pas que pour la version recyclage, il faut le filtre à charbon ; vérifier s’il est déjà monté et le cas échéant installer le filtre à charbon après avoir enlevé les dispositifs de blocage filtres “A” (Fig.17).Remontez le filtre à graisse. FonCTIONNEMENT COMMANDES (Fig.18): A) Eteint et
  • Страница 9 из 29
    In de afzuigversie worden de kookluchtjes en –dampen via een afvoerpijp door de muur of het plafond rechtstreeks naar buiten geleid (Afb. 2). INSTALLATIE LET OP: Dit apparaat moet door minstens 3 personen gemonteerd worden. De installatie kan het beste overgelaten worden aan vakmensen. Bovendien
  • Страница 10 из 29
    van de afzuigkap. Tijdens deze handeling, wordt de elektrische voeding door de opening in de structuur geleid (Afb.6). Monteer de flens unit op het bovenste deel van de structuur en bevestig deze m.b.v. 2 meegeleverde bouten (Afb.6A). Monteer de onderste flens unit op het bovenste deel van de
  • Страница 11 из 29
    een neutraal schoonmaakproduct. Koolstoffilters: ingeval van een filtreerversie, moet de koolstoffilter regelmatig vervangen worden, met name wanneer het relatieve filteralarm verschijnt. Voor de aanwijzingen over het filteralarm, raadpleeg de paragraaf Bedieningselementen. Demontage van de
  • Страница 12 из 29
    rondelle tolte in precedenza). Regolate l’altezza della struttura telescopica tramite le quattro viti (Fig. 9) tenendo conto che la distanza della cappa dal piano cottura deve essere minimo 650 mm. (Fig.10). Tramite le aperture della struttura telescopica, fissare il tubo evacuazione aria alla
  • Страница 13 из 29
    Per modificare tale sensibilità, l’apparecchio deve trovarsi in modalità manuale (cioè il Led L2 deve essere spento); se cosi’ non fosse, premere il tasto E. Modificare la sensibilità premendo contemporaneamente il tasto D ed il tasto E. Verrà evidenziata la sensibilità impostata tramite i 4 led
  • Страница 14 из 29
    Desmonte el conjunto de la brida, desde la parte superior de la estructura, por medio de los 2 tornillos (Fig.6). Fije al techo la parte superior de la estructura telescópica mediante los 4 tornillos y tacos suministrados (Fig. 6); preste atención porque el emplazamiento de la estructura determina
  • Страница 15 из 29
    L2 encendido. Los led L1 indican la velocidad en funcionamiento. L1) Los 4 led VERDES indican la velocidad en funcionamiento. L2) Cuando el led está VERDE indica el modo AUTOMÁTICO. Cuando está apagado, indica el modo MANUAL. Cuando el led está ROJO, indica la Alarma de filtros. ALARMA DE FILTROS:
  • Страница 16 из 29
    e bem estável. Antes de passar às operações de montagem, para que o aparelho possa ser mais facilmente manipulado retirar o filtro anti-gordura: empurrar o manípulo em direcção ao exterior e tirar o filtro para baixo (Fig. 3). Desmontar também a moldura metálica retirando os 4 parafusos de fixação
  • Страница 17 из 29
    anteriormente retiradas). Regular a altura da estrutura telescópica através dos quatro parafusos (Fig. 9) tendo em conta que a distância do exaustor ao fogão deve ser no mínimo 650 mm. (Fig.10). Através das aberturas da estrutura telescópica, prender o tubo de evacuação do ar à flange mediante uma
  • Страница 18 из 29
    РУССКИЙ ОПИСАНИЕ Данная вытяжка снабжена полностью автоматической системой (Advanced Sensor Control), которая используется для управления всеми функциями прибора. Благодаря системе Advanced Sensor Control можно без вмешательства пользователя непрерывно поддерживать чистоту кухонного воздуха и
  • Страница 19 из 29
    Аналогичным образом надеть нижнюю трубу; передвинуть ее наверх и закрепить 4 винтами (рис. 13). Установить металлическую раму, снятую в начале установки (рис. 4). Обратить внимание на направление установки, поскольку отверстия “A” (рис. 4) должны соответствовать расположению датчика, установленного
  • Страница 20 из 29
    прибора (RESET) необходимо нажать кнопку E во время отображения аварийного сигнала фильтров. ЧУВСТВИТЕЛЬНОСТЬ ДАТЧИКА ГАЗА: чувствительность датчика может быть изменена в зависимости от потребностей. Чтобы изменить чувствительность, прибор должен находиться в ручном режиме работы (то есть индикатор
  • Страница 21 из 29
    21
  • Страница 22 из 29
    1 2 A 3 4 B 22
  • Страница 23 из 29
    4 4 4 4D 23
  • Страница 24 из 29
    5 6 FRONTAL PART VORDERTEIL PARTIE AVANT Parte frontale PARTE FRONTAL PARTE FRONTAL VOORAANZICHT ПЕРЕДНЯЯ ЧАСТЬ 6A 6B 24
  • Страница 25 из 29
    7 8 9 10 11 12 min 65 cm 25
  • Страница 26 из 29
    13 14 15 26 16
  • Страница 27 из 29
    17 18 1 2 3 4 O / S OFF/- O /OFF O /OFF 19 A B 27
  • Страница 28 из 29
    04308098/1
  • Страница 29 из 29