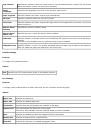
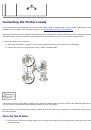
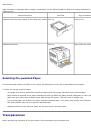
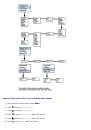
Setting Up for Shared Printing
You can share your new printer on the network using the
Drivers and Utilities
CD that shipped with your printer, or using
Microsoft's point and print or peer-to-peer method. However, if you use one of the Microsoft methods, you will not have all of
the features, such as the status monitor and other printer utilities, that are installed with the
Drivers and Utilities
CD.
To share a locally-attached printer on the network, you need to share the printer, and then install the shared printer on
network clients:
1. Click
Start
®
Settings
®
Printers
.
2. Right-click this printer icon and select
Properties
.
3. From the
Sharing
tab, check the
Shared
check box, and then type a name in the
Shared as
text box.
4. Click
Additional Drivers
and select the operating systems of all network clients printing to this printer.
5. Click
OK
.
If you are missing files, you are prompted to insert the server operating system CD.
To check that the printer was successfully shared:
Make sure the printer object in the
Printers
folder shows it is shared. For example, in Windows 2000, a hand is shown
underneath the printer icon.
Browse
Network Neighborhood
. Find the host name of the server and look for the shared name you assigned to the
printer.
Now that the printer is shared, you can install the printer on network clients using the point and print method or the peer-to-
peer method.
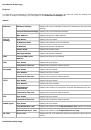
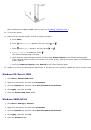
Point and Print
This method is usually the best use of system resources. The server handles driver modifications and print job processing.
This lets network clients return to their programs much faster.
If you use the point and print method, a subset of driver information is copied from the server to the client computer. This is
just enough information to send a print job to the printer.
1. On the Windows desktop of the client computer, double-click
Network Neighborhood
.
2. Locate the host name of the server computer, and then double-click the host name.
3. Right-click the shared printer name, and then click
Install
.
Wait for the driver information to copy from the server computer to the client computer, and for a new printer object
to be added to the
Printers
folder. The time this takes varies, based on network traffic and other factors.
Close
Network Neighborhood
.
4. Print a test page to verify print installation.
5. Click
Start
®
Settings
®
Printers
.
6. Select the printer you just created.
 1
1
 2
2
 3
3
 4
4
 5
5
 6
6
 7
7
 8
8
 9
9
 10
10
 11
11
 12
12
 13
13
 14
14
 15
15
 16
16
 17
17
 18
18
 19
19
 20
20
 21
21
 22
22
 23
23
 24
24
 25
25
 26
26
 27
27
 28
28
 29
29
 30
30
 31
31
 32
32
 33
33
 34
34
 35
35
 36
36
 37
37
 38
38
 39
39
 40
40
 41
41
 42
42
 43
43
 44
44
 45
45
 46
46
 47
47
 48
48
 49
49
 50
50
 51
51
 52
52
 53
53
 54
54
 55
55
 56
56
 57
57
 58
58
 59
59
 60
60
 61
61
 62
62
 63
63
 64
64
 65
65
 66
66
 67
67
 68
68
 69
69
 70
70
 71
71
 72
72
 73
73
 74
74
 75
75
 76
76
 77
77
 78
78
 79
79
 80
80
 81
81
 82
82
 83
83
 84
84
 85
85
 86
86
 87
87
 88
88
 89
89
 90
90
 91
91
 92
92
 93
93
 94
94
 95
95
 96
96
 97
97
 98
98
 99
99
 100
100
 101
101
 102
102
 103
103
 104
104
 105
105
 106
106
 107
107
 108
108
 109
109
 110
110
 111
111
 112
112
 113
113
 114
114
 115
115
 116
116
 117
117
 118
118
 119
119
 120
120
 121
121
 122
122
 123
123
 124
124
 125
125
 126
126
 127
127
 128
128
 129
129
 130
130
 131
131
 132
132
 133
133
 134
134
 135
135
 136
136
 137
137
 138
138
 139
139
 140
140
 141
141
 142
142
 143
143
 144
144
 145
145
 146
146
 147
147
 148
148
 149
149
 150
150
 151
151
 152
152
 153
153
 154
154
 155
155
 156
156
 157
157
 158
158
 159
159
 160
160
 161
161
 162
162
 163
163
 164
164
 165
165
 166
166
 167
167
 168
168
 169
169
 170
170
 171
171
 172
172
 173
173
 174
174
 175
175
 176
176
 177
177
 178
178
 179
179
 180
180
 181
181
 182
182
 183
183
 184
184
 185
185
 186
186
 187
187
 188
188
 189
189
 190
190
 191
191
 192
192
 193
193
 194
194
Инструкции и руководства похожие на DELL 3000cn