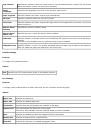
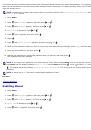
11. Now press
MENU
to get back to
Tray Settings/Paper Size
.
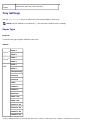
12. Press to get to
Paper Type
.
13. Press to select
Paper Type
.
14. Press to get to
Tray 2
.
15. Press to select
Tray 2
.
16. Using and , select the appropriate paper type (Plain 1).
17. Press
SELECT
, once Plain 1 is displayed on the lower line.
18. Now we have the Tray 2 Type set to Plain 1.
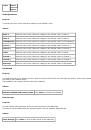
19. Now press
MENU
to get back to
Ready to Print
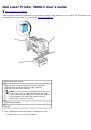
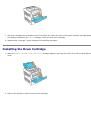
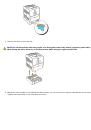
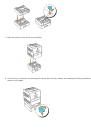
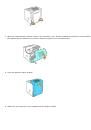
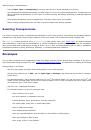
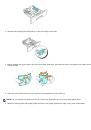
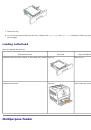
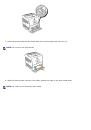
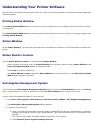
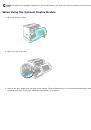
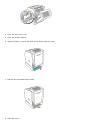
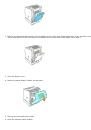
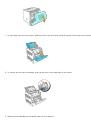
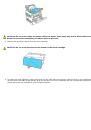
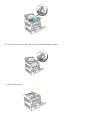
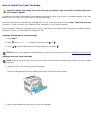
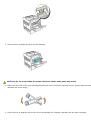
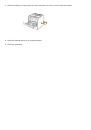
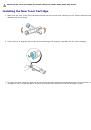
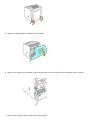
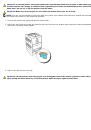
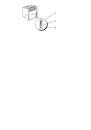
20. Now insert the Letter-sized stack of paper into the
Tray 2
.
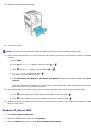
21. On the screen
Tray 2/Letter
will appear. (ONLY ON 3x00cn)
22. Press
SELECT
to confirm this. (ONLY ON 3x00cn)
23. Now on the screen
Tray 2/Plain 1
will appear.
24. Press
SELECT
to confirm this.
25. We now have all the hardware settings on the printer correct
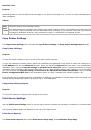
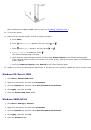
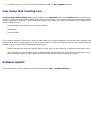
Now, all software settings screen shots are from WORD, this was done in Word. However if in any application, you go
File
®
and then click the
Properties
button, you will get this same driver properties window.
26. Open up Word and create a new document.
27. Go to
File
®
.
28. Select the
Dell Color Laser Printer
from the printers list
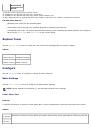
29. Click the
Properties
button to the right.
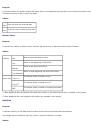
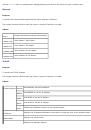
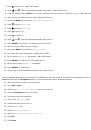
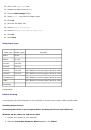
30. This brings up Driver Properties.
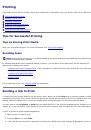
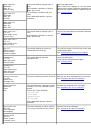
31. Click on the
Paper Tray
Tab.
32. Change the Paper Source to
Tray 2
.
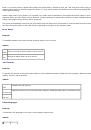
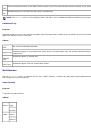
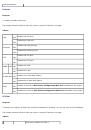
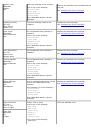
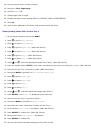
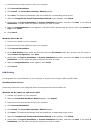
33. Click the
Paper
Tab.
34. Select in
paper size
,
Letter
.
35. Select for
Output Size
,
Same as Paper Size
.
36. Click
OK
.
37. Click
Close
.
38. Now the printer driver is setup correctly.
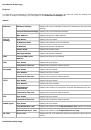
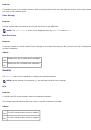
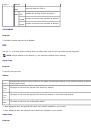
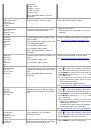
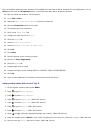
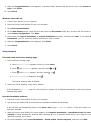
39. Now go to
File
®
Page Setup
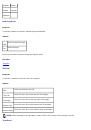
.
40. Click the
Paper
Tab.
41. Change Paper Size to Legal.
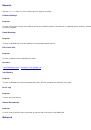
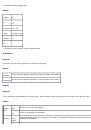
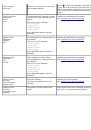
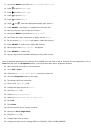
42. Change the Paper source settings BOTH to "DEFAULT TRAY AS PER PRINTER".
 1
1
 2
2
 3
3
 4
4
 5
5
 6
6
 7
7
 8
8
 9
9
 10
10
 11
11
 12
12
 13
13
 14
14
 15
15
 16
16
 17
17
 18
18
 19
19
 20
20
 21
21
 22
22
 23
23
 24
24
 25
25
 26
26
 27
27
 28
28
 29
29
 30
30
 31
31
 32
32
 33
33
 34
34
 35
35
 36
36
 37
37
 38
38
 39
39
 40
40
 41
41
 42
42
 43
43
 44
44
 45
45
 46
46
 47
47
 48
48
 49
49
 50
50
 51
51
 52
52
 53
53
 54
54
 55
55
 56
56
 57
57
 58
58
 59
59
 60
60
 61
61
 62
62
 63
63
 64
64
 65
65
 66
66
 67
67
 68
68
 69
69
 70
70
 71
71
 72
72
 73
73
 74
74
 75
75
 76
76
 77
77
 78
78
 79
79
 80
80
 81
81
 82
82
 83
83
 84
84
 85
85
 86
86
 87
87
 88
88
 89
89
 90
90
 91
91
 92
92
 93
93
 94
94
 95
95
 96
96
 97
97
 98
98
 99
99
 100
100
 101
101
 102
102
 103
103
 104
104
 105
105
 106
106
 107
107
 108
108
 109
109
 110
110
 111
111
 112
112
 113
113
 114
114
 115
115
 116
116
 117
117
 118
118
 119
119
 120
120
 121
121
 122
122
 123
123
 124
124
 125
125
 126
126
 127
127
 128
128
 129
129
 130
130
 131
131
 132
132
 133
133
 134
134
 135
135
 136
136
 137
137
 138
138
 139
139
 140
140
 141
141
 142
142
 143
143
 144
144
 145
145
 146
146
 147
147
 148
148
 149
149
 150
150
 151
151
 152
152
 153
153
 154
154
 155
155
 156
156
 157
157
 158
158
 159
159
 160
160
 161
161
 162
162
 163
163
 164
164
 165
165
 166
166
 167
167
 168
168
 169
169
 170
170
 171
171
 172
172
 173
173
 174
174
 175
175
 176
176
 177
177
 178
178
 179
179
 180
180
 181
181
 182
182
 183
183
 184
184
 185
185
 186
186
 187
187
 188
188
 189
189
 190
190
 191
191
 192
192
 193
193
 194
194