Using the Printer
43
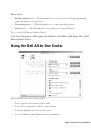
E-mailing a Scanned Image or Document
To send scanned images or documents through e-mail:
1
Turn on your computer and printer, and make sure they are connected.
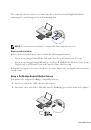
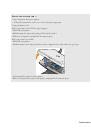
2
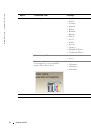
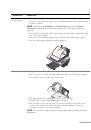
Open the top cover.
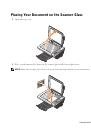
3
Place your document or photo on the scanner glass and make sure the upper left corner
aligns with the arrow on the printer. For more information, see "Placing Your Document on
the Scanner Glass" on page 31.
4
Close the top cover.
5
Click Start
→
Programs or All Programs
→
Dell Printers
→
Dell Photo AIO Printer
942
→
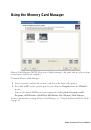
Dell All-In-One Center.
The Dell All-In-One Center appears.
6
Click Preview Now.
7
In the Creative Tasks section, click E-mail an image to a friend.
8
In the What is being scanned? menu, make a selection.
9
Follow the instructions on the screen to prepare the photograph for e-mail.
10
Click Next.
11
Open your e-mail program, write a note to accompany the attached photo, and then send
it.
NOTE:
If you have questions about how to do this, consult the
Help for your e-mail program.
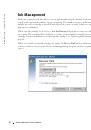
Faxing
To send a fax using this printer, you need to have the printer attached to a computer which is
equipped with a modem and has Microsoft Fax installed. Before you do anything else, check to
see that the Microsoft Fax software is on your computer:
Click Start
→
Programs or All Programs
→
Accessories
→
Communications.
For Windows XP:
•
If you see Fax in the list that appears, you have Microsoft Fax on your computer. Continue
with "Configuring Microsoft Fax Console (Windows XP) or Fax Service Management
(Windows 2000)" on page 44.
If you do not see Fax in the list that appears, continue with "Installing Microsoft Fax
Console in Windows XP" on page 44.
 1
1
 2
2
 3
3
 4
4
 5
5
 6
6
 7
7
 8
8
 9
9
 10
10
 11
11
 12
12
 13
13
 14
14
 15
15
 16
16
 17
17
 18
18
 19
19
 20
20
 21
21
 22
22
 23
23
 24
24
 25
25
 26
26
 27
27
 28
28
 29
29
 30
30
 31
31
 32
32
 33
33
 34
34
 35
35
 36
36
 37
37
 38
38
 39
39
 40
40
 41
41
 42
42
 43
43
 44
44
 45
45
 46
46
 47
47
 48
48
 49
49
 50
50
 51
51
 52
52
 53
53
 54
54
 55
55
 56
56
 57
57
 58
58
 59
59
 60
60
 61
61
 62
62
 63
63
 64
64
 65
65
 66
66
 67
67
 68
68
 69
69
 70
70
 71
71
 72
72
 73
73
 74
74
 75
75
 76
76
 77
77
 78
78
 79
79
 80
80
 81
81
 82
82
 83
83
 84
84
 85
85
 86
86
 87
87
 88
88
 89
89
 90
90
 91
91
 92
92
 93
93
 94
94
 95
95
 96
96
 97
97
 98
98
 99
99
 100
100
 101
101
 102
102
 103
103
 104
104
 105
105
 106
106
 107
107
 108
108
Инструкции и руководства похожие на DELL 942