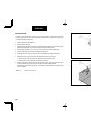
Страница 2 из 73 ENGLISH "IMPORTANT SAFETY INSTRUCTIONS" "When using an electrical appliance, basic safety precautions should always be followed, including the following." "Read all instructions before using this sewing machine." "DANGER- To reduce the risk of electric shock: " 1. "This sewing machine should never
Страница 3 из 73 SUOMI ENGLISH TABLE OF CONTENTS 1. KNOWING YOUR MACHINE Identification chart Accessories Setting up your machine Preparation for threading Lint tray, Cutting width gauge Thread cutter, Changing presser feet Changing needle, thread and fabric chart 2. STARTING TO SEW Threading your machine Helpful
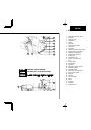
Страница 4 из 73 ENGLISH 1. KNOWING YOUR MACHINE IDENTIFICATION CHART 1. Foot pressure regulator 2. Sewing light 3. Presser foot lever 4. Thread cutter 5. Needle plate 6. Presser foot 7. Overedge cutting width dial 8. Working table 9. Thread guide pole 10. Left needle thread tension control 11. Right needle thread
Страница 5 из 73 SUOMI 1. KONEEN OSAT 22 23 24 25 26 27 20 21 28 WORKING TABLE OPENED SUOJAKOTELO JA ETULEVY AUKI 30 29 30 1. 2. 3. 4. 5. 6. 7. 8. 9. 10. 11. 12. 13. 14. 15. 16. 17. 18. 19. 20. 21. 22. 23. 24. 25. 26. 27. 28. 29. 30. 31. 32. Paininjalan puristuksen säädin Ompeluvalo Paininjalan nostin Lankaleikkuri
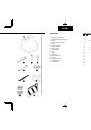
Страница 6 из 73 ENGLISH ACCESSORIES All parts listed may be obtained from your nearest dealer. 1. 2. 3. 4. 5. 6. 7. 8. 9. 10 11. 12. 13. 14. 15. 16. 17. Two-thread convertor Stitch finger (B) (See page 40) Needle set Needle threader (option) Brush Screw driver (small) Tape measure (option) Machine cover Screw
Страница 8 из 73 ENGLISH SETTING UP YOUR MACHINE 1. Wipe off excess oil in the needle plate and bed areas. 2. FOOT CONTROL Push foot control plug into connector socket, and connect the power line plug into power supply outlet. * 3. POWER / LIGHT SWITCH Your machine will not operate unless the power / light switch
Страница 9 из 73 SUOMI SUOMI NEDERLANDS KONEEN ASETTAMINEN OMPELUUN 1. Aseta koneesi tukevalle ja tasaiselle pinnalle. Ennen koneen käyttöä pyyhi ylimääräinen öljy pistolevy- alueelta, öljyä on mahdolliseti valunut kuljetuksen aikana. Ompele koneella ilman lankoja kangastilkulle poistaaksesi liian öljyn koneestasi.
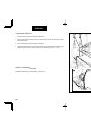
Страница 10 из 73 ENGLISH PREPARATION FOR THREADING THREAD GUIDE POLE Pull up thread guide pole to the highest point until you hear it click. Place thread spools on pins and draw thread through thread guides on the pole from rear to front. Thread guide of pole can hold thread spools on the spool stand by pulling
Страница 11 из 73 SUOMI NEDERLANDS LANKATELINE Vedä lankateline ylimpään asentoon. Aseta lankarullat tappeihin ja vedä langat langanohjaimien läpi takaa eteen. . Säilytyksessä, lankatelineen voi laskea alas ja jättää lankapuolat paikalleen, kuten kuvassa. Kuva * * : Langanohjain : Lankateline . . * * : : 9
Страница 12 из 73 ENGLISH SPOOL CAPS FOR DOMESTIC TYPE SPOOLS * * SPOOL DISC AND SPOOL HOLDERS FOR CONE SPOOLS * For large cone spools use the rubber spool holders with the wide end at the top, and for small ones, use the same rubber spool holders but with the narrow end at the top. * * SPOOL NETS * Polyester or
Страница 13 из 73 SUOMI LANGANOHJAINHATTU Aseta rullien päälle muovinen langanohjainhattu estämään rullien hyppely. . . LANKARULLAN ALUSTAT JA LANKAPUOLAN PIDIKKEET Ota pois lankapuolan pidikkeet. Aseta sen jälkeen lankarullan alustat tappeihin. Kun käytät suuria puolia, aseta lankapuolan pidikkeen leveämpi puoli
Страница 14 из 73 ENGLISH LINT TRAY With the lint tray located in this position, it will collect all your waste material. After completion of work if you then turn tray upwards in direction shown, finger Ref C will locate in slot D and left hand pin will slide into lower hole B. In either position if you gently push
Страница 15 из 73 SUOMI NEDERLANDS ROSKAKAUKALON ASETTAMINEN Aseta kaukalo paikalleen työntämällä kaukalossa oleva tappi suojakotelon lukitsijan alla olevaan reikään. Kaukalon yläreunassa oleva koukku menee etulevyssä olevaan koloon. (Katso kuvaa). Kaukalo kerää leikkuujätteen. , ., . KANKAAN OHJAIN Aseta kankaan
Страница 16 из 73 ENGLISH CHANGING NEEDLE * Raise needle bar to its highest point by turning hand wheel towards you, but leave presser foot down. Loosen needle clamp screw to remove the needle, and place new needle with Flat side Away From You, into the needle bar as far as it will go, and tighten screw.
Страница 17 из 73 SUOMI NEULAN ASETTAMINEN Käännä käsipyörästä neula ylimpään asentoon. Jätä paininjalka alas. Kierrä neulojen kiinnitysruuvi auki. Työnnä neula neulanpitimeen niin pitkälle kuin se menee litteä puoli itsestäsi poispäin. Kiristä ruuvi. Kuva * * : Neulojen kiinnitysruuvi : Litteä puoli itsestäsi
Страница 18 из 73 SUOMI ENGLISH NEEDLE, THREAD AND FABRIC CHART NEULAT, LANGAT JA KANKAAT USe HA Käytä HA 1SP, HA 1(130 / 705H) NeedleS. FABRIC COTTON LINEN WOOL SYNTHETIC FIBRE KNIT 16 THREAD Light weight : Organdy, Lawn, Gingham Cotton No. 100 Heavy weight : Oxford, Denim, Cotton Gaberdine PolyeSter No. 60 - 50
Страница 20 из 73 ENGLISH 2. STARTING TO SEW THREADING YOUR MACHINE 1 Wrong threading may cause skipped stitches, breaking threads, or other problems. Try to master the correct threading before moving on to test sewing. Threading must be carried out in the sequence of Lower Looper-Upper Looper-Needle. Open the front
Страница 21 из 73 SUOMI 2. OMPELUN ALOITTAMINEN LANGOITUS Väärä langoitus voi aiheuttaa hyppytikkiä, langan katkeamisia ym. Opettele langoitus kunnolla ennen ompelemista. , , Langoita seuraavassa järjestyksessä: Alasieppari, yläsieppari ja neulat. Avaa etulevy ja suojakotelo. Nosta neula korkeimpaan asentoonsa
Страница 22 из 73 ENGLISH THREADING UPPER LOOPER 1 1. Feed the thread through the thread guide as illustrated. 2. Pull the upper thread through the slot. Holding the thread with your left hand, pull down with right hand firmly. 3. Draw the thread through the thread guide as illustrated. When threading according to
Страница 23 из 73 SUOMI YLÄSIEPPARIN LANGOITUS 1. Ohjaa lanka langanohjaimen läpi kuten kuvassa. 2. Vedä lanka langankiristimen uraa pitkin alas, kuten kuvassa. 3. Langoita koneessa olevan langoitusohjeen mukaisesti. Kun langoitus on tehty ohjeen mukaan, yläsiepparin lanka menee langanohjaimeen (A) automaattisesti,
Страница 24 из 73 ENGLISH THREADING NEEDLES 1 1. Feed the thread through the thread guide as illustrated. 2. Draw the needle threads through tension slot. Holding the thread with your left hand, pull down with right hand firmly. 3. Draw the thread through the thread guide as illustrated. 4. Thread the needles from
Страница 25 из 73 SUOMI NEULOJEN LANGOITUS 1. Ohjaa lankaa langanohjaimien läpi kuten kuvassa. 1. 2. Vedä langat vasemmanpuoleisiin uriin. kuten kuvassa. 2. ( , , 3. Vedä lanka langanohjaimen läpi, kuten kuvassa. 4. Pujota langat neuloihin edestä ja vedä ommeljalan alle taakse ja jätä lankaa n. 10 cm. 3. 10
Страница 26 из 73 ENGLISH HELPFUL HINTS REPLACING THREAD SPOOLS When replacing thread spools, the following steps may be helpful for quick changeover. 1. Cut off existing threads near the spools. Tie the cut ends thread from new spools as illustrated (seamen's knot). 2. Raise presser foot. 3. Lower needle bar to its
Страница 27 из 73 SUOMI NEDERLANDS HYÖDYLLISIÄ VINKKEJÄ LANKOJEN VAIHTAMINEN Seuraavalla tavalla opit vaihtamaan nopeasti lankapuolat. 1. Katkaise langat kuvan mukaisesti läheltä puolia. sido langanpäät merimiessolmuilla uusiin rulliin. 2. Nosta paininjalka ylös, jolloin langankireys vapautuu. 3. Pyöritä
Страница 28 из 73 ENGLISH TESTING STITCH OVERLOCK STITCHES After threading is completed, use a scrap of fabric that you plan to sew and test to sew in the following order. 1. Gently pulling all the threads to the left, lower the presser foot. Rotate the hand wheel towards you a few times to see if the lock stitches
Страница 29 из 73 SUOMI NEDERLANDS OMPELEMINEN Kun olet langoittanut koneen, kokeile ommelta seuraavasti. 1. Vedä kevyesti kaikki langat vasemmalle ja laske paininjalka. Käännä käsipyörää itseesi päin muutamia kertoja ja tarkista pistojen muodostus. . 1. , . 2. Kokeile ommelta samalle kankaalle, jota aiot käytää.
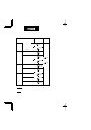
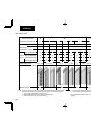
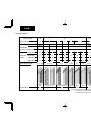
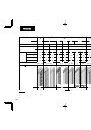
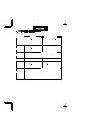
Страница 30 из 73 ENGLISH SETTING CHART Number of threadS 4 Overedge cutting width dial -6- 3 6 4- -5- 2 3 4-6 4 6 -6- 4-6 Left and Right Left Right Left and Right Left Right Left Right -4- -4- - 0- - - - - -4- 0- -4- - TenSion Right needle thread control Upper looper thread -4- - -4- - 0- -4- -4- -4- -4- - - -5 -4-
Страница 31 из 73 SUOMI KONEEN SÄÄDÖT Lankojen määrä 4 3 6 -6- Leikkuu leveyS 4- -5- 2 3 4 4-6 6 -6- 4-6 VaSen ja oikea VaSen Oikea VaSen ja oikea VaSen Oikea VaSen Oikea VaSen neula -4- -4- - 0- - - - - -4- 0- -4- - Oikea neula -4- - -4- - 0- -4- -4- -4- -4- - - -5 YläSieppari -4- -4- -4- -4 -4 -4- -4- -4- - - - -
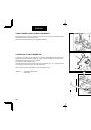
Страница 34 из 73 ENGLISH THREE-THREAD OVERLOCK WITH ONE NEEDLE By threading the LEFT needle only a width of 6 mm will be produced and by threading the RIGHT needle only a width of 3.8 mm will be produced. Please keep the unused needle on the needle pad as illustrated. CONVERTING TO TWO-THREAD USE * 1 To convert to
Страница 35 из 73 SUOMI 3-LANKA OMMEL Jos käytät vasenta neulaa säädä leikkuuleveys 6 mm ja jos käytät oikeaa neulaa, leveys 3,8 mm. säilytä ylimääräinen neula tyynyssä, joka on koneessa etulevyn takana. (kts. kuvaa). 6 , 3.8 - . . 2-LANGAN OMMELMUUNNIN Avaa etulevy. Nosta neula korkeimpaan kääntämällä käsipyörää
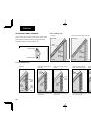
Страница 36 из 73 ENGLISH NARROW AND ROLLED HEM, PICOT STITCH * Narrow and rolled edge is ideal for use on thin materials such as georgette crepe, crepe de chine, silk etc. 1 2 Also, picot stitch can be produced particularly when sewing on fine 'scarflike' materials. In view of the nature of these hems, they are
Страница 37 из 73 SUOMI KAPEA YLILUOTTELU, RULLA PÄÄRME JA SIMPUKKA REUNA " Kapea yliluottelu ja rulla päärme sopivat ohuisiin kankaisiin kuten silkki, kreppi jne. simpukkareuna sopii hyvin "huivimaisiin" kankaisiin. Tämän tyyppiset ompeleet eivät sovi paksuihin tai jäykkiin materiaaleihin. 3. Poista kudontapiikki
Страница 38 из 73 ENGLISH ADJUSTING THREAD TENSIONS TWO-THREAD USE Turning tension dial to a higher number gives a tighter thread tension. Turning tension dial to a lower number gives a looser thread tension. The higher the number, the tighter the tension. JuSt right. Lower looper thread pulled to under Side. Needle
Страница 39 из 73 SUOMI LANGANKIREYDEN SÄÄTÖ KAHDEN-LANGAN KÄYTTÖ Langankireys lisääntyy, kun käännät säädintä alaspäin ja ylöspäin käännettäessä kireys vähenee. Mitä suurempi numero sitä kireämmällä lanka on. Kokeile aina ommelta sille kangaspalalle, jota aiot käyttää. Oikein AlaSiepparin lanka tulee nurjalle
Страница 42 из 73 ENGLISH ADJUSTING STITCH LENGTH Turn the stitch length dial until the required length is reguired. The higher the number, the longer the stitch. This dial can adjust the stitch length from 1 to 5 mm. * * ADJUSTING OVEREDGE CUTTING WIDTH Overedge cutting width can be adjusted from 4 to 7 mm by
Страница 43 из 73 SUOMI PISTONPITUUDEN SÄÄTÖ Pistonpituuden säädin sijaitsee koneen oikeassa päädyssä. . Mitä suurempi säätimessä näkyvä numero on, sitä pidempi on pistonpituus. Pistonpituuden voit säätää välille 1-5 mm. , NO 1 5 . LEIKKUULEVEYDEN SÄÄTÖ 4 Leikkuuleveyttä voit säätää välille 4-7 mm. Leikkuuleveyttä
Страница 44 из 73 ENGLISH DIFFERENTIAL FEED The differential feed has two independent feed dogs, one front (A) and one rear (B). Each feed dog has an individual feed mechanism which enables the feeding of material at a different ratio. B A * POSITIVE DIFFERENTIAL FEED WHEN SET FOR POSITIVE DIFFERENTIAL FEED, the
Страница 45 из 73 SUOMI DIFFERENTIAALI- ELI ERIAIKAISSYÖTTÖ Eriaikaissyöttäjässä on kaksi eri syötintä, jotka syöttävät kangasta eri pituisen matkan. syöttäjä tekee yhden täydellisen liikesarjan jokaisen piston muodostamisessa. 2- , , , . RYPYTTÄVÄ SYÖTTÖ Syöttäjän etuosa (A) tekee pidemmän liikkeen kuin takimmainen
Страница 46 из 73 ENGLISH SETTING DIFFERENTIAL FEED Set by simply turning the differential feed control dial in the direction desired referring to the chart below. * The adjustment can be made between 0.7 (negative effect) and 2 (Positive effect). These settings give the best ratio of feeding. For normal sewing, the
Страница 47 из 73 SUOMI NEDERLANDS DIFFERENTIAALISYÖTÖN SÄÄTÖ Aseta säädin haluttuun kohtaan käyttäen ohjeena alla olevaa taulukkoa. Voit säätää syöttöä 0,7-2,0 välillä. Normaalisyöttö, aseta säädin kohtaan 1. Voit säätää differentiaalisyöttöä myös ompelun aikana. Jos syöttösäädin on asennossa 2, piston pituus ei
Страница 48 из 73 ENGLISH BASIC TECHNIQUES TURNING OUTSIDE CORNERS WITHOUT CUTTING THREADS 1. When you reach the fabric edge, stop stitching with the needle above the fabric. 2. Raise the presser foot and gently pull on the thread chain just enough to clear the stitch finger. 3. Turn the fabric, lower the presser
Страница 49 из 73 SUOMI NEDERLANDS OMPELEMINEN KÄÄNTYMINEN KULMASSA (LANKOJA EI KATKAISTA) 1. Kun olet tullut kankaan kulmaan, jätä neula yläasentoon. 2. Nosta paininjalkaa ja vedä lankoja kevyesti. 3. Käännä kangas, laske jalka ja aloita kulman toisen sivun ompelu. (Kuva 1). HUOM : Jos saumaat ja leikkaat
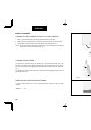
Страница 50 из 73 ENGLISH CORDED OVERLOCK Corded overlock can be used to strengthen shoulder, sleeve or side seams when joining or making up knitted garments. As a decorative feature you can use knitting yarn of contrasting colours to further enhance your garment. Your machine is equipped with a presser foot which
Страница 51 из 73 SUOMI TUKILANGAN KÄYTTÖ Tukilankaa käytetään olka-, hiha- ja sivusaumojen vahvisteena ommeltaessa esim. neuleita sekä rypytyksessä. 1. Kiinnitä tukilanganohjain (1) lankatelineeseen. Kuva 1. . : 1. 4. Aseta kangas normaalisti ja ompele aluksi hitaasti seuraten tukilankaa. 2. OLKAPÄÄT JA HIHOJEN
Страница 52 из 73 ENGLISH DECORATIVE EFFECTS In addition to normal overlocking which is fully described in this instruction book, your machine can also be used for a number of decorative applications such as decorative top-stitching, butted seams, pin-tucking or making lengths of decorative braid. see below. Fig. A
Страница 53 из 73 SUOMI NEDERLANDS KORISTELU Saumauksen lisäksi koneellasi voi tehdä erilaisia koristetöitä: aplikointia, tilkkutöitä, koristetikkauksia, koristelaskoksia, punosta ym. , , KORISTETIKKAUS / 2-LANKAA tai 3-LANKAA (avattava tasosauma) . ( Taita kangas kaksinkerroin, siitä mihin kohtaan haluat
Страница 54 из 73 ENGLISH DIFFERENTIAL FEED APPLICATIONS Please refer to pages 42 - 45 DIFFERENTIAL FEED. Differential feed is designed to minimize puckering and wavering. It is also very effective for gathering. 1. Puckering Puckering tends to occur on woven or sheer fabrics. To obtain pucker-free seams, set the
Страница 55 из 73 SUOMI DIFFERENTIAALISYÖTÖN ELI TUPLASYÖTÖN KÄYTTÖMAHDOLLISUUKSIA Katso sivut 42 - 45 differentiaali syöttö. Jos saumauskoneessa ei ole differentiaalisyöttäjää kangas voi rypistyä tai kankaan reuna voi venyä. Differentiaalisyöttöä voi myös käyttää kankaan poimutuksessa. 42 - 45 . . 1. " 1 ". 1.
Страница 56 из 73 ENGLISH 3. CARING FOR YOUR MACHINE REPLACING MOVING CUTTER * * Replace a moving cutter if it becomes blunt as follows. A spare cutter will be found in your accessories. NOTE : You should not need to replace fixed cutter, which is made of a special hard alloy material. FIRST REMOVE THE POWER PLUG
Страница 57 из 73 SUOMI 3. KONEEN HUOLTO YLÄTERÄN VAIHTO Jos yläterä on tylsynyt, vaihda se tarvikelaatikossa olevaan varaterään. Huom. Terän voi myös teroituttaa. . : Ensin irrota pistoke seinäpistorasiasta. , . . 1. Avaa suojakotelo. Avaa yläterän ruuvi ja ota kulunut terä pois. 2. Sulje suojakotelo. Laske
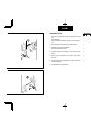
Страница 58 из 73 ENGLISH CLEANING AND OILING To keep the machine running smoothly, keep it clean and lubricated at all times. * FIRST DISCONNECT MACHINE FROM POWER SUPPLY BY REMOVING PLUG FROM SOCKET-OUTLET. * 1. Open the front cover and working table. Using the brush provided, remove dust and lint that have
Страница 59 из 73 SUOMI NEDERLANDS KONEEN PUHDISTUS JA ÖLJYÄMINEN Jotta koneesi toimisi moitteettomasti, on syytä öljytä se säännöllisesti. Irrota ensin koneen johto seinäpistorasiasta. 1. Avaa etu- ja suojalevyt. Puhdista harjalla nukka ja pöly koneen sisältä. (Pölynimuri on kätevä). 2. Käännä kone selälleen ja
Страница 60 из 73 ENGLISH SUOMI 4. CHECKING PERFORMANCE PROBLEMS PROBLEM Irregular StitcheS Breaking Needle Puckering Wavering Skipping StitcheS Breaking ThreadS 58 PROBABLE CAUSE CORRECTION Incorrect Thread TenSion(S). Incorrect Size Needle. ReSet Thread TenSion(S). ChooSe correct Size Needle for Thread and Fabric.
Страница 62 из 73 ENGLISH 5. OPTIONAL ACCESSORIES BLIND HEM FOOT Blind hem feet are obtainable as an optional extra and are available in two sizes. 0.5 for fine-medium fabrics and 1.0 for medium/ heavy fabrics. Fit the appropriate foot. Set the stitch length 4 - 5. Now proceed as follows : 1. Turn up the hem to the
Страница 63 из 73 SUOMI NEDERLANDS 5. LISÄVARUSTEITA PIILO-OMMELJALKA Lisävarusteena EVA-saumariin on saatavana kaksi erilaista piilo-ommeljalkaa. Toinen niistä on tarkoitettu ohuille ja toinen paksuille kankaille. Vaihda normaali paininjalka sopivaan piilo-ommeljalkaan. Säädä piston pituus välille 4 - 5. Aseta
Страница 64 из 73 ENGLISH ELASTICATOR An elastic foot is available as an optional extra. This foot will guide your elastic and at the same time apply pressure to the elastic with our specially designed tension controlled roller, allowing you to control the elasticity while sewing. 1. Replace regular foot with
Страница 65 из 73 SUOMI KUMINAUHAN KIINNITTÄMINEN ERIKOISPAININJALAN AVULLA 1. Vaihda koneeseen erikoispaininjalka. , , 2. Aseta pistonpituus asentoon 4. . 3. Nosta jalan rullaosaa kevyesti ja aseta kuminauha rullan ja tuen väliin (katso kuva), kunnes nauhan reuna on syöttäjän hampaiden kohdalla. 1. 2. 4. Ompele
Страница 66 из 73 ENGLISH PIPING FOOT Prepare a piece of ready-made piping (corded bias fold tape). Place folded piping between seam edges with fold extending beyond seam line toward garment. Pin or baste, and stitch the seam. Braid or ribbon may also be used, either flat or folded braid can be used in straight
Страница 67 из 73 SUOMI TERENAUHAN KIINNITYSJALKA Aseta terenauha kankaiden väliin kaikki reunat vastakkain. Ompele sauma aivan teren vierestä jolloin vain tere näkyy kankaan oikealla puolella. Ohjaa ompelua kuvan mukaisesti. ( , Jalan pohjassa oleva tereura helpottaa ohjaamista. Terenauhaa voit käyttää koristeena
Страница 68 из 73 ENGLISH GATHERING/SHIRRING FOOT 1. Tension settings for gathering : Left needle 4 Right needle 4 Upper looper 4 Lower looper 4 Differential feed 2.0 stitch length 4 2. Replace regular presser foot with gathering foot. 3. Clip both fabric layers approximately 5/8"(1.5 cm.) inside and 1 1/2"(4 cm.)
Страница 69 из 73 SUOMI RYPYTYSJALKA 1. Koneen säädöt Vasen neula Oikea neula Yläsieppari Alasieppari 1. 4 4 4 4 : Differentiaalisyöttö 2.0 Ommelpituus 4 -4 -4 -4 -4 2. Vaihda rypytysjalka koneeseen. 3. Leikkaa kangasta (kts kuva) n. 1,5 cm, että saat kankaat paininjalan alle neuloihin saakka, silloin n. 4 cm jää
Страница 70 из 73 ENGLISH NEEDLE THREADER 1. Feed the thread through the thread guide of needle clamp as illustrated. Raise the presser foot. Raise the needle bar to highest position, and pull the thread leaving about 4 (10 cm) clear. 1 3 2 5 4 2. Lower the presser foot. set the needle threader ensuring the hooking
Страница 71 из 73 SUOMI LANGANPUJOTIN 6 1. Vedä lanka neulatangossa olevaan langanohjaimeen. (Kts kuva) Nosta paininjalka. Nosta neulat lähes korkeimpaan asentoon ja vedä lankaa n. 10 cm. 1. 2. Laske paininjalka. Aseta langanpujotin kuten kuvassa. 2. 3. Pidä lanka ja langanpujotin kädessäsi. Käännä pujotinta kuten
Страница 72 из 73 ENGLISH SUOMI This appliance complies Sähkömagneettinen with EEC Directive yhteensopivuus EEC-direktiivin 89 / 336 / EEC covering the 89/336/ electromagnetic compatibility. EEC mukainen. 89/336/ . Part No. 69881 7 / 97