52
GW29-033_v01
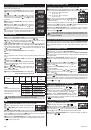
Cleaning, maintenance and operation
1
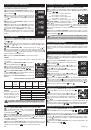
Turn off and unplug the microwave oven before cleaning.
2
Keep the inside of the microwave oven clean. If necessary, remove food deposits or
spilled liquid from the oven walls with a damp cloth. Use a mild detergent to remove heavy
soil. Do not use spray cleaners and other strong cleaning agents as they may stain, streak
or tarnish the surface of the oven and door.
3
Clean the outside surface of the oven with a damp cloth.
In order to avoid damaging the components inside the oven make sure that water does not
penetrate the inside of the oven through the ventilation openings.
4
Regularly wipe both sides of the oven door and window, door seals and neighbouring
parts with a damp cloth to remove food deposits or spilled liquid.
Do not use abrasive cleaners.
When cleaning the door seals, recesses and adjacent parts, it is forbidden
to use any substances that can damage the sealing and cause microwave
leakage.
5
For cleaning the oven housing, do not use abrasive cleaners such as emulsions, cream
cleaners, polishes, etc. They may remove the graphic information symbols such as scales,
marks, warning signs, etc.
6
Do not allow the control panel to moisten. To clean it use a soft, damp cloth. In order to
avoid accidental starting of the oven clean the control panel with the door open.
7
When condensed water vapour begins to appear on the inside or outside of the door,
wipe it with a soft cloth.
Condensation may occur when the microwave oven is operating under high humidity
conditions. In such a case it is a normal situation.
8
From time to time, take out and clean the glass tray. Wash it in warm water with an
addition of washing-up liquid or in a dishwasher.
9
Regularly clean the turntable ring and the bottom of the microwave oven to prevent
noise. Clean the bottom surface with a mild detergent. Wash the turntable ring in water with
an addition of washing-up liquid or in the dishwasher. When replacing the turntable ring
make sure to position it properly.
10
In order to get rid of unpleasant odours inside the microwave oven, boil about 200 ml of
water with lemon juice and lemon peel in a microwave-safe bowl for 5 minutes.
Wipe the inside of the microwave oven thoroughly by means of a dry, soft cloth.
11
When it is necessary to replace the inside light bulb, call a SERVICE CENTRE.
12
Regularly clean the microwave oven and remove food deposits.
Failure to follow the above instructions may lead to a degradation of the
surface which may affect the service life of the appliance and lead to
a dangerous situation.
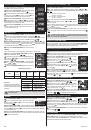
Technical parameters
Technical parameters of the appliance 230 V~ 50 Hz, 1150 W (Microwaves) 1000 W (Grill)
Rated input power (microwaves)
700 W
Frequency
2450 MHz
External dimensions (mm)
320 (H) x 382 (W) x 595 (D)
Internal dimensions (mm)
280 (H) x 195 (W) x 280 (D)
Oven capacity
17 liters
Turntable
Diameter = 245 mm
Net weight
About 13.5 kg
*
The above parameters are subject to change therefore the user should verify them with
the information on the rating label. Any customer complaints regarding errors in these
parameters shall not be considered.
Technical data
ZELMER microwave ovens comply with the requirements of applicable standards.
The appliance meets the requirements of the following directives:
Low Voltage Directive (LVD) – 2006/95/EC.
–
Electromagnetic Compatibility (EMC) – 2004/108/EC.
–
The product is marked with CE symbol on the rating plate.
Microwave cooking – tips
1
Carefully arrange the food. Place the thickest pieces next to the edges of the dish.
2
Check the cooking time. Cook for the shortest time indicated and if necessary extend
the cooking time. Heavily burned products may generate smoke or catch
fi
re.
3
Cover the food while cooking. The cover shall prevent the food from “splashing out”
and ensure even cooking.
4
During cooking turn products over in order to speed up the cooking process of such foods
as chicken or hamburgers. Turn over large products such as roast meat at least once.
5
Halfway through the cooking time change the arrangement of food products such as
meatballs. The products placed on the top should be moved to the bottom and those in the
middle should be moved towards the edges of the dish.
Protective functions
Extended fan operation
In case of cooking for 5 or more minutes, the microwave oven will automatically switch off
after the end of the cooking time, however, the fan will keep on operating for another 15
seconds.
Inside light automatic switch off
The inside light switches on after opening the door. If the door is open longer than 10
minutes without performing any actions, the light will be automatically switched off.
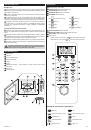
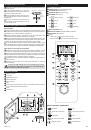
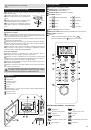
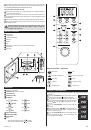
CHILD LOCK – security against child access
Child lock:
In the standby mode press and hold the
STOP/CANCEL
button for 3 seconds.
You will hear a long beep indicating that the child lock has been set. The
symbol will
appear on the display.
To unblock the oven:
Press and hold the
STOP/CANCEL
button for 3 seconds. You will
hear a long beep indicating that the microwave oven has been unblocked.
Kitchen utensils – tips
Use utensils suitable for use in microwave ovens. A container made of transparent material
is ideal for use in microwave ovens as the microwaves can easily penetrate through it in
order to heat the food.
1
Do not use metal utensils or dishes with metal trims – microwaves do not penetrate
through metal.
2
Before cooking in the microwave oven remove wrappings made of recycled paper, as
they may contain metal particles which may cause sparking and/or
fi
re.
3
We recommend using oval/ round dishes rather than square/ rectangular ones, as food
in the corners of the dish gets burned more often.
4
When grilling, protect the exposed areas from getting burned by covering them with
narrow strips of aluminium foil. Remember to avoid the excess of foil and maintain the
distance of minimum 3 cm between the foil and the oven internal walls.
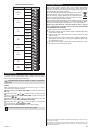
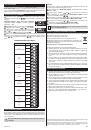
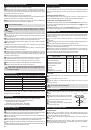
The list below will facilitate the choice of the right dishes and utensils.
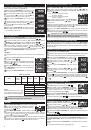
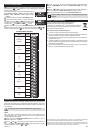
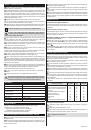
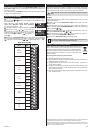
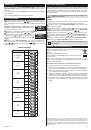
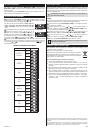
Kitchen utensils
Microwaves
Grill
Combination
mode
Heat-resistant glass
Non-heat-resistant glass
Heat-resistant ceramic utensils
Microwave safe plastic dishes
Parchment paper
Metal tray
Metal gridiron
Aluminum foil and foil containers
Yes
No
Yes
Yes
Yes
No
No
No
Yes
No
Yes
No
No
Yes
Yes
Yes
Yes
No
Yes
No
No
No
No
No
Utensil test:
1
Fill a dish/ container with 1 cup of cold water (250 ml) and place it in the microwave
oven.
2
Cook at the maximum power for 1 minute.
3
When the set time is over, carefully feel the dish/ container. If it is warm, do not use it
for microwave cooking.
Do not exceed 1-minute cooking time.
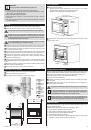
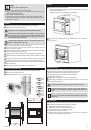
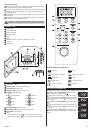
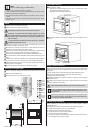
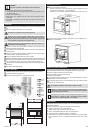
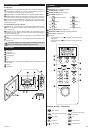
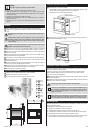
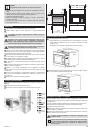
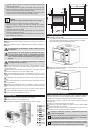
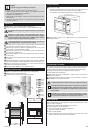
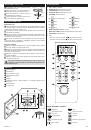
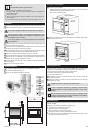
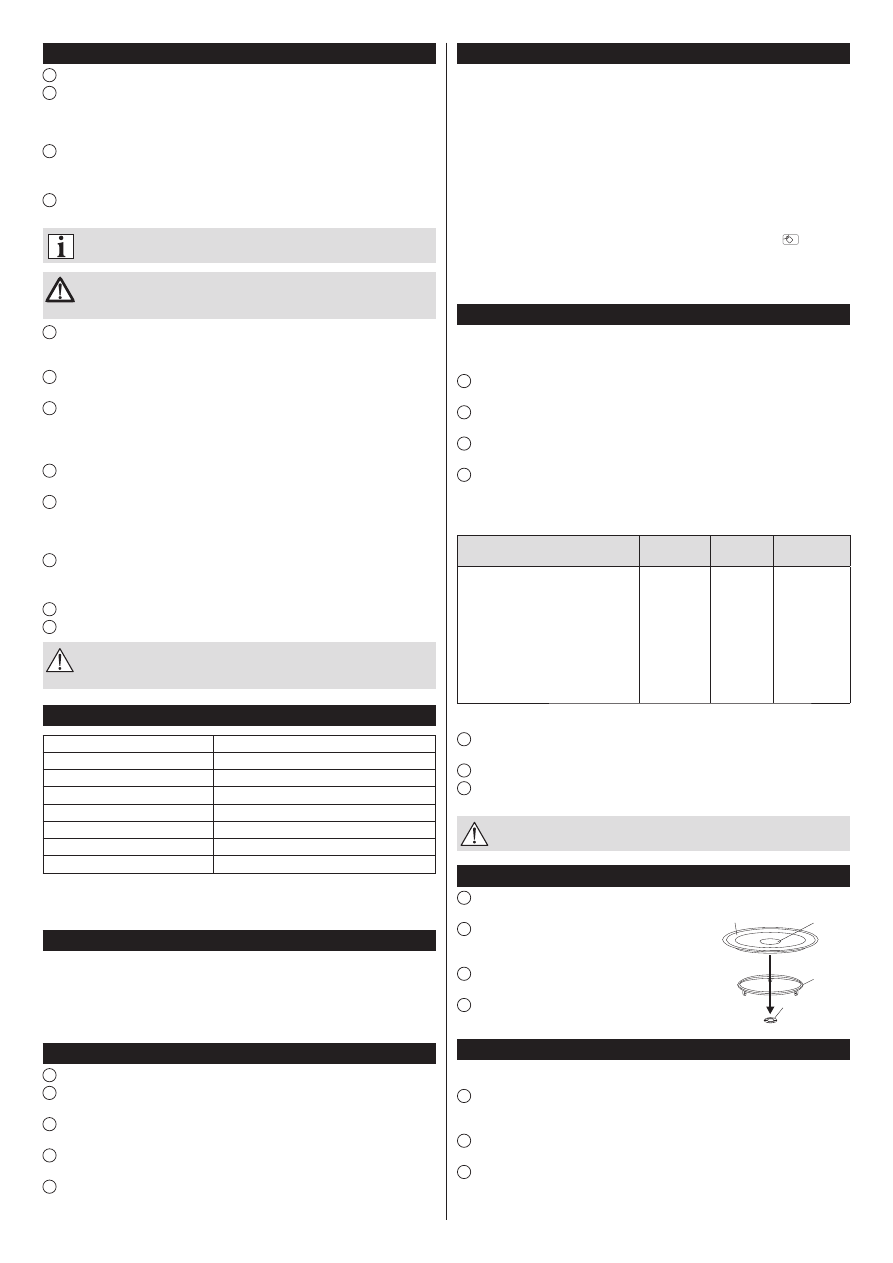
Glass tray installation
1
Never place the glass tray upside down. The glass tray movement should not be
restricted.
2
During cooking, both the glass tray and turntable
ring assembly must always be present in the microwave
oven.
3
During cooking, all food and food containers should
always be placed on the glass tray.
4
In case the glass tray is broken or damaged contact
your nearest service centre.
Before calling the service centre
Normal situation:
1
The operation of the microwave oven may cause interference with radio and TV
reception. This interference is similar to interference caused by small electrical appliances
such as a food processor, fan, vacuum cleaner, etc.
2
When cooking at low microwave power the inside light of the microwave oven may
become dull.
3
During cooking, water vapour gets out of the food. Most of the water vapour escapes
through the ventilation openings. However, condensed water vapour may also appear on
the cool parts of the oven (e.g. on the door).
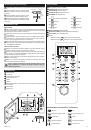
Glass tray
Hub (underside)
Turntable ring
assembly
Turntable shaft