Инструкция для ZELMER ZPG 6004SZ

(скачивание инструкции бесплатно)
Формат файла: PDF
Доступность: Бесплатно как и все руководства на сайте. Без регистрации и SMS.
Дополнительно: Чтение инструкции онлайн
background image

22

PG-005_v01

Installation

GENERAL INSTRUCTIONS


 THE MANUFACTURER IS NOT LIABLE FOR 

ANY DAMAGE CAUSED BY A FAILURE TO 

OBSERVE APPLICABLE STANDARDS AND 

REGULATIONS, OR BY INSTALLING THE HOB 

BY AN UNAUTHORISED PERSON.


 The appliance may be installed only by 

a certi

fi

 ed installation technician.

1

 The appliance must be installed in a kitchen meeting the 

requirements speci

fi

 ed by Building Law regulations (Journal 

of Law No. 89 item 484). The kitchen:

should have appropriate volume, ensuring that the 


maximum thermal load from the installed gas appliances 

is not more than 930 W/m³, 
should have a minimum height of 2.2 m,


should have supply and exhaust ventilation (allowing at 


least 1.5 times exchange of air in an hour),
should have air in

fl

 ow (if there is no window) through 


holes made in external walls, with a minimum area of 

0.016 m²,
should have fumes exhaust, e.g. through an operating 


chimney duct with a minimum size of 0.14 m.

2

 The wall adjacent to the hob should be made of 

in

fl

 ammable materials.

3

 In order to limit the negative impact of drafts on the 

burners, the hob should not be installed on the window-door 

line.

4

 Kitchen cabinets must not be mounted directly above the 

hob. The distance between the side edges of the hob and 

the side edges of the cabinets should be at least 50 mm.

5

 To ensure appropriate absorption and exhaust of kitchen 

fumes, it is recommended that a ventilation hood is installed. 

The distance between the hob and the ventilation hood 

mounted above it should be at least 700 mm.

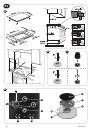
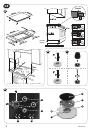
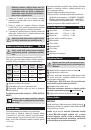
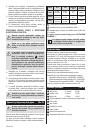
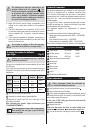
Installation of the hob 

(Fig. A)


 The appliance may be installed only by 

a certi

fi

 ed installation technician.

The dimensions and assembling instructions are presented 

in the 

fi

 gures above.

1

 Before cutting an opening in the worktop, make sure 

that the distance between the rear edge of the hob and the 

wall is at least 55 mm. Cut out the opening in the worktop in 

accordance with the dimensions.

2

 Remove all unattached elements from the hob (pan 

supports, burner caps, crowns, etc.).

3

 Turn the hob upside down. Cut off 4 pieces of the 

appropriate length from the seal, remove the protective tape 

and stick them along the hob edges.

4

 Place the hob in the opening and press 

fi

 rmly so that the 

seal 

fi

 ts closely to the worktop. Fix the hob to the worktop 

from the bottom with the use of 

fi

 xing clamps.

The appliance must be installed in accordance with 


applicable building regulations regarding the installation 

of gas devices in residential facilities.
Make sure the worktop is made of suitable heat resistant 


material to avoid deformation due to heat produced by 

the hob.

Connecting the gas hob


 THE MANUFACTURER IS NOT LIABLE FOR 

ANY DAMAGE CAUSED BY A FAILURE TO 

OBSERVE APPLICABLE STANDARDS AND 

REGULATIONS, OR BY INSTALLING THE HOB 

BY AN UNAUTHORISED PERSON.


  The hob must be connected to the gas system 

only by a certi

fi

 ed installation technician.


  Before proceeding with connecting the hob to 

the electrical and gas mains, make sure that 

the gas valve is closed.


 Before connecting the appliance to the 

electrical and gas mains, read the information 

on the rating label and in this manual.

CONNECTING THE HOB TO THE GAS MAINS

Before installation, make sure that the local distribution 


conditions (gas type and pressure) and appliance 

settings are appropriate.
The gas setting conditions for this appliance are given on 


the rating label.
This appliance is not to be connected to exhaust pipes. 


It should be installed and connected in accordance with 

applicable installation regulations. Especially, appropriate 

ventilation requirements should be met.
The 

fl

 exible gas pipe should be mounted in such a way 


as to not touch any moving parts of furniture (e.g. 

a drawer) and should not go through spaces with not 

enough room. 
After installing the hob, the technician is obliged to check 


the tightness of the gas installation.

CONNECTING THE HOB TO THE ELECTRICAL 
MAINS


 The socket to which the appliance is to be 

connected should be easily accessible to the 

user.


  Make sure that the power cable does not touch 

the hot burners when using the hob.

1
2
3
4
5
6
7
8
9
10
11
12
13
14
15
16
17
18
19
20
21
22
23
24
25
26
27
28
Оглавление инструкции
  • Страница 1 из 29
    PL INSTRUKCJA UŻYTKOWANIA Płyta gazowa Typ ZPG6004SZ CZ NÁVOD K POUŽITÍ Plynová varná deska Typ ZPG6004SZ 8–13 SK NÁVOD NA OBSLUHU Plynová varná doska Typ ZPG6004SZ 14–19 EN USER MANUAL Gas hob Type ZPG6004SZ 20–25 2–7
  • Страница 2 из 29
    PL A B D C 1 6 2 7 5 8 3 10 9 4 2 4 PG-005_v01
  • Страница 3 из 29
    PL Szanowni Klienci! Gratulujemy wyboru naszego urządzenia i witamy wśród użytkowników produktów Zelmer. W celu uzyskania najlepszych rezultatów rekomendujemy używanie tylko oryginalnych akcesoriów firmy Zelmer. Zostały one zaprojektowane specjalnie dla tego produktu. Wskazówki dotyczące
  • Страница 4 из 29
    ● ● Przy pierwszym uruchomieniu z płyty mogą wydobywać się nieznaczne ilości dymu oraz nieprzyjemny zapach. Ponieważ wysoka temperatura może źle wpływać na łatwo psującą się żywność, przedmioty z tworzyw sztucznych a także aerozole, nie przechowuj ich powyżej lub poniżej płyty. Instalacja WSKAZÓWKI
  • Страница 5 из 29
    ● ● ● Urządzenie to nie jest podłączane do przewodów odprowadzających spaliny. Powinno być zainstalowane i przyłączone zgodnie z aktualnymi przepisami instalacyjnymi. W szczególności należy uwzględnić odpowiednie wymagania dotyczące wentylacji. Przewód giętki gazowy powinien być zamontowany w taki
  • Страница 6 из 29
    Regulacja płomienia (Rys. C) Regulację płomienia powinien wykonać uprawniony (autoryzowany) instalator posiadający odpowiednie kwalifikacje. 1 Zapal palnik i ustaw minimalny płomień . 2 Zdejmij pokrętło z trzpienia. 3 Za pomocą odpowiedniego śrubokręta wyreguluj płomień przekręcając śrubę wewnątrz
  • Страница 7 из 29
    Czyszczenie palników rozpocznij od zdjęcia korony palnika i przykrywki palnika. ● Koronę palnika i przykrywkę wymocz w ciepłej wodzie z dodatkiem detergentu a następnie umyj i wytrzyj do sucha. ● Do przetykania otworów w koronie palnika możesz użyć stalowego drucika. Po umyciu sprawdź czy otwory
  • Страница 8 из 29
    CZ těsnění A proudění vzduchu B D C 1 6 2 7 5 8 3 10 9 4 8 4 PG-005_v01
  • Страница 9 из 29
    CZ Vážení zákazníci! ● Blahopřejeme Vám k nákupu našeho spotřebiče a vítáme vás mezi spotřebiteli výrobků Zelmer. Pro dosažení co nejlepších výsledků vám doporučujeme používat pouze originální příslušenství firmy Zelmer, které bylo vyvinuto speciálně pro tento výrobek. Používáním plynové desky se
  • Страница 10 из 29
    Instalace VŠEOBECNÉ POKYNY VÝROBCE NENESE ODPOVĚDNOST ZA PŘÍPADNÉ ŠKODY ZPŮSOBENÉ NEDODRŽENÍM PLATNÝCH NOREM A PŘEDPISŮ A ZA PŘIPOPOJENÍ DESKY NEOPRÁVNĚNOU OSOBOU. Montáž desky může provést pouze oprávněný (autorizovaný) technik s příslušnými kvalifikacemi. 1 Spotřebič musí být instalován v
  • Страница 11 из 29
    Elektrická instalace napájející desku musí být zabezpečená správně zvoleným zabezpečením a dodatečně může mít spínač k zabezpečení elektrického vedení, jež přeruší přívod elektrického proudu v případě nouze. ● ● ● Ujistěte se, že napětí v el. síti je shodné s napětím uvedeným na typovém štítku, jež
  • Страница 12 из 29
    Jesliže plameny hořáku náhodně zhasly, vypněte hořák otočením knoflíku do pozice a čekejte min. 1 minutu, před jeho opětovným zapálením. Jestliže si přejete uhasit plamen, otočte knoflík do polohy . Jestliže nepoužíváte desku, ujistěte se, že jsou všechny knoflíky v uzaveřené poloze . POUŽITÍ Před
  • Страница 13 из 29
    Ekologicky vhodná likvidace Obalový materiál jednoduše neodhoďte. Obaly a balicí prostředky elektrospotřebičů Zelmer jsou recyklovatelné, a zásadně by měly být vráceny k novému zhodnocení. Obal z kartonu lze odevzdat do sběren starého papíru. Pytlík z polyetylénu (PE, PE-HD, PE-LD) odevzdejte do
  • Страница 14 из 29
    SK tesnenie A prúdenie vzduchu B D C 1 6 2 7 5 8 3 10 9 4 14 4 PG-005_v01
  • Страница 15 из 29
    SK Vážený zákazník! Blahoželáme Vám k výberu nášho zariadenia a vítame Vás medzi používateľmi výrobkov Zelmer. Za účelom získania čo najlepších výsledkov odporúčame Vám používať výlučne originálne doplnky k spotrebičom spoločnosti Zelmer. Príslušenstvo bolo navrhnuté špeciálne pre tento výrobok.
  • Страница 16 из 29
    ● ● ● Spotrebič sa môže používať vo vnútorných priestoroch. Po prvom použití z varných platní môže vychádzať neveľké množstvo dymu a môžete cítiť nepríjemný zápach. Zvýšená teplota môže mať negatívny vplyv na potraviny, ktoré podliehajú rýchlemu znehodnoteniu vplyvom tepla, rovnako ako na
  • Страница 17 из 29
    ● ● ● Spotrebič nie je pripojený k zariadenia pre odvádzanie spalín. Takéto zariadenie by malo byť nainštalované a pripojené v súlade s platnými predpismi vzťahujúcimi sa na podobné inštalácie. Osobitne je potrebné dbať na dodržiavanie príslušných predpisov týkajúcich sa ventilácie. Plynovú
  • Страница 18 из 29
    Nastavenie plameňa (Obr. C) Nastavenie intenzity plameňa môže vykonať iba oprávnený (autorizovaný) technik, ktorý je držiteľom príslušného osvedčenia. 1 Zapáľte horák a nastavte plameň na minimum . 2 Odoberte otočný regulátor zo strmeňa. 3 Pomocou príslušného skrutkovača nastavte plameň otočením
  • Страница 19 из 29
    ČISTENIE HORÁKOV Vykonajte v prípade zatečenia horákov pripravovaným pokrmom alebo priebežne odstránením nanesenej špiny a nečistôt na plynových horákoch, elektrických zapaľovačov a termoelektrických poistiek. Čistenie horákov začnite odobratím rozdeľovača a veka horáku. ● Rozdeľovač a veko horáka
  • Страница 20 из 29
    EN seal A airflow B D C 1 6 2 7 5 8 3 10 9 4 20 4 PG-005_v01
  • Страница 21 из 29
    EN Dear Customer, Congratulations on your choice of our appliance and welcome to the group of Zelmer product users. In order to achieve the best possible results we recommend using exclusively original Zelmer accessories. They have been specially designed for this product. Warning! Risk of property
  • Страница 22 из 29
    Installation GENERAL INSTRUCTIONS THE MANUFACTURER IS NOT LIABLE FOR ANY DAMAGE CAUSED BY A FAILURE TO OBSERVE APPLICABLE STANDARDS AND REGULATIONS, OR BY INSTALLING THE HOB BY AN UNAUTHORISED PERSON. The appliance may be installed only by a certified installation technician. 1 The appliance must
  • Страница 23 из 29
    The earthing wire must be connected to the terminal marked with the symbol . The electrical installation supplying the hob should be protected with a properly selected safety device and, in addition, it should be equipped with a suitable switch enabling the current to be cut off in an emergency
  • Страница 24 из 29
    Cleaning and maintenance Operating the hob LIGHTING Turn the appropriate knob left to position . Press it all the way in. After the burner is lit, hold the knob pressed in for approx. 10 seconds. If after approx. 15 seconds of holding the knob pressed in the position the burner is not lit, wait at
  • Страница 25 из 29
    Troubleshooting PROBLEM TIP Flame is uneven ● Make sure that the nozzle is not clogged. ● Check if the holes in the crown are not blocked. ● Check if the burner crown and the cap are put on correctly. No ignition ● Make sure the hob is plugged in. ● Check if there is a power outage at home or in
  • Страница 26 из 29
    PG-005_v01
  • Страница 27 из 29
    PG-005_v01
  • Страница 28 из 29
    PG-005_v01
  • Страница 29 из 29