Инструкция для BEST K 9997 FPV

(скачивание инструкции бесплатно)
Формат файла: PDF
Доступность: Бесплатно как и все руководства на сайте. Без регистрации и SMS.
Дополнительно: Чтение инструкции онлайн
background image

After 30h of operation the central segment lights up on the display; It indicates that the grease filters need to be cleaned.
After 120h of operation, the central segment flashes on the display; It indicates that the grease filters need to be cleaned
and the charcoal filters replaced. After cleaning the grease filters (and/or replacing the charcoal filters), restart the hour
counter (RESET) by pressing the key C during display of the filter alarm.
GAS SENSOR SENSITIVITY:


The sensitivity of the sensor can be modified to suit your requirements. To modify the

sensitivity, the appliance must be in manual mode (i.e. the running speed and not the letter “A” must appear on the display);
If not, press the key E. Modify the sensitivity by simultaneously pressing the keys D and E. The set sensitivity is indicated
on the display. By means of the buttons C(-) and D(+) the desired sensitivity is set


Store the “new” sensitivity by pressing

the key E.

ATTENTION:  TO PREVENT DAMAGING THE SENSOR, DO NOT USE SILICONE PRODUCTS NEAR THE HOOD!

Grease filters

: special attention must be given to the grease filters which must be periodically cleaned, whenever

the grease filter alarm trips. For instructions of the filter Alarm, refer  to the Controls paragraph.
Wash the grease filters with neutral detergent.
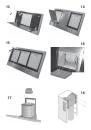
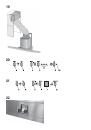
Removing the grease filters :  Refer to Fig.12, Fig.13 or Fig. 14 depending on the model you have purchased.
Fig.  12: Remove the grease filters: pull the handle outwards and release the filter.
Fig.  13: Turn the glass panel gripping it from the front part of the hood. Remove the grease filter Push the catch and
turn the filter outwards
Fig.14:  Remove the metal panels. Remove the grease filters by pushing the catch and turning the filters outwards
(Fig. 15)

Charcoal filters

: If using the hood in filtering version, the charcoal filters will have to be replaced periodically

when the charcoal filter alarm appears.  For instructions on the filter alarm refer to the paragraph Controls. Removing
the charcoal filter :  Refer to Fig.12, Fig.13 or Fig. 14 depending on the model you have purchased.
Fig.  12: Remove the grease filters: pull the handle outwards and release the filter. Then remove the charcoal filter
(Fig. 15). 16): Push the catch towards the inside and turn the filter so that the 2 filter clips slip out of their seats.
Fig.  13: Turn the glass panel gripping it from the front part of the hood. Remove the grease filter Push the catch and
turn the filter outwards Then remove the charcoal filter (Fig. 15). 16): Push the catch towards the inside and turn the
filter so that the 2 filter clips slip out of their seats.
Fig.14: Remove the metal panels. Remove the grease filters by pushing the catch and turning the filters outwards
(Fig. 15) Then remove the charcoal filter (Fig. 15). 16): Push the catch towards the inside and turn the filter so that
the 2 filter clips slip out of their seats.

Replacing the Halogen Bulbs: 

open the Halogen Bulb hatch by pushing it on one side (on the writing “PUSH”) and

then release (Fig. 22). Replace the bulbs with other bulbs of the same kind. 

ATTENTION: do not touch the bulb with your

bare hands.

IMPORTANT

Only for models with perimeter extraction (example the models shown in Fig.13 or in FIg. 14 with opening panel): in the
event of strong vapour concentrations, condensation could form in the lower part of the hood; this is not a defect, nor
does it affect normal operation of the hood.

FRANCAIS

DESCRIPTION

Cette hotte peut être en version recyclage ou en version évacuation.

Version Recyclage 

(Fig.1): votre hotte aspire l’air de la cuisine imprégnée de fumée et d’odeurs, en l’épurant à travers

le/les filtres à graisse ainsi qu’à travers le filtre à charbon pour le renvoyer dans la pièce, propre. Afin que votre hotte
soit efficace d’une façon constante, il est nécessaire de remplacer le filtre à charbon périodiquement. Le filtre à charbon
n’est pas fourni.

Version évacuation

 (Fig. 2): votre hotte aspire l’air de la cuisine imprégnée de fumée et d’odeurs, en le faisant passer

à travers le/les filtres à graisse, puis en l’éliminant à l’extérieur à travers un tuyau d’évacuation. Dans cette version l’emploi
du filtre à charbon n’est pas nécessaire. Vous devez décider dès le début quel type d’installation vous voulez (recyclage
ou évacuation). Afin d’avoir une hotte au rendement optimal, nous vous conseillons d’installer une hotte version évacuation
(si cela est possible).
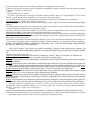
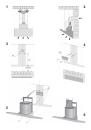
INSTALLATION

ATTENTION: Il faut au moins deux personnes pour monter cet appareil; il est conseillé de confier les opérations
d’installation à des spécialistes.

INSTALLATION VERSION EVACUATION:


Avant de commencer l’installation, il est nécessaire de prévoir le tuyau pour

l’évacuation de l’air à l’extérieur. Employez un tuyau d’évacuation qui ait: - la longueur minimale indispensable; - le moins
de coudes et raccords possibles (angle maximum des coudes: 90°); - qui soit fait d’une matière approuvée par les normes
en vigueur (suivant le pays); - sa surface intérieure la plus lisse possible. Nous vous conseillons aussi d’éviter les

1
2
3
4
5
6
7
8
9
10
11
12
13
14
15
16
17
18
19
20
21
22
23
24
25
26
27
28
29
30
31
32
33
34
35
36
37
38
39
40
Оглавление инструкции
  • Страница 1 из 41
    MONTAGE- UND GEBRAUCHSANWEISUNG INSTRUCTIONS FOR INSTALLATION AND USE INSTRUCTIONS POUR L'INSTALLATION ET L’UTILISATION AANWIJZING VOOR GEBRUIK EN INSTALLATIE INSTRUCCIONES PARA INSTALACIÓN Y USO ISTRUZIONI PER L'INSTALLAZIONE E L’USO ANVISNINGAR FÖR INSTALLATION OCH DRIFT N¡VOD K POUéITÕ DIGESTOÿE
  • Страница 2 из 41
  • Страница 3 из 41
    DEUTSCH BESCHREIBUNG Die Haube steht in Umluftversion und in Abluftversion zur Verfügung. Umluftversion (Abb. 1): Die Haube saugt die mit Rauch und Gerüchen gesättigte Luft an und reinigt sie durch die Fett- und die Kohlefilter. Danach wird die saubere Luft wieder in den Raum geleitet. Um die
  • Страница 4 из 41
    dann gemäß der unten aufgeführten Anweisungen fortfahren. Befestigung der Teleskoprohre: - Die Breite des Teleskoprohr-Tragbügels (D) über die in Abb. 8 gezeigten Schrauben E regulieren. - Anschließend mit Hilfe der mitgelieferten Dübel und Schrauben (F) den Bügel so an der Decke befestigen, dass
  • Страница 5 из 41
    Fettfilter: Besonders ist auf die Fettfilter zu achten. Sie sind regelmäßig zu reinigen, wenn der Alarm Fettfilter erscheint. Für die Hinweise über den Filteralarm wird auf den Abschnitt Bedienung verwiesen. Fettfilter mit Neutralreiniger reinigen. Demontage der Fettfilter: Je nach erworbenem
  • Страница 6 из 41
    of the screws (E) as shown in Fig. 8; then, by means of the screw anchors and screws (F) provided, fix the bracket to the ceiling in such a way that it is positioned along the axis with your hood. 4b - Connect the air outlet pipe to the air vent of the hood. - Use a flexible pipe and lock it to the
  • Страница 7 из 41
    After 30h of operation the central segment lights up on the display; It indicates that the grease filters need to be cleaned. After 120h of operation, the central segment flashes on the display; It indicates that the grease filters need to be cleaned and the charcoal filters replaced. After
  • Страница 8 из 41
    changements brusques de section du tuyau (diamètre conseillé: 150 mm). Pour l’évacuation de l’air à l’extérieur, suivez toutes les autres indications fournies par la feuille “Attention”. Prévoir l’alimentation électrique dans l’encombrement de la cheminée télescopique (pour le branchement
  • Страница 9 из 41
    est vert (clignotant) il indique que le TIMER a été actionné par la touche E. ALARME FILTRES: Après 30h de fonctionnement le voyant L2 devient ROUGE. Il signale que les filtres à graisse doivent être nettoyés. Après 120h de fonctionnement le voyant L2 devient ROUGE et clignote il indique que les
  • Страница 10 из 41
    MISE EN GARDE Uniquement pour les modèles à aspiration sur l’extérieur (par exemple les modèles représentés sur la Fig.13 et la Fig.14 avec panneau ouvrable) : en cas d’importantes concentrations de vapeurs, de la condensation peut se produire dans la partie inférieure de la hotte ; ce n’est pas un
  • Страница 11 из 41
    Fig. 13: draai het glazen paneel door het aan de voorkant van de kap vast te pakken; verwijder het vetfilter: duw tegen de grendel en draai het filter naar buiten. Ga verder met het monteren van het koolstoffilter (Afb. 16) door de 2 lipjes van het koolstoffilter in de daarvoor bestemde sleuven te
  • Страница 12 из 41
    weergegeven op de display. Met de knoppen C(-) en D(+) wordt de gevoeligheid ingesteld Bewaar de “nieuwe” gevoeligheid door te drukken op de knop E. OPGELET: OM DE SENSOR NIET TE BESCHADIGEN, WORDEN VLAKBIJ DE AFZUIGKAP GEEN SILICONENPRODUCTEN GEBRUIKT! Vetfilters: bijzondere zorg dient te worden
  • Страница 13 из 41
    en el equipamiento). Servirse de los dos triángulos recortados en el estribo para emplazarlo correctamente a lo largo del eje vertical de la campana. Luego enganchar la campana al estribo (Fig. 5). Regular la posición horizontal desplazando la campana hacia la derecha o la izquierda, siguiendo la
  • Страница 14 из 41
    MANDOS de la Fig.21: A) apaga las luces. B) enciende las luces. C) Disminuye la velocidad del motor hasta llegar a cero. Si se mantiene pulsado durante 2", cuando está activa la Alarma de filtros, el conteo de las HORAS se pone a cero. D) Enciende el motor (restableciendo la última velocidad
  • Страница 15 из 41
    ITALIANO DESCRIZIONE La cappa puo’ essere in versione filtrante o in versione aspirante. Versione filtrante (Fig. 1): la cappa aspira l’aria della cucina impregnata di fumi e di odori, depurandola attraverso il/i filtri anti-grasso ed il filtro carbone per poi re-immetterla pulita nella stanza. Per
  • Страница 16 из 41
    in modo che sia in asse con la vostra cappa. - Montare la riduzione sulla cappa, in corrispondenza del punto uscita aria (Fig. 17).- Prendere il deflettore aria e fissateci un tubo flessibile (di diametro 125 mm) bloccandolo con una fascetta metallica (tubo e fascette non sono in dotazione);
  • Страница 17 из 41
    Filtri carbone: nel caso d'uso dell'apparecchio in versione filtrante, sarà necessario sostituire i filtri al carbone periodicamente, quando compare l’allarme filtri carbone. Per istruzioni sull’Allarme filtri, fare riferimento al paragrafo Comandi. Smontaggio del filtro carbone: secondo il modello
  • Страница 18 из 41
    INSTALLATION I LUFTRENANDE VERSION (FIG. förbered strömtillförseln inuti utrymmet för det dekorativa röret (för elanslutning, följ alla övriga anvisningar som anges i instruktionsbladet “Varningar”). Montering av kolfiltret: beroende på vilken modell ni inhandlat, se Fig.12, Fig.13 eller Fig. 14.
  • Страница 19 из 41
    Ändra känsligheten genom att samtidigt trycka på knapp D och knapp E. Den inställda känsligheten kommer att visas på displayen. Med hjälp av tryckknapparna C (-) och D (+) ställer man in önskad känslighet. Memorisera den “nya” känsligheten genom att trycka på knappen E. OBS: ANVÄND INTE
  • Страница 20 из 41
    Zah·knÏte digesto¯ ke konzole (Obr. 5). Se¯iÔte vodorovnou polohu, posuÚte digesto¯ vpravo nebo vlevo podle pot¯eby pro vyrovn·nÌ z·vÏsn˝ch polic. PotÈ, co jste provedli regulaci, - aniû byste p¯itom snÌmali digesto¯, vyznaËte na zdi dalöÌ 4 otvory, kterÈ je t¯eba p¯ipravit (C); vyh·knÏte digesto¯
  • Страница 21 из 41
    D) Aktivuje motor (p¯iËemû vyvol· poslednÌ pouûitou rychlost) a zvyöuje rychlost, aû do dosaûenÌ maxim·lnÌ hodnoty. E)SpouötÌ/vypÌn· Ëidlo (AUTOMATICK› nebo RU»NÕ provoz). P¯i automatickÈm provozu je Ëidlo zapnutÈ a na displeji (L) se objevÌ pÌsmeno ÑAî. L) Displej: - signalizuje aktu·lnÌ provoznÌ
  • Страница 22 из 41
    SLOVINSKO POPIS DIGESTORU Digestor mÙûe byù vo filrovacej alebo ods·vacej verzii. Filtrovacia verzia (Obr. 1): digestor z kuchyne ods·va vzduch nasiaknut˝ v˝parmi a z·pachmi, ËistÌ ho prostrednÌctvom filtra/-ov absorbuj˙ceho/-ich tuky ako aj uhlÌkov˝ch filtrov, aby ho Ëist˝ znova dodal do
  • Страница 23 из 41
    Upevnenie teleskopick˝ch trubÌc: - Nastaviù öÌrku opornÈho drûiaka (D) teleskopickej trubice prostrednÌctvom skrutiek E zobrazen˝ch na Obr. 8. - N·sledne prostrednÌctvom hmoûdiniek a skrutiek (F), ktorÈ s˙ s˙Ëasùou v˝bavy, pripevnite drûiak na strop tak, aby bol zarovnan˝ s osou v·öho digestora. -
  • Страница 24 из 41
    Obr. 12: Odobraù filtre zachyt·vaj˙ce tuky: ùahaù r˙Ëku smerom von a uvoæniù filter. Obr. 13: ot·Ëaù sklenen˝m panelom uchytiac ho z prednej Ëasti digestora; odstr·Úte filter zachyt·vaj˙ci tuk; stlaËiù brzdu a ot·Ëaù filtrom smerom von. Obr. 14: odobraù kovovÈ panely; Po stlaËenÌ brzdy a ot·ËanÌm
  • Страница 25 из 41
    termékhez járó csavarokkal és tiplikkel (F) rögzítsük a tartóbilincset a mennyezethez úgy, hogy a kürtõ tengelyében helyezkedjen el. 4b - Kössük össze a kürtõ légelvezetõ nyílását a légelvezetõ csatornával; ehhez használjunk rugalmas csövet, melyet a kürtõ légelvezetõ nyílásához fémgyûrûvel kell
  • Страница 26 из 41
    E) Be/kikapcsolja az érzékelõt (AUTOMATIKUS vagy KÉZI üzemmódban). Automatikus üzemmódban az érzékelõ aktív és a kijelzõn (L) az „A” betû látható. L) Kijelzõ: - az aktuális sebességfokozatot jelzi - az automatikus üzemmódot jelzi az „A” betû kiírásával. A motor sebességfokozatának változásakor az
  • Страница 27 из 41
    MONTAéA POZOR: Za montaûo te naprave sta potrebni vsaj dve osebi; PriporoËamo, da montaûo naprave izvede strokovno osebje. MONTAéA IZVEDBE ZA IZSESAVANJE ZRAKA: preden napravo pritrdite, poskrbite za odtok zraka na prosto. Uporabite izpuöni cevovod: ñ minimalna dolûina; ñ Ëim manjöe ötevilo zavojev
  • Страница 28 из 41
    L1) 4 ZELENE opozorilne luËke oznaËujejo hitrost izvajanja. L2) Kadar je opozorilna luËka LED rdeËa (pri ugasnjenem motorju), oznaËuje ALARM ZA FILTRE. Kadar je opozorilna luËka LED zelena (utripa), oznaËuje, da se je prek gumba E aktiviral ODäTEVALNIK »ASA. ALARM ZA FILTRE: Po 30. urah delovanja
  • Страница 29 из 41
    POLSKI OPIS Okap moøe byÊ w wersji filtrujπcej lub w wersji zasysajπcej. Wersja filtrujπca (Rys. 1): okap zasysa powietrze kuchni nasycone dymami i zapachami, oczyszczajπc je poprzez filtry przeciwt≥uszczowe i filtry wÍglowe, aby nastÍpnie ponownie wprowadziÊ je czyste do pokoju. Do sta≥ej
  • Страница 30 из 41
    powietrza (Rys. 17).- WziπÊ deflektor powietrza i umocowaÊ elastyczny przewÛd (o úrednicy 125 mm) blokujπc jπ opaskπ metalowπ (przewÛd i opaska nie sπ w wyposaøeniu); przymocowaÊ deflektor powietrza do gÛrnej rury (Rys. 18) 4 úrubami. - Pod≥πczyÊ elastyczny przewÛd do z≥πczki redukcyjnej
  • Страница 31 из 41
    Rys. 14: wyjπÊ metalowe panele; zdjπÊ filtry przeciwt≥uszczowe popychajπc zacisk w kierunku tylnej strony urzπdzenia i przekrÍcajπc je w kierunku zewnÍtrznym (Rys.15) Filtry wÍglowe: w przypadku uøycia urzπdzenia w wersji filtrujπcej, bÍdzie konieczna okresowa wymiana filtrÛw wÍglowych, gdy pojawia
  • Страница 32 из 41
    4c - Napravite elektriËni spoj iz nape pomoÊu kabela napajanja. Umetnite teleskopske cijevi polaûuÊi ih na napu; podignite gornju cijev sve do stropa i uËvrstite je pomoÊu 2 vijka (H) ñ sl. 11. INSTALACIJA U VERZIJI S FILTRIRANJEM: Namjestite elektriËno napajanje unutar spleta dekorativne cijevi
  • Страница 33 из 41
    OSJETLJIVOST SENZORA PLINA: osjetljivost senzora moûe se promijeniti ovisno o vlastitim potrebama. Za promjenu te osjetljivosti, ureaj se mora nalaziti u ruËnom naËinu (odnosno, na displeju se ne smije vidjeti slovo ìAî, veÊ brzina rada); ako nije tako, pritisnite tipku E. Promijenite osjetljivost
  • Страница 34 из 41
    konumlandýrmak için üzengi üzerindeki 2 küçük üçgeni kullanýn. Tahliye bacasýný üzengiye takýn (Þekil 5). Askýlarýn hizalanmasýyla ilgili ihtiyaçlara uygun olarak tahliye bacasýný saða ve sola hareket ettirin ve yatay konumu ayarlayýn. Ayarlama yapýldýktan sonra, tahliye bacasýný çýkarmadan, duvara
  • Страница 35 из 41
    D) Motoru çalýþtýrýr (kullanýlan son hýzda) ve maksimuma ulaþýncaya kadar hýzý artýrýr. E) Sensörü devreye sok / devreden çýkar (OTOMATÝK veya MANÜEL yöntem). Otomatik yöntemde sensör devrededir ve Ekran (L) üzerinde “A” harfi belirir. L) Ekran: - uygulanmakta olan hýzý gösterir - “A” harfinin
  • Страница 36 из 41
    1 2 3 4 5 6
  • Страница 37 из 41
    8 7 10 9 11 12
  • Страница 38 из 41
    13 14 15 16 18 17
  • Страница 39 из 41
    19 20 21 22
  • Страница 40 из 41
    04307929 - K9997-14l
  • Страница 41 из 41