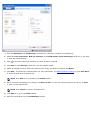
Printer- Select the check box to hear a beep when you press a button on the Operator Panel.
Name- Your printer has a serial number that is used to construct name for Bluetooth printing. The default
name is DellP703w+XXXX, where XXXX represents the last four digits of the printer's serial number. You can
change this to a more personalized name by entering a new name.
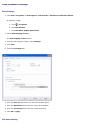
AIO
Printer-
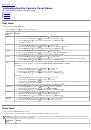
Print quality- Select
Draft
,
Normal
,
or
Best
for non-photo paper. Draft produces the fastest print speed,
but the lowest quality. Normal delivers high-quality output and is the default setting. Best produces the
highest quality for all paper.
Print options- Select
Borderless
,
Bordered
,
2 to 9 per page
,
2 X 2
,
3 X 3
,
and
4 X 4 Poster Layout
.
The photo layouts on your printer "snap" to the nearest standard print size based on the combination of
layout and paper size loaded whenever possible. Otherwise the layouts are based on a standard 2x3 aspect
ratio.
Print date on front- Select to print today's date on the front of the picture.
Quantity- Select the number to print.
Print colors as grayscale- Select the check box to print a color photo in black and white. The grayscale
palette contains white, black, and 254 shades of gray. Each color in the image is replaced with a gray that
matches its lightness value.
Automatically apply screen balance to digital camera pictures- Select the check box to adjust the color and
density of digital images for brighter color and truer flesh tones.
Enable printing of tagged pictures- Select the check box to enable the printer to detect tagged photo files
(DPOF) and prompt you for the options.
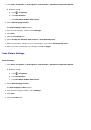
AIO
Printer-
Copy
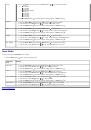
Output quality- Select
Draft
,
Normal
,
or
Best
for non-photo paper output quality.
Copy options- Select
Same Size
,
Fit to Page
,
Scale Percent
,
or
Photo Layouts
.
Size- Set the percentage you want to scale your copies. It is enabled when you select Scale Percent in the
Output.
Layout- Select your preferred layout to print one of more photos on the size paper loaded (see Layouts). It
is enabled when you select Photo Layouts from the Output.
Brightness- Use the slide-bar to increase or decrease the brightness of copies.
Quantity- Sets the default number of copies to the value you select.
Print colors as grayscale- Select the check box to print a color photo in black-and-white. The grayscale
palette contains white, black, and 254 shades of gray. Each color in the image is replaced with a gray that
matches its lightness value.
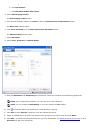
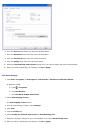
Scan-
General
Default item type- Select
Documents
or
Pictures
.
Default scan destination- Select
Memory card
,
File
,
or
Application
that list by default.
Application List- You can add and remove applications from the destination list for scanned items.
Scan-
Document
Scan as- Select a color. Color sets the printer to scan a color photo in color. Grayscale sets the printer to
scan a black and white photo and convert it to gray. Black & White sets the printer to scan in black and
white.
Resolution- You can choose a resolution you want to use for scanning: 75, 150, 300, 600, and 1200 dpi.
File format- Select to save the scanned image as PDF, RTF, JPEG, or TIFF file.
Prompt for filename and location- Select to have Dell Imaging Toolbox prompt you for the filename and
location to save the file.
Automatically save- Select to automatically save scans to the name and location you specify. The default
filename base is Scan appended with a three digit integer that increments sequentially as photos are
scanned and saved.
Base name- Edit field for entering your base filename.
Location- Click
Browse
for choosing a new location.
Save into new folder with current date as file name- Select the check box to save scanned files to the base
name and location you specified.
Scan-
Picture
Scan as- Select a color. Color sets the printer to scan a color photo in color. Grayscale sets the printer to
scan a black and white photo and convert it to gray. Black & White sets the printer to scan in black and
white.
Resolution- You can choose a resolution you want to use for scanning: 75, 150, 300, 600, and 1200 dpi.
File format- Select to save the scanned image as PDF, RTF, JPEG, or TIFF file.
 1
1
 2
2
 3
3
 4
4
 5
5
 6
6
 7
7
 8
8
 9
9
 10
10
 11
11
 12
12
 13
13
 14
14
 15
15
 16
16
 17
17
 18
18
 19
19
 20
20
 21
21
 22
22
 23
23
 24
24
 25
25
 26
26
 27
27
 28
28
 29
29
 30
30
 31
31
 32
32
 33
33
 34
34
 35
35
 36
36
 37
37
 38
38
 39
39
 40
40
 41
41
 42
42
 43
43
 44
44
 45
45
 46
46
 47
47
 48
48
 49
49
 50
50
 51
51
 52
52
 53
53
 54
54
 55
55
 56
56
 57
57
 58
58
 59
59
 60
60
 61
61
 62
62
 63
63
 64
64
 65
65
 66
66
 67
67
 68
68
 69
69
 70
70
 71
71
 72
72
 73
73
 74
74
 75
75
 76
76
 77
77
 78
78
 79
79
 80
80
 81
81
 82
82
 83
83
 84
84
 85
85
 86
86
 87
87
 88
88
 89
89
 90
90
 91
91
 92
92
 93
93
 94
94
 95
95
 96
96
 97
97
 98
98
 99
99
 100
100
 101
101
 102
102
 103
103
 104
104
 105
105