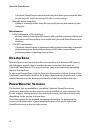
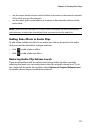
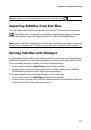
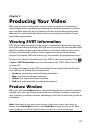
Chapter 4: Creating Your Story
55
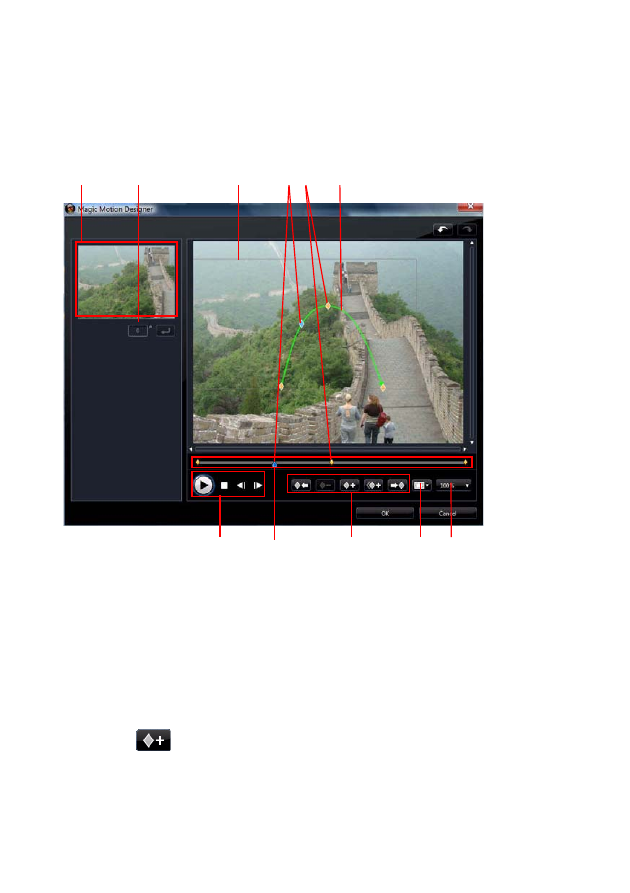
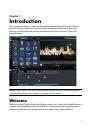
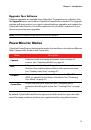
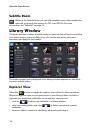
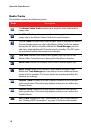
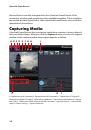
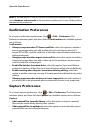
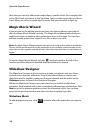
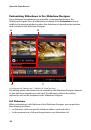
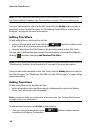
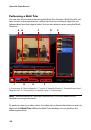
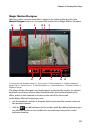
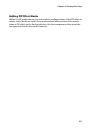
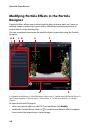
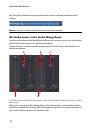
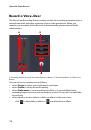
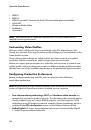
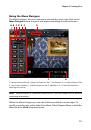
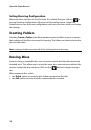
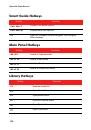
Magic Motion Designer
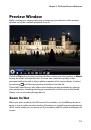
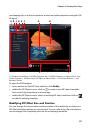
After you select a motion template to apply to the selected photo, select the
Motion Designer
button to customize the motion in the Magic Motion Designer.
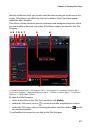
A - Preview Area, B - Rotation Amount, C - Focus Area, D - Timeline Indicator, E - Keyframe Indicator, F-
Motion Path, G - Zoom In/Out, H - TV Safe Zone/Grid Lines, I - Keyframe Buttons, J - Keyframe Timeline, K -
Playback Controls
The Magic Motion Designer uses keyframes to customize the motion on a photo.
Keyframes are frames of your video that define the start and end points of an
effect, which in this example is motion or the size of the focus area.
In the Magic Motion Designer you can:
•
use the playback controls or drag the slider to preview the current motion in
the preview window.
•
click on
to add keyframes to the motion path. By adding keyframes you
can alter the motion or size of the focus area between two points on the
keyframe timeline.
A
B
G
D E
F
H
I
J
C
K
 1
1
 2
2
 3
3
 4
4
 5
5
 6
6
 7
7
 8
8
 9
9
 10
10
 11
11
 12
12
 13
13
 14
14
 15
15
 16
16
 17
17
 18
18
 19
19
 20
20
 21
21
 22
22
 23
23
 24
24
 25
25
 26
26
 27
27
 28
28
 29
29
 30
30
 31
31
 32
32
 33
33
 34
34
 35
35
 36
36
 37
37
 38
38
 39
39
 40
40
 41
41
 42
42
 43
43
 44
44
 45
45
 46
46
 47
47
 48
48
 49
49
 50
50
 51
51
 52
52
 53
53
 54
54
 55
55
 56
56
 57
57
 58
58
 59
59
 60
60
 61
61
 62
62
 63
63
 64
64
 65
65
 66
66
 67
67
 68
68
 69
69
 70
70
 71
71
 72
72
 73
73
 74
74
 75
75
 76
76
 77
77
 78
78
 79
79
 80
80
 81
81
 82
82
 83
83
 84
84
 85
85
 86
86
 87
87
 88
88
 89
89
 90
90
 91
91
 92
92
 93
93
 94
94
 95
95
 96
96
 97
97
 98
98
 99
99
 100
100
 101
101
 102
102
 103
103
 104
104
 105
105
 106
106
 107
107
 108
108
 109
109
 110
110
 111
111
 112
112
 113
113
 114
114
 115
115
 116
116
 117
117
 118
118
 119
119
 120
120
 121
121
 122
122
 123
123
 124
124
 125
125
 126
126
 127
127
 128
128