clic.
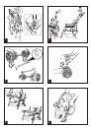
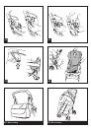
5• Enganchar la barra frontal como indica la figura.
CAPOTA
6• Para aplicar la capota, meter los acoples en sus
alojamientos.
7• Abrochar la capota en la parte de detrás del respaldo.
Bajar los compases como indica la figura.
8• Para quitar la capota presionar los botones laterales y al
mismo tiempo sacarla hacia arriba como indica la figura.
PORTABEBIDAS
9• El portabebidas puede colocarse a la derecha o a la
izquierda de la silla de paseo gracias a la instalación de
puntos de fijación a ambos lados de ésta. Para colocar
el portabebidas, presionar sobre él hasta oír un “click”
tal y como muestra la imagen A. En la imagen B, un
portabebidas colocado.
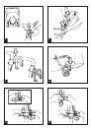
FRENO
10• Para frenar la silla de paseo, bajar con el pie la palanca del
freno del grupo de ruedas traseras.
Para desbloquear el freno, repetir las operaciones en
sentido contrario.
CINTURÓN DE SEGURIDAD
11• A: Asegurarse que los tirantes estén correctamente
introducidos, empujando tal y como muestra la figura. B:
Enganchar el cinturón actuando como muestra la figura.
12• Para desenganchar el cinturón, pulsar en los lados de la
hebilla y al mismo tiempo tirar hacia fuera, el cinturón.
13• El nuevo cinturón de seguridad desde hoy es más fácil de
poner gracias al sistema “quita y pon”. De hecho, antes de
enganchar el cinturón, fije la hebilla pequeña al respaldo
introduciendo la lengüeta en la presilla como indica la
figura; luego, cuando haya enganchado el cinturón al
niño tiene que soltarla del respaldo para dejar que el
niño tenga más movilidad. La hebilla pequeña tiene que
quedar debajo de los hombros del niño.
REGULACIÓN DEL RESPALDO
14• Para reclinar el respaldo bajar el botón del regula-respaldo
y al mismo tiempo empujar este último hacia abajo. Para
subir el respaldo empujar hacia arriba el regula-respaldo
como indica la figura.
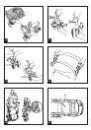
RUEDAS GIRATORIAS
15• Para hacer que giren las ruedas delanteras hay que bajar la
palanca como indica la figura. Para que no giren hay que
subir la palanca.
FRONTAL-BANDEJA
16• Se puede abrir la barra frontal-bandeja para que el niño
entre y salga fácilmente cuando es más mayor. Para
abrirla, presionar con una mano el botón y al mismo
tiempo girar la barra frontal hacia arriba con la otra mano.
17• Para quitar el frontal-bandeja, apretar los dos pulsadores
como indica la figura y al mismo tiempo, tirar hacia arriba.
CAMBIO DE LA CESTA
18• Si hubiera que cambiar la cesta, para montarla,
engánchela por delante a los ganchos como indica la
figura.
19• Engánchela por detrás, cerrando los botones como indica
la figura.
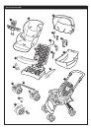
EXTRACCIÓN DE LAS RUEDAS
Las ruedas de la silla de paseo se pueden quitar.
20• Para quitar las ruedas delanteras hay que hacer que estén
libres (pivotantes), presionar las palanquitas y al mismo
tiempo empujar la rueda hasta quitarla como indica la
figura.
21• Para quitar las ruedas traseras presionar el botón A y al
mismo tiempo empujar las ruedas hacia abajo hasta
quitarlas, como indica la figura.
ES_Español
Le agradecemos haber elegido un
producto Peg-Pérego.
• Peg-Pérego S.p.A. posee la certificación ISO
9001.
• La certificación ofrece a los clientes y a los
consumidores la garantía de transparencia
y confianza en cuanto a los procedimientos
de trabajo de la empresa.
ADVERTENCIA
• IMPORTANTE: léase atentamente estas instrucciones
y consérvelas para futuras consultas. La seguridad
del niño podría estar en peligro si no se leen dichas
instrucciones.
• Este artículo se ha diseñado para el transporte de 1 niño
en el asiento.
• No utilice este artículo para un número de ocupantes
superior al previsto por el fabricante.
• Este artículo está homologado para niños desde los 6
meses hasta los 15 kg en el asiento.
• Las operaciones de ensamblaje y de preparación del
artículo deben efectuarse por adultos.
• No utilice este artículo si le faltan partes o presenta
rupturas.
• Utilice siempre los cinturones de cinco puntos; utilice
siempre la tira entrepiernas del cinturón junto con la
correa ventral.
• Podría ser peligroso dejar a su hijo sin vigilancia.
• Utilice siempre los frenos estando parado.
• Antes de usarse, asegúrese de que todos los mecanismos
de enganche estén perfectamente enganchados.
• No introduzca los dedos en los dispositivos.
• Preste atención a la presencia del niño cuando efectúe
operaciones de regulación de los dispositivos (asa,
respaldo).
• Toda carga que cuelgue del asa o de las empuñaduras
puede desestabilizar el artículo. Siga las indicaciones del
fabricante con respecto al peso máximo permitido.
• La barra frontal no se ha diseñado para soportar el peso
del niño; la barra frontal no se ha diseñado para mantener
al niño en el asiento y no sustituye el cinturón de
seguridad.
• No introduzca en la cesta pesos superiores a los 5 kg. No
introduzca en los portabebidas pesos superiores a los
establecidos en el mismo artículo ni bebidas calientes. No
introduzca en los bolsillos de las capotas (en caso fueran
presentes) pesos superiores a los 0.2 Kg.
• No utilice el artículo cerca de escaleras o peldaños; no
utilizar cerca de fuentes de calor, llamas directas u objetos
peligrosos que se hallen al alcance de los niños.
• Podría ser peligroso usar accesorios no aprobados por el
fabbricante.
• Este artículo no está adaptado para el footing o carreras
en patines.
• Utilice los frenos durante las operaciones de carga y
descarga de los ocupantes.
instrucciones de uso
APERTURA
1• Para abrir la silla de paseo, desenganchar al mismo tiempo
los dos acoples como indica la figura.
2• Levantar con decisión el manillar hacia arriba y luego
empujarlo hacia abajo hasta oír el clic.
ENSAMBLAJE DE LA SILLA DE PASEO
3• Para meter el grupo de ruedas traseras presionar el botón
A hasta el fondo y al mismo tiempo empujar las ruedas
hasta el tope de acoplamiento.
4• Para meter las ruedas delanteras meter la rueda hasta oír