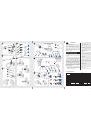
76
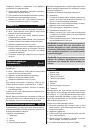
Mincing unit
(Fig. 4)
Fit the following elements in the mincer body:
The scroll with the clutch facing to the inside of the body.
●
The cutter to the bolt with the blades facing the screen.
●
The screen so that the protrusion of the body fits the
●
groove in the circumference of the screen.
Tightly fit all the elements of the mincer body.
●
Place the assembled mincer body on the motor and turn
●
left until you hear a click. It means that the body has
been properly installed.
Fit the tray to the mincer body.
●
Operation with the sausage filler nozzle (Fig. 5)
Place the following elements in the mincer body:
The scroll with the clutch facing to the inside of the body.
●
The base plate to the bolt.
●
The sausage filler nozzle.
●
Tightly fit all the elements with the ring nut.
●
Soak the casing for about 10 minutes before fitting.
Fit the wet casing on the sausage filler nozzle.
●
Make sure the not to block the ventilation openings on the
nozzle.
The meat cannot be „too thin”. A large liquid content may
cause its leakage to the inside of the mincer.
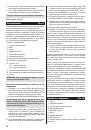
Citrus juicer
(Fig. 6)
The citrus juicer is an additional appliance, which enables to
squeeze juice from citrus fruits together with the pulp.
Citrus juicer unit:
I. Clutch
II. Bowl
III. Screen
IV. Squeezer
Open the lid of the compartment on the back of the housing,
which enables to operate the appliance in a vertical position.
Place the appliance on a hard, even surface.
Fit the following elements onto the motor:
Clutch.
●
Fix the bowl to the motor and turn left until you hear
●
a click. It means that the bowl has been properly
installed.
Attach the screen and the squeezer to the protruding
●
part of the bowl.
Prepare the fruits by cutting them into halves.
●
Plug in the appliance.
●
Switch on the appliance using the
●
„I”
switch and
place the fruit on the squeezer with the pulp facing the
squeezer.
Push to start the squeezing process.
●
CAUTION! In case the sieve is blocked with the pulp
of extracted fruit, it is necessary to switch off the
appliance, disassemble the sieve and empty it, as the
excess of the pulp can cause leakage to the motor
chamber of the appliance.
CAUTION! The citrus juicer spins during operation.
Pay special attention to your fingers while pushing the
fruits on the squeezer.
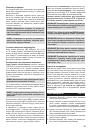
Shredder
(Fig. 7)
I. Fine grating disc
II. Coarse grating disc
III. Slicing disc
IV. Pureeing disc
V. Locking tab
VI. Body
VII. Tray
VIII. Pusher
The shredder is equipped with two grating discs for fine
(I)
and coarse
(II)
grates (cheese, carrot, celery, cooked
beetroots etc.). The slicing disc
(III)
is used to slice
vegetables (potatoes, cucumbers, onions, etc.). The purée
disc
(IV)
is used to purée potatoes, beetroots, fruits, etc.
In order to prepare the shredder for operation:
Pull the locking tab
●
(V)
and place one of the discs with
the clutch facing the inside of the body.
Snap the tab shut.
●
Assemble the shredder body in the same way as the
●
mincer body.
Cut larger products into pieces.
●
Do not grind soft fruits with hard stones.
●
Switch off and unplug the appliance after operation.
●
Remove the remaining products from the inside of the
●
disc or body using a wooden spoon.
The blades of the discs do to require renovation.
Replacing the discs (Fig. 8).
Juicer
(Fig. 9)
The juice squeezer is an equipment included to some
types of mincers. It allows to squeeze juice from fruits such
as: raspberries, currants, strawberries, gooseberry and
additionally from grapes and tomatoes. Berry fruits such
as currants can be squeezed with stalks. Fruits with large
stones for example plums, cherries etc can be squeezed in
the appliance after removing the stones.
Appliance elements:
I. Chamber
II. Worm
III. Body
IV. Nut
V. Juice channel
VI. Adjusting screw
VII. Bowl (from the mincing unit)