77
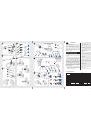
VIII. Pusher (from the mincing unit)
IX. Screen – 2 pieces
No. 1 – smaller openings
No. 2 – larger openings
X. Large sealing ring for the body
(3)
XI. Small sealing ring for the worm
(2)
XII. Hook
NOTE: Use only the pusher to push fruits (VIII).
Preparing for operation and operation
Make sure the sealing rings
●
(X)
and
(XI)
are installed
on the body
(III)
and worm
(II)
. If not, please install the
sealing rings in the openings of these elements (the body
and the worm).
Insert the screen
●
(IX)
into the body
(III)
and push until
stop.
In order to remove the sieve (IX) out of the body (III), it
is helpful to use the hook (XII). Put the shorter end of
the hook (XII) into the hole of the sieve (IX), and pull
the sieve (IX) outside.
Insert the worm
●
(II)
into the squeezer chamber
(I)
and
insert the body with the screen onto the worm paying
attention that the sieve is placed downwards, and the
positioning opening fits the protrusion of the squeezer
chamber.
Screw the nut
●
(IV)
onto the squeezer chamber
(I)
.
Screw the adjustment screw
●
(VI)
into the body
(III)
and
insert the juice channel
(V)
until it snaps shut on the body
(III)
and you hear a click.
Insert the assembled squeezer onto the motor,
●
proceeding in the same way as in the description of the
mincing chamber.
Insert the bowl
●
(VII)
and the pusher
(VIII)
– from the
mincing unit onto the feeding tube.
Put some appropriate vessels for juice and pulp under
●
the juice channel outlet
(V)
and adjusting screw
(VI)
.
Plug in the appliance.
●
Turn on the appliance by pressing the
●
„I”
button and
next insert the fruits pushing them with the pusher.
In order for the juice squeezing process to run properly
do not screw the adjustment screw too deeply in the initial
operation phase. After assessing the amount of juice in
the processed fruits, adjust the screw in order to obtain an
adequate effectiveness and to avoid clogging the appliance.
Observe the pulp dryness during squeezing. If they
●
are too dry, unscrew the adjusting screw
(VI)
, to avoid
clogging the appliance.
The screw adjustment depends on the type of processed
fruits, in case of juicy and ripe fruits adjust the screw
deeper, and for fruits that are not as juicy, the level of screw
adjustment should be lower.
If the screw adjustment does not provide an adequate
squeezing effectiveness, you can process the processed
fruits once again.
The clogging of the chamber outlet (in the adjustment screw
(III)
) with juicy processed fruits can cause the juice to contact
the motor.
Unplug the appliance if the chamber outlet becomes
clogged. Pay special attention during the juice squeezing
process, make sure the screen openings are not clogged.
Dismantle the juicer from the motor (as in the case of the
mincing chamber), dismantle the squeezer, clean (wash)
the squeezer elements. Use the included brush to clean the
appliance, especially the screen.
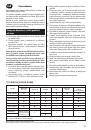
Quern grinder
(Fig. 10)
I. Nut
II. Quern regulator
III. Body with handle
IV. Internal quern
V. External quern
VI. Worm
VII. Grinder chamber
VIII. Pan
IX. The groove of the body has to hit the protrusion of the
grind chamber
Device description
Presented device can be used to grinding such products as:
corns, oily seeds and the dry comestibles
The quern grinder enables grinding of such products as:
wheat, oat, rice, granular coffee, all-spice, charlock, walnuts,
hazel-nuts dried mushrooms, almonds, soya. linseed,
buckwheat groats, peeled sunflower seeds etc.
IMPORTANT: Don`t grind the oily products by the
minimal granulation set up. Grinding device can be
glued or blocked.
IMPORTANT: Device is not dedicated for grinding the
very hard products as f. e. dried pea, maize, popcorn.
The installation of the grinder on the device
When the grinder chamber is turned right through the angle
of 45, put the assembled grinder on the drive by putting the
protrusions of grinder chamber
(VII)
on the recesses of the
drive, and then, turn left to the position in which you will hear
“
clicking
” of the blocking. It means that the grinder has been
assembled correctly.
Usage and regulation of the grinder
Before the first use,
wash (see “CLEANING”) and dry
a disassembled grinder, and then grind around 50 grams of
product (f. e. corns) - set-up the grinding option of the device
with the medium comminute. The grinded product is not fit to
use cause it` s polluted and its necessary throw it away.
IMPORTANT: Maximal time of uninterrupted work is
around 15 minutes.
This condition is connected with maximal work time of
machine, for which it should be done the 45 minutes of
pause after 15 minutes of operation.