operAtion
Controls shown in Fig.11:
p1:
Briefly pressing the button turns the lower lights on and off. Pressing and holding down the button for >2” turns the
LEDs on and off (if present)
p2:
Activates/deactivates the AUTOMATIC function
p3:
Nothing happens when the button is pressed when the motor is OFF.
Briefly pressing the button when the motor is ON reduces the speed until the motor turns off (4^?3^?2^?1^?OFF)
If the filter alarm is active, pressing and holding down the button for >2”, resets the filter alarm
p4:
Pressing the button when the motor is OFF, turns the motor on.
Pressing the button when the motor is ON, increases the speed.
p5:
Pressing the button when the motor is OFF, the motor is turned on at the speed stored when it was turned off or in
first speed. If pressed for 2’’, it deactivates all the loads (lower lights, LEDs, motor) storing the motor speed.
N.B. The hour count for filter change remains stored even if the power fails.
filter alarm:
After 30h of motor operation, the central segment of the display lights up for 30’’ each time the motor is turned off.
After 120h of motor operation, the central segment of the display flashes for 30’’ each time the motor is turned off.
To reset the filter alarm, press and hold down P3 when they are active.
Display:
1) Shows the current speed
2) When the motor is off it indicates the filter alarm: after 30 hours the central segment comes on fixed, and after 120
hours the central segment flashes
AutoMAtic function
After setting the
AutoMAtic
function, the speed is automatically set by the sensor; this mode is shown on the display
with the letter “A”. When the
AutoMAtic
function is activated/deactivated the motor turns off. When there is a speed
change, the display shows the current speed flashing for 5” and then the letter “A” reappears. During
AutoMAtic
operation you can at any time adjust the motor speed.
If turning off the motor (pressing P3 or P5) when the
AutoMAtic
function is active, the function is deactivated.
sensitiVitY setting
•
With the motor off and the
AutoMAtic
function deactivated, press and hold down
p2
until the display shows the
current sensitivity.
•
Select the sensitivity using
p3 (-)
and
p4 (+)
. The settable values are from 1 to 9.
•
To store the new sensitivity, press
p2
.
Attention: to preVent DAMAGinG the sensor, Do not use siLicone
proDucts neAr the hooD!
Grease filter:
The grease filter must be handled with particular care and must be cleaned periodically.
On average every 2 months, clean the grease filter when the filter alarm appears (for instructions on the filter alarm
refer to the paragraph on the controls).
Removing the grease filter Push the handle outwards and pull the filter downwards (Fig. 3). Wash the filter with neutral
detergent.
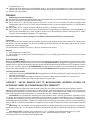
Charcoal filter:
If the hood is used in the filtering version, the charcoal filter will periodically have to be replaced.
In relation to use, on average every 6 months, replace the charcoal filter when the filter alarm appears (for instructions
on the filter alarm refer to the paragraph on the controls). Removing the charcoal filter: Remove the grease filter by
pushing the handle outwards and pulling the filter downwards (Fig.3). Then remove the charcoal filter by pulling the tab
and turning the filter downwards (Fig. 8).
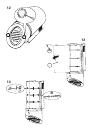
Lighting
: to change the halogen bulbs open the cover levering from the proper slots (Fig. 12). Replace with bulbs
of the same type.
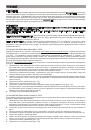
replacing the LeDs:
Remove the front panel (Fig. 13-C) and the retaining screws (Fig. 13-B).
Remove the fastening bracket screw (Fig. 14-A) and detach the connector (Fig. 14-B).
Replace with a LED of the same type.