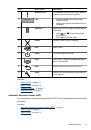
Tips on using the Scan button
•
Before you use the
Scan
(
) button for the first time, you must select the shortcuts
you want displayed in the scan shortcuts menu.
•
To cancel a scan, press the
Cancel
( ) button.
•
You can associate the
Scan
(
) and
Copy
(
) buttons with any button-aware
scanning software. For more information, see the printed Getting Started Guide.
•
If you want to preview and edit your scan before sending it, double-click the
HP Scanning
icon on the desktop, click
Change Settings...
, and select
Show a
preview scan
. You can also set the
Scan
button to show a preview before sending
the scan. For more information, see the scanner software help.
•
If you are scanning 35 mm slides or negatives, select a scan shortcut for slides or
negatives. If you do not, the transparent materials adapter light does not turn on.
•
If you want to create a custom scan shortcut, double-click the
HP Scanning
icon on
your computer. In the
HP Scanning
shortcuts dialog box, highlight the scan shortcut
that is most like the one you want to create, and then click
Change Settings
. Modify
the settings, and then save the scan shortcut. For more information, see the scanner
software help. You can also specify a scan shortcut as the default so that you do not
need to select it from the list each time.
See also
•
•
“Use the HP scanning software” on page 14
•
“Use other software programs” on page 15
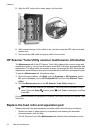
Use the HP scanning software
Start the scan from the HP scanning software when you want more control during the
scanning process, such as when you want to preview the image before the final scan,
use more advanced features, or change scan settings.
To scan using the HP scanning software, follow these steps:
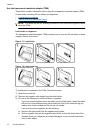
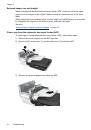
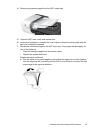
1.
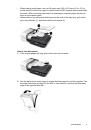
Load the originals.
2.
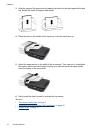
Double-click the
HP Scanning
icon.
Chapter 1
14
Use the scanner


Инструкции и руководства похожие на HP Scanjet N6310