Automatically remove blank pages
To set your scan preferences to automatically remove blank pages from the automatic
document feeder (ADF) output scan, follow these steps:
1.
Double-click the
HP Scanning
icon on the desktop, select a document scan shortcut,
click
Change Settings...
, select
Document (Glass or Feeder)
as the scan type
under
Scan Shortcut Settings
, and then click
Advanced Document Settings...
.
2.
Select
Automatically remove blank pages (from feeder)
on the
Advanced
Document Settings
dialog box, and then click
OK
.
3.
Click
Save Shortcut...
, accept the default shortcut name or enter a new shortcut
name, and then click
Save
to save this as a new scan shortcut.
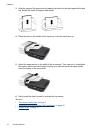
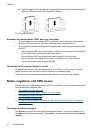
Automatically straighten scanned images
Items fed through the automatic document feeder (ADF) or placed on the scanner glass
may not be aligned with the scanner glass. The software can automatically detect skewed
items, and correct for up to 20 degrees of skew in the output image.
To automatically straighten the scan output, follow these steps:
1.
Double-click the
HP Scanning
icon on the desktop, select a document scan shortcut,
then select
Scan Preferences
on the
Options
menu.
2.
On the
Document
tab of the
Scan Preferences
dialog box, select
Automatically
straighten scanned images
, and then click
OK
.
3.
Click
Save Shortcut...
, accept the default shortcut name or enter a new shortcut
name, and then click
Save
to save this as a new scan shortcut.
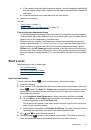
Filter out color from a document (color channel dropout)
You can filter out a color channel (red, green, or blue) from a scan, which might reduce
the scan file size and improve optical character recognition (OCR) results.
To select a color channel to eliminate from a scanned image, follow these steps:
1.
Double-click the
HP Scanning
icon on the desktop and initiate a scan.
2.
In the
Final Images
area, select the thumbnail to adjust.
3.
Under
Output Type
in the
HP Scanning
preview window, select
Black and White
.
4.
In the image toolbar, select
Adjust Black and White
, select the color to drop out,
and then click
Finish
.
For more information on dropping out colors, see the scanner software help.
Scan without reviewing
The standard process for using the HP scanner software to complete your scans is as
follows:
1.
Scan document pages.
2.
Review the scanned document pages in the
HP Scanning
preview window. Delete
and rescan pages as necessary.
Chapter 2
18
Useful scanning features