Configuring the system
15
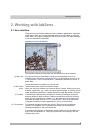
Select
Single Sign On
entry. With Windows Authentication, the data with
which the user logs on to MS-Windows will also be used for logging on to
the database.
You can also select the
SQL Authentication
entry.
With SQL Authentication the log-on data that has been defined for
Microsoft SQL Server will be used. Every user of your database must
know the log-on data (supplied by the database administrator) and
has to enter them in the
User Name
and
Password
fields to be able
to open the database.
The first step in setting up a database has now been completed.
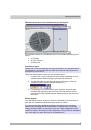
4. Click
the
Next >
button.
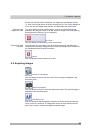
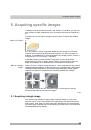
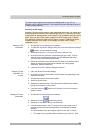
5. Enter the name of the database in the
Database Name
field. The name
must not be longer than 20 characters and must not contain any spaces
or special characters. Under this name you'll find the database in the
Open Database
dialog box later on.
6. If the new database is to become your standard database, select the
Use
as standard database
check box. This option makes sense when you
mostly work with the same database.
Later on, you can use the
Tools > Options > Database > Standard
database
command to specify that the standard database will be
automatically opened whenever you start your software.
7. Enter the directory in which the documents are to be stored. To do so,
click the button [ … ] with the three points located next to the
Document
Storage Path
field, then browse to the directory you want to use.
Note: When several people are to work with the database, select a
directory which is also available to other users of this database.
If you're the only user of the database, you can also choose a local
directory on your own PC.
Note: To have your database with all of its documents regularly saved,
make sure that both the database server, and the PC on which the
documents are stored are incorporated in an automatic data back-up
process (e.g., every night).
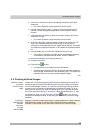
8. When you work with several databases, enter a descriptive text for the
new database in the
Database Description
field. This text will later be
displayed in the
Open Database
dialog box (when you use the
Use
database connection file
connection mode).
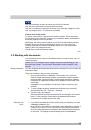
9. Click
the
Next >
button.
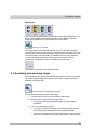
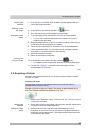
10. In the
Template File Path
field, choose a database template. A database
template has the file extension DBE.
A database template already contains a defined database structure.
Your software will have been supplied with a database template.
During the software installation, the template is installed in the
following directory:
..\Documents and Settings\All Users\Application Data\Olympus\OSIS
\ <Name of the software>\Database\DBE
Step 2: Entering
the name of the
database, and
specifying the
storage location for
documents
Step 3: Selecting a
database template