Инструкция для DIMPLEX ECW 937 T

(скачивание инструкции бесплатно)
Формат файла: PDF
Доступность: Бесплатно как и все руководства на сайте. Без регистрации и SMS.
Дополнительно: Чтение инструкции онлайн
background image


5

357

432

MIN

230

230
MIN

577

230

156

MIN

450 MIN

3. Electrical Connection


The heater is supplier with an attached plug.


If the connecting lead is damaged, it must be replaced; a 

special new lead can be obtained from the manufacturer or 

from after-sales service.


The heater must not be located directly beneath a wall 

socket outlet. 

The plug must be accessible after installation. 
 

4. Heater Operation 

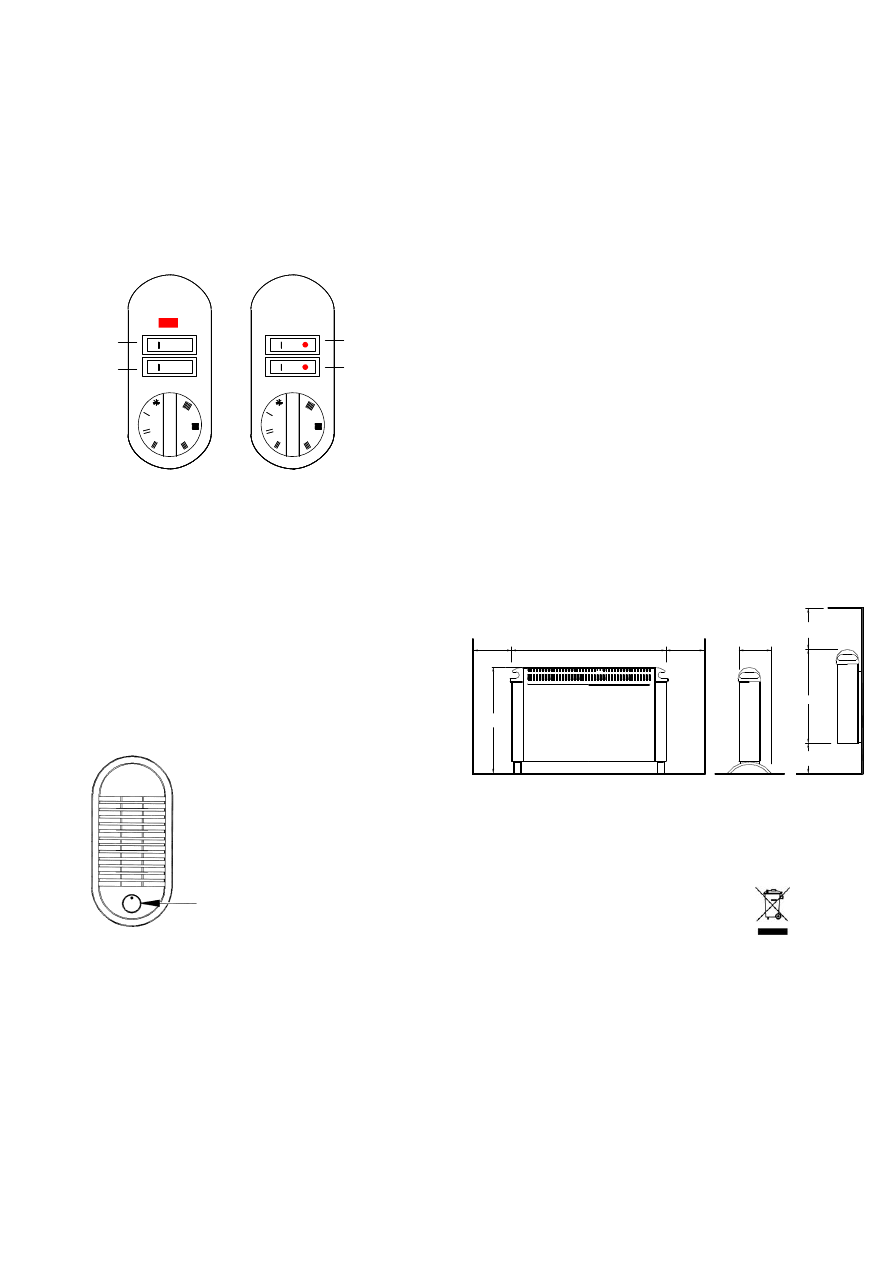
All switch functions are explained below.  

ECW 934  

ECW 937 T 


The heater is equipped with a thermostat, by means of 

which the desired room temperature can be set. 


The setting * represents a room temperature of about 6°C 

(protection against freezing).


Turning the thermostat knob to the right (clockwise) 

increases the temperature setting, while turning to the left 

(anticlockwise) reduces the desired temperature. 

Warning! 

Depending on the size of the room, heat requirement and 
thermostat setting, rooms may overheat if the heating is not 
controlled. This can be dangerous for people who are not 
able to leave the room as it gets too hot.


4.1. Fan Operation (only ECW 937 T)


The ECW 937 T heater has an 

additional fan for faster air 

circulation and quicker heat 

convection. 

The fan can also be used as a cold 

air blower. 


Fan on/off 


5. Anti-Overheat


The heater is protected against overheating. If the air 

circulation is impeded (e.g. by covering or blocking of the air 

grille), the unit automatically switches off.


If this occurs, switch the heater off for a few minutes (turn 

the switch to “0” or pull the plug out), so that the unit can 

cool down sufficiently. Before switching the unit on again, 

remove the cause of overheating. 

Keep the air inlets and outlets free of dust to ensure that 

maximum heat output is available. Before the start of the 

heating season, vacuum-clean the heater to remove any dirt 

or dust. 

 
6. Possible Faults


If the heater does not give out any warmth, check that it is 

switched on and that the thermostat is set to the 


correct temperature. Then check the fuse or miniature circuit 

breaker.


If the cause of the fault cannot be identified, contact the 
nearest after-sales service center.  
You must state the unit E-number and FD-number, as 
indicated on the type plate (wiring compartment cover).


Any examination of the heater or repair work may only be 
carried out by a qualified electrician or after-sales service 
technician. 


7. Cleaning


Before cleaning, ensure that the heater is disconnected from 

the power supply and that it has cooled down. The outer 

surface can be wiped with a soft damp cloth. Do not use 

scouring powder or furniture polish, as these can damage 

the surface.


Dust that collects within the unit can be removed from the 

outside using a vacuum cleaner. 


8. Technical Data


Power supply voltage 

1/N/PE~ 230V, 50Hz


Heat output


2000 W 

Protection class I


Protective earth terminal


Weight


ECW 934: 


3.5 kg 


ECW 937 T:  4.0 kg 


9. Warranty


Authorized dealers can provide information on the terms and 
conditions of warranty. The warranty is not valid without a 
sales receipt marked with the date of purchase. 


Disposal Notice


The product should not be disposed of with 
your other household waste 


I

II

O

I

On/off 

1000 W, 
2000 W 

Thermo-
stat 

1000 W 

1000 W 


1
2
3
4
5
6
7
8
9
10
11
12
13
14
15
16
17
18
19
20
Оглавление инструкции
  • Страница 1 из 21
    Montage- und Gebrauchsanweisung Instructions for Installation and Use Instructions de montage et de service Návod k montáži a použití Instrukcja montażu i obsługi Szerelési és kezelési útmutató Указания за монтаж и употреба Montavimo ir vartojimo instrukcija Руководство по монтажу и эксплуатации
  • Страница 2 из 21
    D Montage- und Gebrauchsanweisung ECW 934, ECW 937 T Standkonvektor 1. Wichtige Hinweise ecw93_ba 07/10/B Montage der Standfüße Die beiden Befestigungsschrauben für die Standfüße befinden sich auf der Geräteunterseite. Befestigungsschrauben lösen. Standfüße wie im Bild dargestellt einrasten und
  • Страница 3 из 21
    3. Elektrischer Anschluss Damit die volle Heizleistung abgegeben wird, ist es notwendig die Luftein- und Luftaustrittsöffnungen staubfrei zu halten. Bitte vor der Heizperiode mit Staubsauger reinigen! Das Heizgerät wird steckerfertig geliefert. Wenn die Anschlussleitung dieses Gerätes beschädigt
  • Страница 4 из 21
    GB Instructions for Installation and Use ECW 934, ECW 937 T Convector Heater 1. Important Information Attaching the Support Feet The two fastening screws are located on the bottom of the unit. Undo the screws. Engage the support feet as shown in the illustration and secure with the attachment
  • Страница 5 из 21
    3. Electrical Connection Keep the air inlets and outlets free of dust to ensure that maximum heat output is available. Before the start of the heating season, vacuum-clean the heater to remove any dirt or dust. The heater is supplier with an attached plug. If the connecting lead is damaged, it must
  • Страница 6 из 21
    F Instructions de montage et de service Convecteur vertical ECW 934, ECW 937 T 1. Indications importantes Montage des pieds Les deux vis pour la fixation des pieds se trouvent à la face inférieure de l’appareil. Desserrez les vis de fixation, puis encliquetez et vissez les pieds comme sur le
  • Страница 7 из 21
    3. Branchement électrique Afin que l’appareil dégage sa pleine puissance de chauffage, il est nécessaire de maintenir les entrées et sorties d’air exemptes de poussière. Veuillez donc les nettoyer avec l’aspirateur avant la saison de chauffage. L’appareil est livré avec une fiche prête à l’emploi.
  • Страница 8 из 21
    CZ Návod k montáži a použití ECW 934, ECW 937 T vertikální konvektor 1. Důležité informace Montáž noh Oba šrouby určené k montáži noh se nacházejí na spodní straně přístroje. Uvolněte fixační šrouby. Nohy nasaďte tak jak je znázorněno na obrázku u přišroubujte. Pozorně si prosím přečtěte veškeré
  • Страница 9 из 21
    3. Připojení k síti K zajištění plného výkonu pravidelně zbavujte prachu vstupní a výstupní otvory vzduchu. Před zahájením topného období ke zbavení nečistot a prachu použijte vysavač! Konvektor se dodává ve stavu připraveném k připojení k síti. Dojde-li k poškození síťového kabelu, musí být
  • Страница 10 из 21
    PL Instrukcja montażu i obsługi ECW 934, ECW 937 T Konwektor stojący 1. Ważne wskazówki Proszę uważnie przeczytać wszystkie informacje podanie w niniejszej instrukcji obsługi. Instrukcję należy starannie przechowywać i przekazać ją dalej przy ewentualnej zmianie właściciela. Urządzenie wolno używać
  • Страница 11 из 21
    3. Przyłącze elektryczne Grzejnik jest gotowy do podłączenia za pośrednictwem wtyczki. Uszkodzony przewód przyłączowy tego urządzenia należy wymienić na specjalny przewód, który można nabyć u producenta lub w jego serwisie. Grzejnika nie wolno ustawiać bezpośrednio pod gniazdkiem ściennym. Po
  • Страница 12 из 21
    H Szerelési és kezelési útmutató ECW 934, ECW 937 T Állókonvektor 1. Fontos tájékoztatás Figyelmesen olvassuk el a jelen útmutatóban leírt információkat. Gondosan őrizzük meg az útmutatót, és adjuk tovább azt, ha a készüléket esetleg másnak a tulajdonába adjuk. A készüléket csakis a helyiség
  • Страница 13 из 21
    3. Villamos csatlakoztatás A készülék dugaszolásra készen kerül leszállításra. Ha a csatlakozókábel megsérül, azt speciális csatlakozókábellel kell pótolni, amely a gyártónál vagy vevőszolgálatánál kapható. A készüléket nem szabad közvetlenül a dugaszolóaljzat alá állítani. A dugasznak a szerelés
  • Страница 14 из 21
    BG Указания за монтаж и употреба ECW 934, ECW 937 T Конвекторен отоплителен уред 1. Важни указания Прочетете внимателно изложената в ръководството информация. Съхранявайте старателно това ръководство и го предайте на евентуален следващ притежател. Уредът е предназначен само за отопление на стаен
  • Страница 15 из 21
    3. Електрическо свързване Уредът се доставя напълно комплектован. Ако се повреди кабелът на уреда, той следва да се подмени със специален такъв, който може да се получи от производителя или сервизната му служба. Не монтирайте уреда непосредствено под контакт на стената. След приключване на монтажа
  • Страница 16 из 21
    LT Montavimo ir vartojimo instrukcija ECW 934, ECW 937 T Stovintis konvektorius 1. Svarbūs nurodymai Prašome atidžiai perskaityti visą šioje instrukcijoje pateiktą informaciją. Rūpestingai saugokite šią instrukciją ir prireikus perduokite ją kitam savininkui. Prietaisą leidžiama naudoti tik orui
  • Страница 17 из 21
    3. Prijungimas prie elektros tinklo Šildymo prietaisas tiekiamas pilnai sukomplektuotas pajungimui su šakute. Pažeistas šio prietaiso prijungiamasis kabelis turi būti pakeistas specialiu kabeliu, kurį Jūs galite įsigyti pas šių prietaisų gamintoją arba jų techninės priežiūros tarnyboje. Draudžiama
  • Страница 18 из 21
    RU Руководство по монтажу и эксплуатации ECW 934, ECW 937 T Напольный конвектор 1. Важные указания Перед началом работы рекомендуется внимательно изучить информацию, содержащуюся в руководстве. Бережно сохраняйте руководство, которое затем, возможно, будет передано следующему пользователю. Прибор
  • Страница 19 из 21
    3. Электрическое подключение Прибор поставляется готовым к подключению. Если кабель подключения поврежден, то он подлежит замене производителем или в гарантийной мастерской. Запрещается устанавливать прибор непосредственно под электрической розеткой. Не закрывайте доступ к штекеру. 4. Нагрев
  • Страница 20 из 21
    Garantieurkunde gültig für Deutschland und Österreich Die nachstehenden Bedingungen, die Voraussetzungen und Umfang unserer Garantieleistung umschreiben, lassen die Gewährleistungsverpflichtungen des Verkäufers aus dem Kaufvertrag mit dem Endabnehmer unberührt. Für die Geräte leisten wir Garantie
  • Страница 21 из 21