Appendix A
Accessibility
147
•
The iPad FaceTime camera:
Move your head to trigger the switch. You can use the camera as
two switches: one when you move your head to the left, and the other when you move your
head to the right.
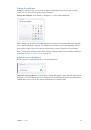
Add a switch and choose its action.
Go to Settings > General > Accessibility > Switch Control >
Switches. If you use only one switch, it is your Select Item switch by default.
If you’re adding an external switch, you need to connect it to iPad before it will appear in the
list of available switches. Follow the instructions that came with the switch. If it connects using
Bluetooth, you need to pair it with iPad—turn on the switch, go to Settings > Bluetooth, tap the
switch, then follow the onscreen instructions. For more information, see
page 41.
Turn on Switch Control.
Go to Settings > General > Accessibility > Switch Control, or use the
Accessibility Shortcut. See
on page 130.
Turn off Switch Control.
Use any scanning method to select and tap Settings > General >
Accessibility > Switch Control. Or triple-click the Home button.
Basic techniques
Whether you use item scanning or point scanning, the Switch Control basics are the same.
Select an item.
Trigger your Select Item switch when the item is highlighted (item scanning) or
under the crosshairs (point scanning).
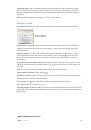
Perform an action on the selected item.
Choose a command from the control menu that
appears when you select the item. The layout of the menu depends on whether you use
Auto Tap.
•
With Auto Tap off:
The control menu includes only the Tap button and the More button (two
dots at the bottom). If you’re in a scrollable area of the screen, a Scroll button also appears.
To tap the highlighted item, trigger your Select Item button when Tap is highlighted. To see
additional action buttons, choose More at the bottom of the menu. If you have multiple
switches, you can set one up specifically for tapping.
•
With Auto Tap on:
To tap the item, do nothing—the item is automatically tapped when the
Auto Tap interval expires (0.75 seconds if you haven’t changed it). To see the control menu,
trigger your Select Item button before the Auto Tap interval expires. The control menu skips
the Tap button and goes right to the full set of action buttons.
Turn on Auto Tap.
Go to Settings > General > Accessibility > Switch Control > Auto Tap. To tap an
item with Auto Tap on, just wait for the Auto Tap interval to pass.
Dismiss the control menu without choosing an action.
Tap while the original item is
highlighted and all the icons in the control menu are dimmed. Or choose Escape from the
control menu. The menu goes away after cycling the number of times you specify at Settings >
General > Accessibility > Switch Control > Loops.
Perform screen gestures.
Choose Gestures from the control menu.
Scroll the screen.
Select an item in a scrollable part of the screen, then:
•
With Auto Tap off:
Choose the Scroll Down button (next to the Tap button) in the control menu.
Or, for more scrolling options, choose More, then choose Scroll.
•
With Auto Tap on:
Choose Scroll from the control menu. If many actions are available, you
might have to choose More first.
Tap the Home button.
Choose Home in the control menu.
 1
1
 2
2
 3
3
 4
4
 5
5
 6
6
 7
7
 8
8
 9
9
 10
10
 11
11
 12
12
 13
13
 14
14
 15
15
 16
16
 17
17
 18
18
 19
19
 20
20
 21
21
 22
22
 23
23
 24
24
 25
25
 26
26
 27
27
 28
28
 29
29
 30
30
 31
31
 32
32
 33
33
 34
34
 35
35
 36
36
 37
37
 38
38
 39
39
 40
40
 41
41
 42
42
 43
43
 44
44
 45
45
 46
46
 47
47
 48
48
 49
49
 50
50
 51
51
 52
52
 53
53
 54
54
 55
55
 56
56
 57
57
 58
58
 59
59
 60
60
 61
61
 62
62
 63
63
 64
64
 65
65
 66
66
 67
67
 68
68
 69
69
 70
70
 71
71
 72
72
 73
73
 74
74
 75
75
 76
76
 77
77
 78
78
 79
79
 80
80
 81
81
 82
82
 83
83
 84
84
 85
85
 86
86
 87
87
 88
88
 89
89
 90
90
 91
91
 92
92
 93
93
 94
94
 95
95
 96
96
 97
97
 98
98
 99
99
 100
100
 101
101
 102
102
 103
103
 104
104
 105
105
 106
106
 107
107
 108
108
 109
109
 110
110
 111
111
 112
112
 113
113
 114
114
 115
115
 116
116
 117
117
 118
118
 119
119
 120
120
 121
121
 122
122
 123
123
 124
124
 125
125
 126
126
 127
127
 128
128
 129
129
 130
130
 131
131
 132
132
 133
133
 134
134
 135
135
 136
136
 137
137
 138
138
 139
139
 140
140
 141
141
 142
142
 143
143
 144
144
 145
145
 146
146
 147
147
 148
148
 149
149
 150
150
 151
151
 152
152
 153
153
 154
154
 155
155
 156
156
 157
157
 158
158
 159
159
 160
160
 161
161
 162
162
 163
163
 164
164
 165
165
 166
166
 167
167
 168
168
 169
169
Инструкции и руководства похожие на APPLE iPad Pro 128Gb Wi-Fi+Cellular (4G), iPad Pro 128Gb Wi-Fi