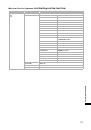
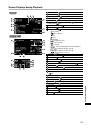
100
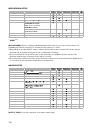
[MARKER LEVEL] Markers’ Intensity Level
Changes the intensity of the markers displayed on the screen to 40% (gray) or 100% (white).
Setting Options: [MARKER] Level/center/grid markers:
[100%]
, [40%]
[ASPECT] Aspect ratio guides:
[100%]
, [40%]
[SAFETY] Safety zone guides:
[100%]
, [40%]
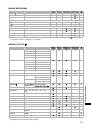
[F.AST BW-MOD] Focus Assist Function B&W Display Mode
Changes the display mode to black & white while the focus assist functions are activated.
Setting Options: [MAGN.] While the Magnifying function is active:
[OFF]
, [ON]
[PEAKING] While the Peaking function is active:
[OFF]
, [ON]
[OBJ DST UNIT] Object Distance Units Display
Selects the units (meters or feet) for the display of the distance to the object.
Setting Options:
[m (meter)]
, [ft (feet)]
[ZOOM INDICATOR] Zoom Indicator Display
Selects the display of the zoom indicator between a graphic bar and a numeric display.
Setting Options:
[BAR]
, [NUMBER]
[COLOR BARS] Color Bars Signal
Selects the type of signal to use to produce the color bars: EBU color bars (type 1) or SMPTE color bars
(type 2).
Setting Options:
[TYPE 1]
, [TYPE 2]
[1kHz TONE] 1 kHz Reference Audio Signal
Selects the strength of the audio signal.
Setting Options:
[OFF]
, [-12dB], [-18db], [-20dB]
[LANC AE SHIFT] AE SHIFT Dial on a
Controller
Selects the function of the AE SHIFT dial on the optional ZR-2000 Zoom Remote Controller so you can use it
to adjust the exposure compensation or the aperture value.
Setting Options:
[AE SHIFT]
, [IRIS]
[TALLY LAMP] Tally Lamp
Selects the operation of the tally lamp. Even if set to [OFF], the tally lamp will turn on when receiving a
command from the wireless controller.
Setting Options:
[ON]
, [BLINK], [OFF]
[LED] LED Indicators
Selects the operation of the LED indicators on the camcorder. When set to [TYPE 1], all LED indicators
(including that of the HDV/DV terminal) will be on. When set to [TYPE 2] all LED indicators will be on, except
for that of the HDV/DV terminal.
Setting Options:
[TYPE 1]
, [TYPE 2], [OFF]
[CUSTOM REC] Custom Recording
Selects whether to embed the on-screen character displays (date and time) as part of the video recording
and whether to record on the tape the enlarged image when using the Magnifying focus assist function.
• When [CHARACTER REC] is set to [ON], the menu option [TV SCREEN] will not be available and
[COMP.OUT] will automatically be set to [1080i/576i] and you will not be able to select [576i].
Setting Options: [CHARACTER REC] Recording of superimposed on-screen displays:
[OFF]
, [ON]
[MAGNIFYING REC] Recording of enlarged image while the Magnifying function is active:
[OFF]
, [ON]
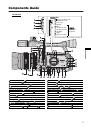
11
12
13
14
15
16
17
18
19
20
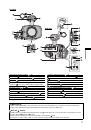
 1
1
 2
2
 3
3
 4
4
 5
5
 6
6
 7
7
 8
8
 9
9
 10
10
 11
11
 12
12
 13
13
 14
14
 15
15
 16
16
 17
17
 18
18
 19
19
 20
20
 21
21
 22
22
 23
23
 24
24
 25
25
 26
26
 27
27
 28
28
 29
29
 30
30
 31
31
 32
32
 33
33
 34
34
 35
35
 36
36
 37
37
 38
38
 39
39
 40
40
 41
41
 42
42
 43
43
 44
44
 45
45
 46
46
 47
47
 48
48
 49
49
 50
50
 51
51
 52
52
 53
53
 54
54
 55
55
 56
56
 57
57
 58
58
 59
59
 60
60
 61
61
 62
62
 63
63
 64
64
 65
65
 66
66
 67
67
 68
68
 69
69
 70
70
 71
71
 72
72
 73
73
 74
74
 75
75
 76
76
 77
77
 78
78
 79
79
 80
80
 81
81
 82
82
 83
83
 84
84
 85
85
 86
86
 87
87
 88
88
 89
89
 90
90
 91
91
 92
92
 93
93
 94
94
 95
95
 96
96
 97
97
 98
98
 99
99
 100
100
 101
101
 102
102
 103
103
 104
104
 105
105
 106
106
 107
107
 108
108
 109
109
 110
110
 111
111
 112
112
 113
113
 114
114
 115
115
 116
116
 117
117
 118
118
 119
119
 120
120
 121
121
 122
122
 123
123
 124
124
 125
125
 126
126
 127
127
 128
128
 129
129
 130
130
 131
131
 132
132
 133
133
 134
134
 135
135
 136
136
 137
137
 138
138
 139
139
 140
140
 141
141
 142
142
 143
143
 144
144
 145
145
 146
146
 147
147
 148
148
 149
149
 150
150
 151
151
 152
152