-
3
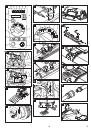
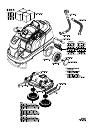
Place the boards on the edge of the pal-
let. Place the boards in such a way that
they lie in front of the four wheels of the
machine. Fasten the boards with
screws.
Slide the four support beams included
in the packaging under the ramp.
Remove the wooden bars in front of the
wheels.
Figure 5, see cover page
Pull the brake lever and push the appli-
ance down the ramp with the level
pulled.
or
Release emergency-stop button by
turning.
Set main switch to "1".
Press the drive direction switch and
slowly move the machine down from
the ramp.
Set main switch back to "0".
The procedure for changing the cleaning
head is described in the chapter "Mainte-
nance Tasks".
Note
On some models, the cleaning head is al-
ready installed.
The installation of the brushes is described
in the chapter "Maintenance Tasks".
Figure 6, see cover page
Insert the vacuum bar into the vacuum
bar suspension in such a manner that
the profiled sheet is positioned above
the suspension.
Tighten the wing nuts.
Insert the suction hose.
Danger
Risk of injuries. Never use the unit without
protective roof in areas where the opera-
tors can be hit by dropping objects.
Note
Press emergency-stop switch to immedi-
ately switch off all functions of the machine.
Danger
Danger of accident. The immobilizing brake
must always be checked first on an even
surface before starting the machine.
Take the seating position.
Release emergency-stop button by
turning.
Set main switch to “1”.
Select a direction of travel.
Gently depress drive pedal.
The brake must get released and you
must be able to hear it (the control lamp
for immobilizing brake on the console
switches off). The machine must roll
slightly on a plane surface. When the
pedal is released, the brake falls in in an
audible manner. Switch off the ma-
chine and call the aftersales service if
the above-mentioned events do not oc-
cur.
Danger
Danger of accident. If the machine does not
brake, then proceed as follows:
If the device does not come to a halt on
a ramp with a gradient of 2% when you
release the drive pedal, then the emer-
gency-stop button may be pressed for
safety reasons only if the mechanical
functioning of the immobilizing brake
has been checked properly before com-
missioning the device.
Switch off the machine only after it
comes to a complete halt (on an even
surface) and call up the aftersales serv-
ice!
Further, follow all warning instructions
for braking.
Danger
Danger of tipping if gradient is too high.
The gradient in the direction of travel
should not exceed 10%.
Danger of tipping when driving round
bends at high speed.
Danger of slipping on wet floors.
Drive slowly when cornering.
Danger of tipping on unstable ground.
Only use the machine on sound surfac-
es.
Danger of tipping with excessive sideways
tilt.
The gradient perpendicular to the direc-
tion of travel should not exceed 10%.
Release emergency-stop button by
turning.
Sit on the seat and set main switch to
"1".
Set the drive direction using the drive
direction button at the operator console.
Determine the driving speed by press-
ing the drive pedal.
Stop the machine: Release the drive
pedal.
Note
The drive direction can also be changed
during the drive. Thus, very blunt edges
can be polished by moving forward and
backward a few times.
When switching on the display, the follow-
ing messages will appear in sequence:
–
„ < SELFTEST >“: The control conducts
a self-test.
–
„Water E-----F“ (model Adv): Water lev-
el in the fresh water tank (lasts for 6
seconds).
„OpHrs xxxxxhxxm+“ (Classic model):
Operating hours (lasts for 6 seconds)
–
"Battery: E-----F“: Charging status of
battery.
In case of overloading, the drive motor au-
tomatically switches off after a certain peri-
od. A fault message is displayed on the
console. The concerned unit gets switched
off if the controls get overheated.
Allow machine to cool down at least for
15 minutes.
Turn the main switch to "0" and turn it
back to "1".
몇
Warning
Risk of damage. Only use the recommend-
ed detergents. With respect to different de-
tergents the operator bears the increased
risk regarding the operational safety and
danger of accident.
Only use detergents that are free from sol-
vents, hydrochloric acid and hydrofluoric
acid.
Follow the safety instructions for using de-
tergents.
Note
Do not use highly foaming detergents.
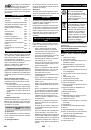
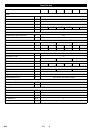
Recommended detergents:
Open the cover of the fresh water reser-
voir.
Fill fresh water (max. 60 °C) until 15 mm
below the upper edge of the tank.
Pour in detergent.
Note
If detergent is added to the cleaning deter-
gent tank first, followed by water, there
could be a lot of foam.
Close the cover of the fresh water res-
ervoir.
Note
Fill up the fresh water tank completely be-
fore starting up the machine to ventilate the
water supply system.
Install cleaning head
Installing the Brushes
Installing the Vacuum Bar
Operation
Check immobilizing brake
Driving
Driving
Display
Overload
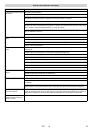
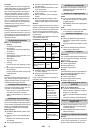
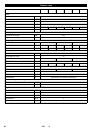
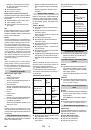
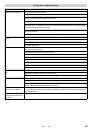
Filling in detergents
Detergent
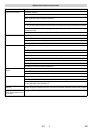
Application
Detergent
Routine cleaning of all wa-
ter resistant floors
RM 746
RM 780
Routine cleaning of glossy
surfaces (e.g. granite)
RM 755 es
Routine cleaning and ba-
sic cleaning of industrial
floors
RM 69 ASF
Routine cleaning and ba-
sic cleaning of fine stone-
ware tiles
RM 753
Routine cleaning of tiles in
sanitary areas
RM 751
Cleaning and disinfection
in sanitary areas
RM 732
Removal of coating from
all alkali-resistant floors
(e.g. PVC)
RM 752
Removal of coating from li-
noleum floors
RM 754
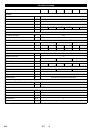
Fresh water
17
EN
 1
1
 2
2
 3
3
 4
4
 5
5
 6
6
 7
7
 8
8
 9
9
 10
10
 11
11
 12
12
 13
13
 14
14
 15
15
 16
16
 17
17
 18
18
 19
19
 20
20
 21
21
 22
22
 23
23
 24
24
 25
25
 26
26
 27
27
 28
28
 29
29
 30
30
 31
31
 32
32
 33
33
 34
34
 35
35
 36
36
 37
37
 38
38
 39
39
 40
40
 41
41
 42
42
 43
43
 44
44
 45
45
 46
46
 47
47
 48
48
 49
49
 50
50
 51
51
 52
52
 53
53
 54
54
 55
55
 56
56
 57
57
 58
58
 59
59
 60
60
 61
61
 62
62
 63
63
 64
64
 65
65
 66
66
 67
67
 68
68
 69
69
 70
70
 71
71
 72
72
 73
73
 74
74
 75
75
 76
76
 77
77
 78
78
 79
79
 80
80
 81
81
 82
82
 83
83
 84
84
 85
85
 86
86
 87
87
 88
88
 89
89
 90
90
 91
91
 92
92
 93
93
 94
94
 95
95
 96
96
 97
97
 98
98
 99
99
 100
100
 101
101
 102
102
 103
103
 104
104
 105
105
 106
106
 107
107
 108
108
 109
109
 110
110
 111
111
 112
112
 113
113
 114
114
 115
115
 116
116
 117
117
 118
118
 119
119
 120
120
 121
121
 122
122
 123
123
 124
124
 125
125
 126
126
 127
127
 128
128
 129
129
 130
130
 131
131
 132
132
 133
133
 134
134
 135
135
 136
136
 137
137
 138
138
 139
139
 140
140
 141
141
 142
142
 143
143
 144
144
 145
145
 146
146
 147
147
 148
148
 149
149
 150
150
 151
151
 152
152
 153
153
 154
154
 155
155
 156
156
 157
157
 158
158
 159
159
 160
160
 161
161
 162
162
 163
163
 164
164
 165
165
 166
166
 167
167
 168
168
 169
169
 170
170
 171
171
 172
172
 173
173
 174
174
 175
175
 176
176
 177
177
 178
178
 179
179
 180
180
 181
181
 182
182
 183
183
 184
184
 185
185
 186
186
 187
187
 188
188
 189
189
 190
190
 191
191
 192
192
 193
193
 194
194
 195
195
 196
196
 197
197
 198
198
 199
199
 200
200
 201
201
 202
202
 203
203
 204
204
 205
205
 206
206
 207
207
 208
208
 209
209
 210
210
 211
211
 212
212
 213
213
 214
214
 215
215
 216
216
 217
217
 218
218
 219
219
 220
220
 221
221
 222
222
 223
223
 224
224
 225
225
 226
226
 227
227
 228
228
 229
229
 230
230
 231
231
 232
232
 233
233
 234
234
 235
235
 236
236
 237
237
 238
238
 239
239
 240
240
 241
241
 242
242
 243
243
 244
244
 245
245
 246
246
 247
247
 248
248
 249
249
 250
250
 251
251
 252
252
 253
253
 254
254
 255
255
 256
256
 257
257
 258
258
 259
259
 260
260
 261
261
 262
262
 263
263
 264
264
 265
265
 266
266
 267
267
 268
268
 269
269
 270
270
 271
271
 272
272
Инструкции и руководства похожие на KARCHER B 90 R ADV BP PACK


Другие инструкции и руководства из категории Поломоечная машина