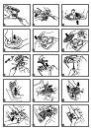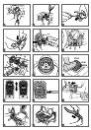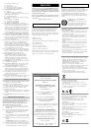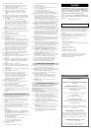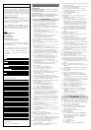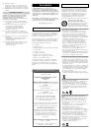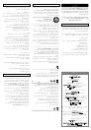
• B - selettore stazioni radio
• C - tasti on/off
• D - spia di radio accesa
• E - manopola regolazione volume
• F - tasti regolazione orologio digitale
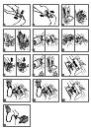
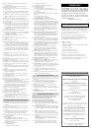
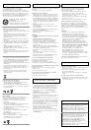
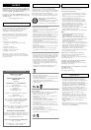
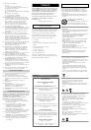
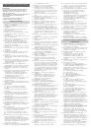
82 • COMPONENTI ABITACOLO:
• A - volante
• B - radio funzionante (vedi fig 81)
• C - quadro di controllo velocita' e stato di carica
della batteria (vedi fig 83)
• D - maniglia passeggero
• E - pedale acceleratore/freno elettrico (vedi fig
84-85-86)
• F - leva cambio (vedi fig 87)
• G - portabibite (vedi fig 88)
• H - vano porta lettore MP3
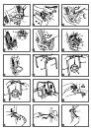
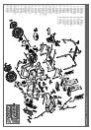
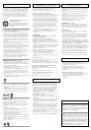
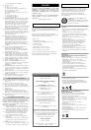
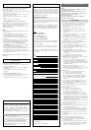
83 • QUADRO di CONTROLLO - Nella parte
inferiore del quadro di controllo viene visualizzato
lo stato di carica della batteria. Spia verde, la
batteria e' carica; spia arancione, la batteria si sta
scaricando, spia rossa, la batteria deve essere
ricaricata. Nella parte superiore i led verdi si
accendono pregressivamente all'aumentare della
velocita' del veicolo (sono solo a scopo di gioco
e non visualizzano la reale velocita' del veicolo).
84 • PEDALE ACCELERATORE/FRENO ELETTRICO
- Premendo con il piede il pedale dell’acceleratore
il veicolo si mette in moto. Rilasciando il pedale
entrerà in funzione il freno elettrico arrestando il
veicolo automaticamente.
85 • Sul pedale è posizionato il blocco seconda velocità.
Quando viene tolto il veicolo dall’imballo, il
blocco seconda velocità è posizionato come in
figura A (LOW) e permette al veicolo di viaggiare
alla velocità più bassa. Quando il blocco seconda
velocità è posizionato come in figura B (HIGH), il
veicolo viaggia alla velocità più alta.
86 • Per posizionare il blocco seconda velocità nella
posizione B (HIGH), svitare la vite di fissaggio del
blocco seconda velocità e spostarlo verso l’alto.
Attenzione, riavvitare sempre la vite.
87 • LEVA CAMBIO - Quando la leva cambio e'
posizionata in posizione verticale, il veicolo
viaggia in avanti alla velocita' LOW o HIGH.
Tirando indietro la leva cambio e premendo
contemporaneamente il pedale dell’acceleratore
il veicolo procede in retromarcia.
88 • PORTABIBITE - E’ dotato di due vani portabibite
per lattine o bottigliette.
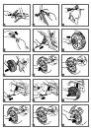
89 • CASSONE e MOLLEGGI - Il retro del veicolo è
dotato di un ampio cassone portaoggetti e di
veri molleggi funzionanti sulle ruote.
90 • CINTURE di SICUREZZA - Per agganciare la
cintura di sicurezza inserire la parte terminale
della cintura più lunga nella fibia della cintura più
corta premendo le due estremita' tra di loro.
91 • Per sganciare la cintura di sicurezza premere il
pulsante della fibia e contemporaneamente
sganciare i due elementi.
92 • Per regolare la lunghezza della cintura di sicurezza,
spostare il cursore come mostrato in figura.
SOSTITUZIONE DELLA BATTERIA
93 • Svitare la vite di sicurezza della seduta del sedile
passeggero e sollevare la seduta;
94 • Svitare i pomoli e togliere il sedile;
95 • Svitare le due viti della base del sedile. Scollegare
le spine della batteria e dell'impianto elettrico;
96 • Estrarre la base del sedile e sfilare le spine;
97 • Sostituire la batteria.
• Riposizionare la base del sedile dopo aver inserito
le spine nei fori. Ricollegare le spine e riposizionare
il sedile.
98 • ATTENZIONE: riavvitare sempre tutti i pomoli e
le viti.
CARICA DELLA BATTERIA
ATTENZIONE: LA CARICA DELLA BATTERIA E
QUALSIASI INTERVENTO ALL'IMPIANTO ELETTRICO
DEVONO ESSERE EFFETTUATI DA ADULTI.
LA BATTERIA PUÓ ESSERE CARICATA ANCHE
SENZA RIMUOVERLA DAL GIOCO.
99 • Scollegare la spina A dell' impianto elettrico
dalla spina B della batteria premendo le spine
lateralmente.
100 • Inserire la spina del caricabatterie ad una presa
domestica seguendo le sue istruzioni allegate.
Collegare la spina B con la spina C del
caricabatterie.
101 • A carica ultimata staccare il caricabatteria dalla
presa domestica, poi scollegare la spina C dalla
spina B.
102 • Inserire a fondo, fino allo scatto, la spina B nella
spina A.
• ATTENZIONE: terminate le operazioni di
ricarica riavvitare sempre tutti i pomoli e le viti.
103 • La batteria può essere caricata anche fuori dal
veicolo in questo modo se avete una batteria di
scorta, il bambino può continuare a giocare.
Read this instruction manual carefully to learn how
to use the vehicle and teach your child to drive it
properly and safely while enjoying it at the same
time. Keep the manual safe for future reference.
Before using the vehicle for the first time, charge the
battery for 18 hours. Failure to do this could result in
irreparable damage to the battery.
• Ages 3 to 10
• Two-seater vehicle
• One 24V 15Ah sealed lead acid rechargeable battery
• Two drive wheels
• Two 280 W motors
• Speed in 1st gear 5 km/h
• Speed in 2nd gear 10.5 km/h
• Speed in reverse gear 5 km/h
Peg Perego reserve the right to make changes to the
models and information in the present publication at
any time, for technical or company reasons.
Thank you for choosing a PEG PEREGO® product.
For over 50 years PEG PEREGO have been with you
as you take your children out - in carriages just after
they are born, then in strollers, and later on in pedal
and battery-powered toys
Discover our complete range of products, news and
other information about the Peg Perego world on
our web site.
www.pegperego.com
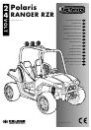
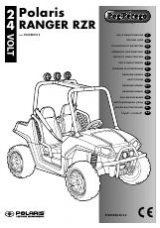
PRODUCT NAME
Polaris Ranger RZR
PRODUCT IDENTIFICATION CODE
IGOD0513
REFERENCE STANDARD (origin)
General Toy Safety Directive 88/378/EEC
Standard EN 71 / 1 -2 -3
Standard EN62115
Electromagnetic Compatibility Directive
2004/108/EC
Standard EN55022 – EN55014
European Directive WEEE 03/108/EC
European Directive RoHS 2002/95/EC
Phthalates Directive 2005/84/EC
Standard EN 60825-1
The vehicle is not compliant with the requirements
of road transport standards and consequently
cannot travel on public roads.
DECLARATION of CONFORMITY
Peg Perego S.p.A. declares under its own
responsibility that the item in question has been
subjected to internal operational tests and
approved according to the standards in force at
external, independent laboratories.
PLACE AND DATE OF ISSUE
Italy - 06.05.2008
Peg Perego S.p.A.
via A. De Gasperi 50
20043 Arcore (MI) – ITALIA
ENGLISH
DECLARATION OF CONFORMITY
IMPORTANT INFORMATION
Our toys are compliant with European Safety
Standards for toys (safety requirements stipulated by
the EEC Council) and with the “U.S. Consumer Toy
Safety Specification”. They are approved by the
I.I.S.G. (Italian Toy Safety Institute). They are not
compliant with the requirements of road transport
standards and consequently cannot travel on public
roads.
Peg Perego S.p.A. is ISO 9001
certified.
This certification provides customers
and consumers with a guarantee of
transparency and assurance about the
company’s working procedures.
WARNING! THE SUPERVISION OF AN ADULT IS
ALWAYS NECESSARY.
• Not suitable for children of under 36 months of
age due to the presence of small parts that could
be swallowed or inhaled.
• Do not use the vehicle on public roads, in places
where there is traffic or parked cars, on steep
slopes, near to steps and stairs, watercourses or
swimming pools.
• Children must always wear shoes when using the
vehicle.
• When the vehicle is in operation make sure that
children do not put their hands, feet, other body
parts, clothing, or other objects close to the
moving parts.
• Never wet sensitive vehicle components like the
motors, electrical systems, buttons, etc.
• Do not use petrol or other flammable substances
close to the vehicle.
• The vehicle must be only be used by a single child
unless it is classed as a two-seater vehicle.
WEEE DIRECTIVE (EU only)
• At the end of its useful life, this product is classed
as Waste Electrical and Electronic Equipment
(WEEE) and must therefore not be disposed of as
urban waste but instead taken to a designated
separated waste collection facility.
• Take it to an appropriate collection centre.
• The presence of dangerous substances contained in
the electrical components of this product
represents a potential source of danger to human
health and for the environment if the products are
not disposed of correctly.
• The barred dustbin symbol indicates that the
product must undergo sorted waste collection.
DISPOSAL OF THE BATTERY
• Help protect the environment.
• Used batteries must not be disposed of with
domestic waste.
• They can be left at a used battery or special waste
collection centre. Contact your local authorities
for more information.
AA 1.5 VOLT BATTERY WARNINGS
The insertion of the batteries must be carried out
and supervised by adults only. Do not allow children
to play with the batteries.
• The batteries must be replaced by an adult.
• Only use the battery type specified by the
manufacturer.
• Respect the +/- polarity.
• Do not short circuit the power supply terminals:
risk of fire or explosion.
• Always remove the batteries when the toy is not
used for a long time.
• Do not throw the batteries into a fire.
• Never try to recharge batteries if they are not
rechargeable.
• Do not mix old and new batteries.
• Remove flat batteries.
• Dispose of flat batteries in the appropriate
recycling containers.
SAFETY STANDARDS