Инструкция для PEG-PEREGO Polaris Ranger RZR

(скачивание инструкции бесплатно)
Формат файла: PDF
Доступность: Бесплатно как и все руководства на сайте. Без регистрации и SMS.
Дополнительно: Чтение инструкции онлайн
background image

Battery charging must be carried out and supervised
by adults only.
Do not allow children to play with the battery. 

CHARGING THE  BATTERY
• Charge the battery according to the instructions

enclosed with the battery charger and never for
more than 24 hours.

• To avoid damage, the battery should be charged as

soon as the vehicle starts to lose speed.

• If the vehicle is left unused for a long time,

remember to charge the battery and to keep it
disconnected from the electrical system. Repeat
the recharge procedure at least once every three
months.

• The battery must not be charged upside-down.
• Do not forget about the battery which is being

charged! Check it from time to time.

• Only use the battery charger provided and the

original 

PEG PEREGO

battery.

• The battery is sealed and does not require

maintenance. 

WARNING
• THE BATTERY CONTAINS CORROSIVE TOXIC

SUBSTANCES.
DO  NOT TAMPER WITH  IT.

• The battery contains acid-based electrolytes.
• Do not create direct contact between the battery

terminals, avoid strong impacts: risk of explosion
and/or fire.

• While charging, the battery produces gas. Charge

the battery in a well-ventilated environment, away
from sources of heat and flammable materials.

• The flat battery must be removed from the vehicle.
• It is not advisable to bring the battery into contact

with clothes, as it could damage them.

• Only use the recommended type of battery or an

equivalent type.

IF THERE IS A BATTERY LEAK
Protect your eyes. Avoid direct contact with the
electrolyte. Protect your hands.
Put the battery in a plastic bag and follow the
instructions for battery disposal.

IF SKIN OR EYES COME INTO CONTACT WITH
THE ELECTROLYTE
Thoroughly rinse the area concerned with running
water.
Consult a doctor immediately.

IF THE ELECTROLYTE IS SWALLOWED
Rinse the mouth and spit out the water.
Consult a doctor immediately.

BATTERY WARNINGS

• Check the condition of the vehicle regularly, paying

particular attention to the electrical system, the
plug connections, the terminal protectors and the
battery charger. If defects are identified, the
electrical vehicle and the battery charger must not
be used. For repairs use only original 

PEG PEREGO

spare parts.

PEG PEREGO

do not accept any responsibility for

cases of tampering with the electrical system.

• Do not leave the batteries or the vehicle close to

sources of heat like radiators, fireplaces, etc.

• Protect the vehicle from water, rain, snow, etc.

Using the vehicle on sand or mud may damage the
buttons, motors and gears.

• Lubricate moving parts like bearings, steering, etc.

periodically with light oil.

• The vehicle surfaces can be cleaned with a damp

cloth and, if necessary, with non-abrasive domestic
cleaning products.

• Cleaning must only be carried out by adults.
• Never dismantle the vehicle mechanisms or

motors, unless authorized by 

PEG PEREGO.

MAINTENANCE AND VEHICLE  CARE

For the safety of the child, before starting up the
vehicle read and carefully follow the following
instructions.
• Teach the child how to use the vehicle properly for

safe and enjoyable driving.

• Before starting, check that there are no people or

objects obstructing the vehicle’s path.

• Drive with hands on the handlebars/steering wheel

and always watch the road ahead.

• Brake in good time to avoid collisions.

2nd GEAR (if present)
Initially, use in 1st gear is recommended. Before
enabling 2nd gear, check that the child has learned to
use the handlebars/steering wheel, 1st gear and the
brake correctly, and has become familiar with the
vehicle.

WARNING!
• Check that all the wheel fixing studs/nuts are

fastened properly.

• If the vehicle is overloaded, as can happen on soft

sand, mud, or very uneven ground, the overload
switch will immediately disconnect the power. The
power supply will be restored after a few seconds.

• If the vehicle is overloaded on steep slopes, the

overload cut-out will immediately disconnect the
power. If this happens, 

REMOVE THE FOOT FROM THE

ACCELERATOR

. The electrical brake will be

activated, slowing down the descent of the vehicle.

• Only for 12 and 24 Volt vehicles: in first gear the

vehicle has a differential effect like a real motor
vehicle; on smooth terrain and with just one child
on board, the two wheels can turn at different
speeds and they can slip and slow down.

UNINTERRUPTED FUN: Keep a spare set of charged
batteries ready for use.

THE VEHICLE DOES NOT WORK?

• Check that there are no disconnected cables under

the accelerator plate.

• Check the operation of the accelerator button and

replace it if necessary.

• Check that the battery is connected to the

electrical system.

THE VEHICLE LACKS POWER?
• Charge the batteries. If after charging the problem

persists, have the battery and charger checked by
an assistance centre.

PROBLEMS?

RULES FOR SAFE DRIVING

PEG PEREGO

offers an after-sales assistance service,

directly or through a network of authorized
assistance centres, for any repairs or replacements
and the sale of original spare parts. To contact the
assistance centres refer to the “Assistance Centres”
booklet included in the packaging.

Peg Perego always strive to best satisfy their
customers' needs. Knowing the opinions of our
customers is therefore very important and valuable
to us. We would be very grateful if, once you have
used the product, you would fill out the 

CONSUMER

SATISFACTION QUESTIONNAIRE 

which you can find on

the internet at: www.pegperego.com, making
any observations or suggestions you might have.

ASSISTANCE SERVICE

WARNING
ASSEMBLY MUST ONLY BE CARRIED OUT BY
ADULTS. TAKE  CARE WHEN  REMOVING THE
VEHICLE FROM ITS PACKAGING. ALL THE
SCREWS AND SMALL PARTS ARE CONTAINED IN
A BAG INSIDE THE PACKAGING. THE BATTERY
MAY ALREADY BE FITTED INSIDE THE ITEM.
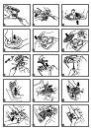
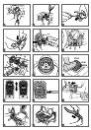
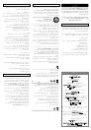
ASSEMBLY

1 • Remove the 4 fixing screws from the two seat

base sections.

2 • Pull out and remove the two seat bases.
3 • Remove the fixing screws from the two rear

base fixtures.

4 • Remove the two rear base locks.
5 • Pull the base in the direction of the arrow to

fully remove the motor unit.

6 • Reposition and screw on both rear base locks.
7 • Lift the two shock absorbers (1). Insert them

into the holes in the bodywork (2).

8 • Attach the shock absorbers to the bodywork

with the two pins (one each side). Note: the
packaging contains two spare pins.

9 • Insert the exhaust pipe as shown in the figure.

10 • Attach the exhaust pipe with the screw

provided.

11 • Position the rear box.
12 • Insert the tabs on the front of the rear box into

the bodywork (two each side).

13 • Fully insert the two metal tubes (one each side)

as shown in the figure.

14 • Attach the rear box with the three screws

provided. Important: the middle screw must be
tightened as shown in the following figure.

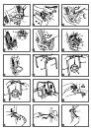
15 • Press the pin to help align the screw holes.
16 • Complete the attachment of the rear box by

fastening the two screws inside the cabin.

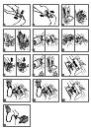
17 • Insert the side guards as shown in the figure,

taking care to fit the parts with the grid
extending towards the outside. Complete the
attachment by pushing the guards forward until
they click into position.

18 • Pull out the sides of the bodywork (1) and insert

the pins of the side guards (2).

19 • Press the sides of the bodywork at the two

points indicated in the figure to fix them in
position.

20 • Rear cover plate:

• A - Housing for attachment to bodywork.
• B - Housing for the insertion of metal tubes.
• C - Housing for the insertion of the exhaust

pipe. 

• D - Tabs for fixture to bodywork.

21 • Position the rear cover plate, matching the

various points marked with the letters A, B and
C.

22 • Lift the upper part of the rear cover plate to

facilitate the engagement of the tabs (D).

23 • Secure the rear cover plate with the two screws

as shown in the figure.

24 • Complete the attachment of the rear cover plate

by fastening the screw under the exhaust pipe.

25 • Front cover plate: 

• A - Tabs for fixing to the bodywork.
• B - Housing for engagement with the bodywork.
• C - Housing for attachment to the base
• D - Tab for engagement to the hood.
• E - Hole for inserting the front roll bar. 

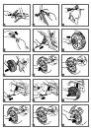
26 • Position the front cover plate by inserting the

points indicated with the letters A and B into the
bodywork. Put a hand inside the bodywork at
point B and squeeze it together with the mask to
click it into place (as shown in the circle).

27 • Press on the central area of the front cover plate

at the tab D to attach it to the hood.

28 • Press the lower part of the cover plate to engage

the two tabs C.

29 • Position the front roll bar, sliding it onto the

relevant pins.

30 • Take care with the bottom of the roll bar, which

must be inserted into the hole E of the cover
plate as shown in the picture.

31 • Attach the roll bar with the screw provided.
32 • Complete the attachment of the roll bar with

the two screws at the front.

33 • Press together the two sections of the steering

wheel to fully engage them.

34 • Insert the central steering wheel cap.
35 • Remove the plastic protectors from the steering

shaft.

36 • Position the steering wheel, aligning the holes

with those on the steering shaft.

37 • Attach the steering wheel with the threaded pin

and the bolt (the bolt must be inserted into the
hexagonal hole, the threaded pin in the circular
hole), holding the bolt to keep it in place.

ASSEMBLY INSTRUCTIONS

1
2
3
4
5
6
7
8
9
10
11
12
13
14
15
16
17
18
19
20
21
22
23
24
25
26
27
28
29
30
31
32
33
34
35
36
37
38
39
40
41
42
43
44
45
46
47
48
49
50
51
52
Оглавление инструкции
  • Страница 1 из 53
    VOLT 2 Polaris 4 RANGER RZR cod. IGOD0513 made in italy USO E MANUTENZIONE IT USE AND CARE EN UTILISATION ET ENTRETIEN FR GEBRAUCH UND WARTUNG DE EMPLEO Y MANUTENCION ES USO E MANUTENÇÃO PT UPORABA IN VZDRŽEVANJE SL BRUGSANVISNING DA KÄYTTÖOHJE FI BRUKSANVISNING NO BRUKSANVISNING SV KULLANIM VE
  • Страница 2 из 53
    1 2 3 4 5 6 7 8 9 10 11 12 13 14 15 1 2
  • Страница 3 из 53
    2 1 1 2 16 17 18 D A 19 B B C 20 A C B A 21 D D 22 B D B 25 24 23 A D A A E B C 26 27 29 30 C 28 E
  • Страница 4 из 53
    31 32 33 34 35 36 37 38 39 40 41 42 43 44 45
  • Страница 5 из 53
    A 46 47 50 2 48 51 1 49 E D A C C B 52 B 53 54 56 57 59 60 D E 55 58 A A
  • Страница 6 из 53
    61 62 63 64 65 66 67 68 69 70 71 72 73 74 75
  • Страница 7 из 53
    76 77 78 F D A 79 80 B A C 81 B H C E STOP E F LOW HIGH G D 82 83 84 R A B 85 86 87 88 89 90
  • Страница 8 из 53
    1 2 91 92 93 94 95 96 A B 97 99 98 C C 1 1 2 C A 100 103 B A 101 A 2 C B B 102
  • Страница 9 из 53
    b = blu bk = nero r = rosso w = bianco b = blue bk = black r = red w = white b b = bleu bk = noir r = rouge w = blanc MEIE0826 b = blau bk = schwarz r = rot w = weiß b w r bk b r b b b ACCELERATOR HOUSING r 10 8 6 b = azul bk = preto r = vermelho w = branco b 9 7 5 r b = blå bk = sort r = rød w =
  • Страница 10 из 53
    1 SAGI0132N 2 SPMV8896DN 3 SPMV8896SN 4 SPST8917N 5 ASGI0203N 6 SPMV8898DN 7 SPMV8898SN 8 SPMV8899DN 9 SPMV8899SN 10 ASGI0204N 11 SPRP8890N 12 SPRP8889N 13 SPST8892N 14 SAGI8891N 15 SPST8918SN 16 SPST8887SR 17 SPST8885N 18 SOTF0254L30 19 SPST8918DN 20 SPST8887DR 21 dx SPST8888DN 21 sx SPST8888SN 22
  • Страница 11 из 53
    ITALIANO NORME DI SICUREZZA PEG PEREGO® vi ringrazia per aver preferito questo prodotto. Da oltre 50 anni PEG PEREGO porta a spasso i bambini. Appena nati con le carrozzine, poi con i passeggini e ancora dopo, con i giocattoli a pedali e a batteria. I nostri giocattoli sono conformi alle Norme di
  • Страница 12 из 53
    REGOLE PER UNA GUIDA SICURA Per la sicurezza del bambino: prima di azionare il veicolo, leggere e seguire attentamente le seguenti istruzioni. • Insegnate al vostro bambino un uso corretto del veicolo per una guida sicura e divertente. • Prima di partire assicurarsi che il percorso sia sgombro da
  • Страница 13 из 53
    • B - selettore stazioni radio • C - tasti on/off • D - spia di radio accesa • E - manopola regolazione volume • F - tasti regolazione orologio digitale 82 • COMPONENTI ABITACOLO: • A - volante • B - radio funzionante (vedi fig 81) • C - quadro di controllo velocita' e stato di carica della
  • Страница 14 из 53
    BATTERY WARNINGS RULES FOR SAFE DRIVING ASSEMBLY INSTRUCTIONS Battery charging must be carried out and supervised by adults only. Do not allow children to play with the battery. For the safety of the child, before starting up the vehicle read and carefully follow the following instructions. • Teach
  • Страница 15 из 53
    38 • Insert the passenger's handle into the hole on the dashboard. 39 • Attach the handle with the screws provided. 40 • Snap fit the petrol cap. 41 • Insert the seat base (removed previously) on the driver's side. 42 • Insert the battery (charged previously) into the compartment under the seat on
  • Страница 16 из 53
    NORMES DE SECURITE Nos jouets sont conformes aux normes de sécurité européennes sur les jouets (conditions essentielles de sécurité prévues par le Conseil de l’EEC) et par l’ « U.S. Consumer Toy Safety Specification ». Ils ont été approuvés par l’I.I.S.G. (Institut Italien pour la Sécurité des
  • Страница 17 из 53
    GARANTIE Nos véhicules sont garantis pendant une période de six mois à compter de la date d’achat (le ticket de caisse faisant foi) contre vice ou défaut de fabrication, à l’exception de la batterie et du chargeur (se reporter aux instructions d’utilisation détaillées dans cette notice). La
  • Страница 18 из 53
    92 • Pour régler la longueur de la ceinture de sécurité, déplacez le curseur tel qu’illustré sur le dessin. REMPLACEMENT DE LA BATTERIE 93 • Dévisser la vis de sécurité de l’assise du siège passager et soulever l’assise; 94 • dévisser les boutons et enlever le siège; 95 • dévisser les deux vis de
  • Страница 19 из 53
    HINWEISE ZUR BATTERIE Das Laden der Batterie darf nur von Erwachsenen ausgeführt und überwacht werden. Kinder nicht mit den Batterien spielen lassen. LADEN DER BATTERIE • Die Batterie nicht länger als 24 Stunden laden und sich dabei an die Anweisungen halten, die dem Ladegerät beigelegt sind. • Die
  • Страница 20 из 53
    30 • Es muss darauf geachtet werden, dass das Endstück des Überrollbügels, wie in der Abbildung dargestellt, in die Öffnung E eingefügt wird. 31 • Den Überrollbügel mittels der beigefügten Schraube befestigen. 32 • Den Überrollbügel mittels der beiden beigefügten Schrauben an der Vorderseite
  • Страница 21 из 53
    ESPAÑOL NORMAS DE SEGURIDAD PEG PEREGO® le agradece que haya elegido este producto. Hace más de 50 años que PEG PEREGO lleva a pasear a los niños. Al nacer, con sus cochecitos, después con los coches de paseo y, posteriormente, con los juguetes de pedal y batería. Nuestros juguetes respetan los
  • Страница 22 из 53
    REGLAS PARA UNA CONDUCCIÓN SEGURA INSTRUCCIONES DE MONTAJE Para la seguridad del niño: antes de accionar el vehículo, leer y seguir atentamente las siguientes instrucciones. • Enseñar a su niño el uso correcto del vehículo para una conducción segura y divertida. • Antes de partir, comprobar que el
  • Страница 23 из 53
    75 • Encajar las llantas sobre las cuatro ruedas. CARACTERÍSTICAS DEL VEHÍCULO 76 • RADIO – Destornillar los dos tornillos tal y como se muestra en la figura para sacarla e introducir las pilas. 77 • Hacer palanca con la ayuda de una herramienta sobre la parte alta de la parte frontal de la radio
  • Страница 24 из 53
    NORMAS DE SEGURANÇA ADVERTÊNCIAS: BATERIA REGRAS PARA CONDUZIR COM SEGURANÇA Nossos brinquedos respeitam as Normas de Segurança Européias para brinquedos (requisitos de segurança previstos pelo Conselho da EEC) e pelo “U.S. Consumer Toy Safety Specification”. São aprovados pelo I.I.S.G (Instituto
  • Страница 25 из 53
    INSTRUÇÕES DE MONTAGEM ATENÇÃO AS OPERAÇÕES DE MONTAGEM DEVEM SER FEITAS SOMENTE POR ADULTOS. PRESTE ATENÇÃO AO RETIRAR O VEÍCULO DA EMBALAGEM. TODOS OS PARAFUSOS E PEQUENAS PEÇAS ENCONTRAM-SE EM UM SAQUINHO DENTRO DA EMBALAGEM. PODE SER QUE A BATERIA TENHA JÁ SIDO COLOCADA NO VEÍCULO. MONTAGEM 1 •
  • Страница 26 из 53
    carregador de bateria da tomada doméstica, e então desligue o plug C do plug B. 102 • Introduza o plug B no A até o fundo, até sentir o encaixe. • ATENÇÃO: Depois de recarregar, atarraxe sempre todos os botões e parafusos. 103 • A bateria pode ser carregada também fora do veículo, deste modo, caso
  • Страница 27 из 53
    OPOZORILA ZA AKUMULATOR Akumulator smejo polniti ali polnjenje nadzorovati samo odrasle osebe. Ne dovolite, da bi se z akumulatorjem igrali otroci. POLNJENJE AKUMULATORJA • Napolnite akumulatorje, tako da sledite navodilom, priloženim polnilniku. Akumulator se ne sme polniti več kot 24 ur. • Če
  • Страница 28 из 53
    39 • Pritrdite ročaj s priloženim vijakom. 40 • S pritiskom namestite zamašek rezervoarja. 41 • Vstavite podstavek sedeža (ki ste ga prej odstranili) na strani voznika. 42 • Vstavite akumulator (ki ste ga prej napolnili) v odprtino pod sedež na sopotnikovi strani. 43 • Vstavite vtič akumulatorja in
  • Страница 29 из 53
    SIKKERHEDSNORMER BEMÆRKNINGER OM BATTERIET Vores legetøjsprodukter er fremstillet i overensstemmelse med de europæiske sikkerhedsforskrifter for legetøj (sikkerhedskrav foreskrevet af Europarådet) og med ”U.S. Consumer Toy Safety Specification”. De er godkendt af I.I.S.G. (Det Italienske Institut
  • Страница 30 из 53
    REKLAMATIONSRET EL-KØRETØJER MONTERINGSANVISNINGER Der er 2 års reklamationsret på køretøjet. Medbring købsbon ved henvendelse. Reklamationsretten dækker alle køretøjets dele ved normal og korrekt brug med undtagelse af batterier og hjul. Læs derfor brugsanvisningen nøje igennem, inden køretøjet
  • Страница 31 из 53
    • F - justeringsknapper for digitalur 82 • Udstyr i kabinen: • A - rat • B - rigtig radio (se fig. 81) • C - kontrolpanel til kontrol af hastighed og batteriets tilstand (se fig. 83) • D - Passager-håndtag • E - acceleratorpedal / elektrisk bremse (se fig. 84-85-86) • F - gearstang (se fig. 87) • G
  • Страница 32 из 53
    AKKUA KOSKEVIA HUOMAUTUKSIA Aikuisen tulee ladata akku tai valvoa sen lataamista. Älä anna lasten leikkiä akulla. AKUN LATAAMINEN • Lataa akku laturin mukana toimitettujen ohjeiden mukaisesti. Älä koskaan lataa yli 24 tuntia. • Lataa akku aina ajoissa, heti kun ajoneuvon nopeus alkaa hidastua. Näin
  • Страница 33 из 53
    ASENNUSOHJEET HUOMIO VAIN AIKUISET SAAVAT SUORITTAA ASENNUSTOIMENPITEET. OLE VAROVAINEN PURKAESSASI AJONEUVOA PAKKAUKSESTA. KAIKKI RUUVIT JA PIKKUOSAT OVAT PAKKAUKSEN SISÄLLÄ OLEVASSA PUSSISSA. AKKU SAATTAA JO OLLA ASENNETTU TUOTTEESEEN. ASENNUS 1 • Ruuvaa auki istuimien pohjan neljä
  • Страница 34 из 53
    NORSK SIKKERHETSNORMER PEG PEREGO® takker for at dere har valgt dette produktet. I mer enn 50 år har PEG PEREGO tatt med barn ut på tur: Som nyfødte, i barnevognene, og senere med pedell- og batteridrevne leker. Lekene våre er i samsvar med De Europeiske Sikkerhetsnormene for leketøy
  • Страница 35 из 53
    REGLER FOR TRYGG BRUK REKLAMATIONSRET EL-KØRETØJER For at barnet skal være så trygt som mulig, må man før man starter kjøretøyet lese og følge disse anvisningene nøye. • Lær barnet riktig bruk av kjøretøyet, slik at man kan kjøre sikkert og ha det gøy. • Før man starter må man kontrollere at det
  • Страница 36 из 53
    38 • Sett inn håndtaket på passasjersiden i åpningen i dashbordet. 39 • Fest håndtaket med den medfølgende skruen. 40 • Trykk inn bensinproppen. 41 • Sett in setefestet (som ble fjernet tidligere) på førersiden. 42 • Sett inn batteriet (som nå er blitt ladet opp) i batteriboksen under setet på
  • Страница 37 из 53
    SÄKERHETSFÖRESKRIFTER Våra leksaker överensstämmer med de Europeiska säkerhetsföreskrifterna för leksaker (säkerhetskrav som förutses av EEC-rådet) och av “U.S. Consumer Toy Safety Specification”. De är godkända av I.I.S.G. (Istituto Italiano Sicurezza Giocattoli). Produkten är inte i
  • Страница 38 из 53
    REKLAMATIONSRET EL-KØRETØJER MONTERINGSINSTRUKTIONER Der er 2 års reklamationsret på køretøjet. Medbring købsbon ved henvendelse. Reklamationsretten dækker alle køretøjets dele ved normal og korrekt brug med undtagelse af batterier og hjul. Læs derfor brugsanvisningen nøje igennem, inden køretøjet
  • Страница 39 из 53
    82 • Komponenter i kabinen: • A - ratt • B - fungerande radio (se bild 81) • C - tavla med hastighetskontroll och batteriets laddningsstatus (se bild 83) • D - passagerarhandtag • E - gaspedal/elektrisk bromspedal (se bild 84-8586) • F - växelspak (se bild 87) • G - dryckeshållare (se bild 88) • H
  • Страница 40 из 53
    BATARYA İLE İLGİLİ UYARILAR GÜVENLİ BİR SÜRÜŞ İÇİN KURALLAR MONTAJ TALİMATLARI Batarya doldurma işlemi sadece yetişkinler tarafından yapılmalı ve denetlenmelidir. Çocukların batarya ile oynamasına izin vermeyiniz. Çocuğunuzun güvenliği için: aracı çalıştırmadan önce aşağıdaki talimatları dikkatlice
  • Страница 41 из 53
    38 • Yolcu tutma kolunu kontrol panelinin deliğine takınız. 39 • Araçla birlikte verilen vidayı kullanarak kolu sabitleyiniz. 40 • Depo kapağını bastırarak takınız. 41 • Sürücü tarafındaki koltuk tabanını (önceden çıkarılmış olan) takınız. 42 • Bataryayı (önceden doldurulmuş halde) yolcu
  • Страница 42 из 53
    НОРМЫ БЕЗОПАСНОСТИ ПРЕДУПРЕЖДЕНИЯ ПО БАТАРЕЕ ПРАВИЛА БЕЗОПАСНОГО ВОЖДЕНИЯ Наши игрушки соответствуют Европейским нормам по безопасности игрушек (требованиям по безопасности, предусмотренным Советом ЕЭС) и спецификации “U.S. Consumer Toy Safety Specification”. Они также одобрены организацией
  • Страница 43 из 53
    ИНСТРУКЦИЯ ПО СБОРКЕ ВНИМАНИЕ ОПЕРАЦИИ ПО МОНТАЖУ ДОЛЖНЫ ВЫПОЛНЯТЬ ТОЛЬКО ВЗРОСЛЫЕ. БУДЬТЕ ВНИМАТЕЛЬНЫ ПРИ ИЗВЛЕЧЕНИИ ИГРУШКИ ИЗ УПАКОВКИ. ВСЕ ВИНТЫ И МЕЛКИЕ ДЕТАЛИ НАХОДЯТСЯ В ПАКЕТЕ ВНУТРИ УПАКОВКИ. БАТАРЕЯ МОЖЕТ БЫТЬ УЖЕ УСТАНОВЛЕНА НА ИГРУШКУ. МОНТАЖ 1 • Отвинтите 4 крепежных винта с оснований
  • Страница 44 из 53
    97 • Замените батарею. • Установите на место основание сиденья, пропустив разъемы через отверстия. Снова подключите разъемы и установите сиденье. 98 • ВНИМАНИЕ: всегда затягивайте все рукоятки и винты. ЗАРЯДКА БАТАРЕИ ВНИМАНИЕ: ЗАРЯДКУ БАТАРЕИ И ЛЮБЫЕ РАБОТЫ НА ЭЛЕКТРИЧЕСКОЙ СИСТЕМЕ ДОЛЖНЫ
  • Страница 45 из 53
    PQOEIDOPOIGREIR LPASAQIAR G u qsirg sgy lpasaq ay pq pei ma c mesai jai ma epibk pesai l mom ap em kijey. Lgm au mese sa paidi ma pa fotm le sg lpasaq a. Cia sgm aru keia sot paidio : pqim ma emeqcopoi rese so vgla, diab rse jai ajokoth rse pqorejsij siy aj kothey odgc ey. • L hese rso paidi ray sg
  • Страница 46 из 53
    ODGCIER RTMAQLOKOCGRGR PQOROVG OI EQCARIER RTMAQLOKOCGRGR PQEPEI MA EJSEKOTMSAI LOMOM APO EMGKIJER. PQOROVG OSAM HA BCAKESE SO OVGLA APO SG RTRJETARIA. OKER OI BIDER JAI SA LIJQA SELAVIA BQIRJOMSAI RE EMA RAJOTKAJI RSO ERXSEQIJO SGR RTRJETARIAR. G LPASAQIA LPOQEI MA EIMAI GDG SOPOHESGLEMG RSO PQO
  • Страница 47 из 53
    87 88 89 90 91 92 sav sgsay rsg h rg B (HIGH), nebid rse sg b da rseq xrgy sot lpkoj de seqgy sav sgsay jai lesajim rse so pqoy sa p mx. Pqorov , ma namabid mese p msa sg b da. • LOVKOR SAVTSGSAR - sam o lovk y sav sgsay e mai sopohesgl moy re j hesg h rg, so vgla jime sai lpqors rsgm sav sgsa LOW
  • Страница 48 из 53
    .dzhfV§”gH «h§¥gH ‘ m¢Vh¨fgH SfhŒl Gw‘jf Lr • 45 .(Fkh¥ G”g K¢keH) V¢lhsl 4 LH¬Ojshf ¬UhŒlgH ¬UH‘r J¢fejf Lr • 46 ¬UhŒlgH ¬UH‘r dt Khl®H ml«P® K¢V¢wŒgH K¢tV¨gH GO¬• • 47 vl (m”VPgH GŒk cHVƒ Kl FVŒghf M¬‘¥‘lgH F‘ŒegH dt) dt ¬¬PlgH ‘ Glh”ghf V¢ywgH LH«PgH TV¨ GhO¬™ IhfjkBH cHVƒ ngî ml«P®H Gh…r• VHV«•
  • Страница 49 из 53
    m¢Vh¨fghf mwhO JHV¢ƒPj Khl®H pzH‘g .¨Œt K¢yghfgH Gfr Kl h§wPt ‘ Jh¢Vh¨fgH KPa Lj¢ K• F¥¢ ˆ .Jh¢Vh¨fghf K‘fug¢ Gh…¨®H “Vjj B m¢Vh¨fgH KPa ngU ‘ Jh¢Vh¨fgH KPhaf mŒtVlgH Jhl¢gujgH chfjïf m¢Vh¨fgH KPaH • .mUhs 24 «‘h¥j¢ K• KPagg F¥¢ B GhP m¢• “gƒf ’Jr‘gH Qufg m¢Vh¨fgH KPaH h§jUVs mfVugH ¬Œ…j K• ¬V¥lf •
  • Страница 50 из 53
  • Страница 51 из 53
  • Страница 52 из 53
    Polaris RANGER RZR cod. IGOD0513 PEG PEREGO S.p.A. via DE GASPERI 50 20043 ARCORE (MI) ITALIA tel. 039·60881 fax 039·615869-616454 assistenza: tel. 039·6088213 fax 039·3309992 numero verde (solo da telefono fisso): PEG PEREGO U.S.A Inc. 3625 INDEPENDENCE Dr. FORT WAYNE IN 46808 phone 260·4828191
  • Страница 53 из 53