1. Press
Menu
( ) on the control panel.
2. Press the left/right arrow until
System Setup
appears and press
OK
.
3. Press the left/right arrow until
Machine Setup
appears and press
OK
.
4. Press the left/right arrow until
Toner Save
appears and press
OK
.
5. Press the left/right arrow until
On
appears and press
OK
.
6. Press
Stop/Clear
( ) to return to ready mode.
When PC-printing, you can also turn on or off toner save mode in the printer properties.
Using the power saving feature
When you are not using the machine for a while, use this feature to save power.
1. Press
Menu
( ) on the control panel.
2. Press the left/right arrow until
System Setup
appears and press
OK
.
3. Press the left/right arrow until
Machine Setup
appears and press
OK
.
4. Press the left/right arrow until
Power Save
appears and press
OK
.
5. Press the left/right arrow to select the time you want.
6. Press
OK
to save the selection.
7. Press
Stop/Clear
( ) to return to ready mode.
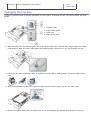
Setting the default tray and paper
You can select the tray and paper you would like to keep using for printing job.
In the control panel
Setting the paper size
1. Press
Menu
( ) on the control panel.
2. Press the left/right arrow until
System Setup
appears and press
OK
.
3. Press the left/right arrow until
Paper Setup
appears and press
OK
.
4. Press the left/right arrow until
Paper Size
appears and press
OK
.
5. Press the left/right arrow to select the paper tray you want and press
OK
.
6. Press the left/right arrow to select the paper size you want.
7. Press
OK
to save the selection.
8. Press
Stop/Clear
( ) to return to ready mode.
Setting the paper type
1. Press
Menu
( ) on the control panel.
2. Press the left/right arrow until
System Setup
appears and press
OK
.
3. Press the left/right arrow until
Paper Setup
appears and press
OK
.
4. Press the left/right arrow until
Paper Type
appears and press
OK
.
5. Press the left/right arrow to select the paper tray you want and press
OK
.
6. Press the left/right arrow to select the paper type you want.
7. Press
OK
to save the selection.
8. Press
Stop/Clear
( ) to return to ready mode.
Setting the paper source
1. Press
Menu
( ) on the control panel.
2. Press the left/right arrow until
System Setup
appears and press
OK
.
3. Press the left/right arrow until
Paper Setup
appears and press
OK
.
4. Press the left/right arrow until
Paper Source
appears and press
OK
.
5. Press the left/right arrow to select the paper tray you want.
6. Press
OK
to save the selection.
7. Press
Stop/Clear
( ) to return to ready mode.
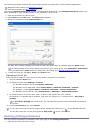
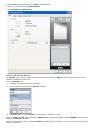
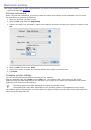
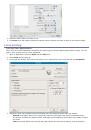
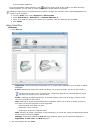
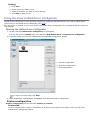
In the computer
Windows
1. Click the Windows
Start
menu.


Инструкции и руководства похожие на DELL 1133