clik
14
15
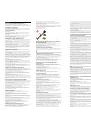
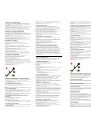
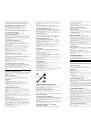
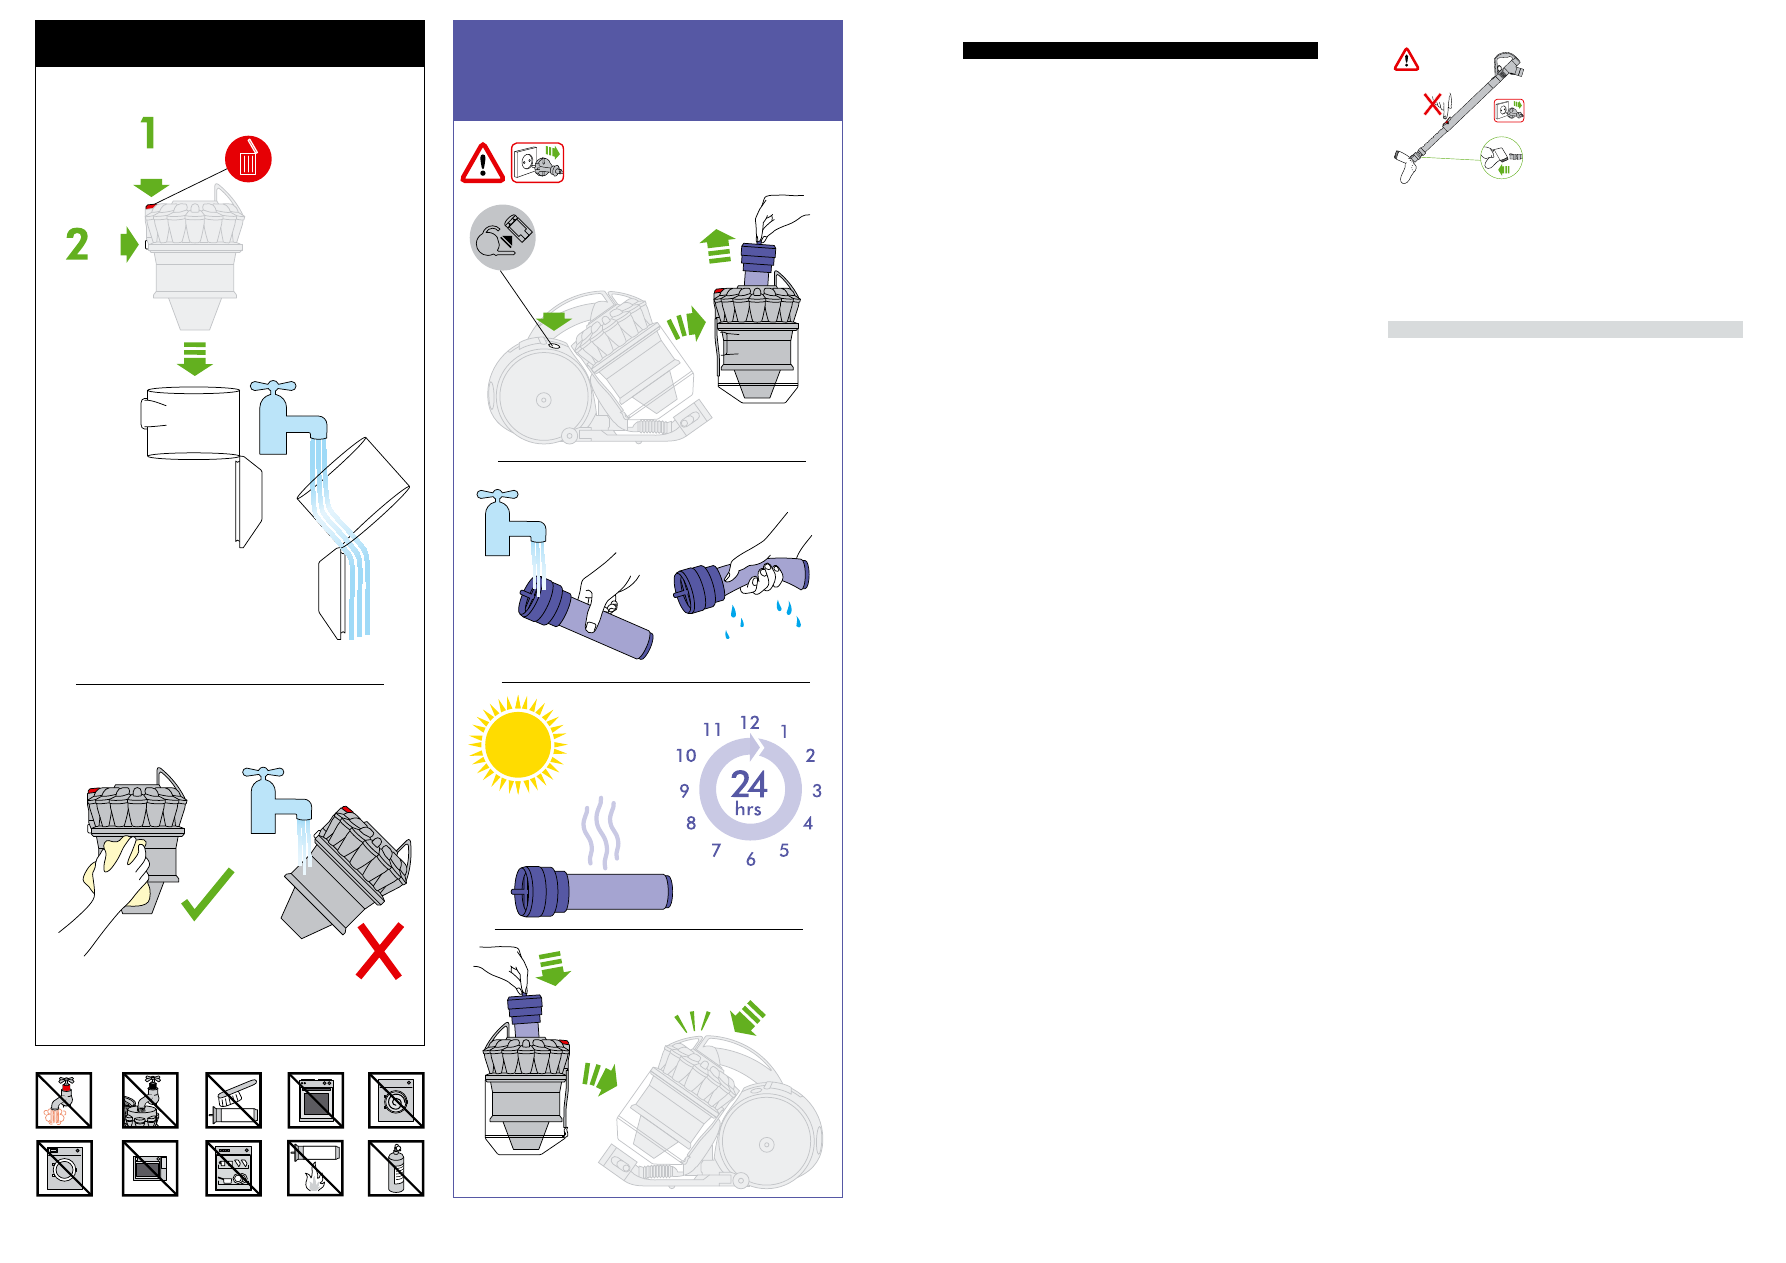
Wash filter with cold water at least every month • Laver le filtre à l’eau
froide une fois par mois minimum • Reinigen sie den Filter mindestens
einmal im monat mit kaltem wasser • Was de filter ten minste eenmaal
per maand met koud water • Lave el filtro con agua fría al menos una
vez al mes • Lavare il filtro con acqua fredda almeno una volta al mese
Промывайте фильтр холодной водой не реже одного раза в месяц
Filter operite s hladno vodo vsaj enkrat na mesec
Cleaning • Entretien • Behälterreinigung
Schoonmaken • Limpieza del cubo • Pulizia
Уход за контейнером и циклоном • Čiščenje
EN
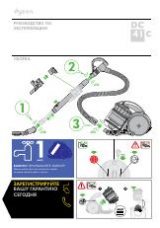
USING YOUR DYSON AppLIANCE
PLEASE READ THE ‘IMPORTANT SAFETY INSTRUCTIONS’ IN THIS
DYSON OPERATING MANUAL BEFORE PROCEEDING.
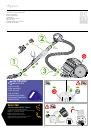
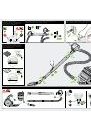
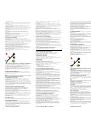
CARRYING THE AppLIANCE
•
Carry the appliance by the main handle on the body.
•
Do not press the cyclone release button or shake the appliance when carrying or the
cyclone could disengage, fall off and cause injury.
OpERATION
•
Unwind the cable.
•
Always extend the cable fully to the red tape before use.
•
Plug the appliance into the mains electricity supply.
•
To switch ‘ON’ or ‘OFF’ press the power button, located as shown.
•
After use: unplug, retract the cable safely, put the appliance away.
•
Switch ‘OFF’ the appliance and unplug before:
– changing or using tools
– removing the hose or airway inspection parts.
LOOKING AFTER YOUR DYSON AppLIANCE
•
Do not carry out any maintenance or repair work other than that shown in this Dyson
Operating Manual, or advised by the Dyson Helpline.
•
Only use parts recommended by Dyson. If you do not this could invalidate your
guarantee.
•
Store the appliance indoors. Do not use or store it below 0°C (32°F). Ensure the
appliance is at room temperature before operating.
•
Clean the appliance only with a dry cloth. Do not use any lubricants, cleaning agents,
polishes or air fresheners on any part of the appliance.
•
If used in a garage, always wipe the base plate and ball with a dry cloth after
vacuuming to clean off any sand, dirt, or pebbles that could damage delicate floors.
VACUUMING - CAUTION
•
Do not use without the clear bin and filter in place.
•
Fine dust such as plaster dust or flour should only be vacuumed in very small amounts.
•
Do not use the appliance to pick up sharp hard objects, small toys, pins, paper clips,
etc. They may damage the appliance.
•
When vacuuming, certain carpets may generate small static charges in the clear bin or
wand. These are harmless and are not associated with the mains electricity supply. To
minimise any effect from this, do not put your hand or insert any object into the clear
bin unless you have first emptied it and rinsed it out with cold water (see ‘Cleaning the
clear bin’).
•
Powerful suction can cause the hose to ‘pull back’ – please take care.
•
Do not work with the appliance above you on the stairs.
•
Do not put the appliance on chairs, tables, etc.
•
Before vacuuming highly polished floors, such as wood or lino, first check that the
underside of the floor tool and its brushes are free from foreign objects that could
cause marking.
•
Do not push hard with the floor tool when vacuuming, as this may cause damage.
•
Do not leave the cleaner head in one place on delicate floors.
•
On waxed floors the movement of the cleaner head may create an uneven lustre. If this
happens, wipe with a damp cloth, polish the area with wax, and wait for it to dry.
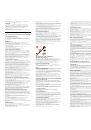
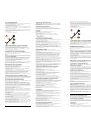
EMpTYING THE CLEAR BIN
•
Empty as soon as the dirt reaches the level of the MAX mark – do not overfill.
•
Switch ‘OFF’ and unplug before emptying the clear bin.
•
To remove the cyclone and clear bin unit, push the release button to the side of the
carrying handle, as shown.
•
To release the dirt, press the red bin release button.
•
To minimise dust/allergen contact when emptying, encase the clear bin tightly in a
plastic bag and empty.
•
Remove the clear bin carefully.
•
Seal the bag tightly, dispose as normal.
The British Allergy Foundation is a UK national charity with the aim of improving
awareness, prevention and treatment of allergies. The British Allergy Foundation Seal
of Approval is a UK registered trademark.
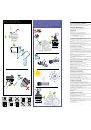
CLEANING THE CLEAR BIN
•
Remove cyclone and clear bin (instructions above).
•
To separate the cyclone unit from the clear bin press the red bin release button to open
the bin base. This exposes a small silver button behind the red opening mechanism.
Press the silver button and separate the cyclone unit from the clear bin.
•
Clean the clear bin with cold water only.
•
Ensure the clear bin is completely dry before replacing.
•
Do not use detergents, polishes or air fresheners to clean the clear bin.
•
Do not put clear bin in a dishwasher.
•
Do not immerse the whole cyclone in water or pour water into it.
•
Clean the cyclone shroud with a cloth or dry brush to remove lint and dust.
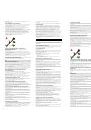
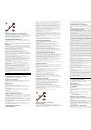
WASHING YOUR FILTER
•
Your appliance has one washable filter, located as shown.
•
Check and wash the filter regularly according to instructions to maintain performance.
•
Switch ‘OFF’ and unplug before checking or removing the filter.
•
The filter may require more frequent washing if vacuuming fine dust.
•
Wash the filter with cold water only. Do not use detergents. Hold under a tap and run
water through the open end for 10 seconds. Turn upside down and tap out 10 times.
•
Squeeze and twist with both hands to make sure the excess water is removed.
•
Run water over the outside of the filter for 15 seconds.
•
Squeeze and twist with both hands to make sure the excess water is removed.
•
Place the filter on its side to dry completely.
•
Do not put the filter in a dishwasher, washing machine, tumble dryer, oven, microwave
or near a naked flame.
•
IMpORTANT
: After washing please leave at least 24 hours to dry completely
before refitting.
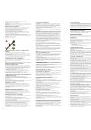
LOOKING FOR BLOCKAGES
•
Switch ‘OFF’ and unplug before looking for blockages. Failure to do so could result in
personal injury.
•
Beware of sharp objects when checking for blockages.
•
Refit all parts securely before using.
•
Clearing blockages is not covered by your guarantee.
•
To access the flexible inspection hose beneath the clear bin, first remove the clear bin
(see above).
•
Unscrew the two Philips screws on the clear bin locator bracket. (Do not remove any
other screws.) Remove the bracket.
•
Pull the top of the flexible inspection hose away from the inlet next to the ball (do not
remove the end next to the connection for the main hose). It is quite firm, but do not
pull it off roughly. Use a constant, firm pressure.
•
Inspect for blockages.
•
Reassemble in reverse order.
1
2
3
CLEARING BLOCKAGES – THERMAL CUT-OUT
•
This appliance is fitted with an automatically resetting thermal cut-out.
•
Large items may block the tools or wand inlet. If any part becomes blocked the
appliance may overheat and automatically cut-out.
•
Switch ‘OFF’ and unplug. Leave to cool down for 1-2 hours before checking filter or
for blockages.
•
Clear any blockage before restarting.
DISpOSAL INFORMATION
Dyson products are made from high grade recyclable materials. Please dispose of this
product responsibly and recycle where possible.
EN
GUARANTEE TERMS AND CONDITIONS
DYSON CUSTOMER CARE
THANK YOU FOR CHOOSING TO BUY A DYSON VACUUM CLEANER.
After registering your 5 year guarantee, your Dyson appliance will be covered
for parts and labour for 5 years from the date of purchase, subject to the terms
of the guarantee.
If you have any questions about your Dyson appliance, call the Dyson Helpline
with your serial number and details of where/when you bought the appliance.
Most questions can be solved over the phone by one of our trained
Dyson Helpline staff.
Alternatively, visit www.dyson.co.uk/support for online help, general tips and useful
information about Dyson.
If your Dyson appliance needs a service, call the Dyson Helpline so we can discuss
the available options. If your Dyson appliance is under guarantee, and the repair is
covered, it will be repaired at no cost.
Your serial number can be found on your rating plate which is on the base
of the appliance.
pLEASE REGISTER AS A DYSON AppLIANCE OWNER
To help us ensure you receive prompt and efficient service, please register as a Dyson
appliance owner. There are three ways to do this:
•
Online
at www.dyson.com/register
•
Telephone
the Dyson Helpline.
•
Complete the enclosed form and post it to us.
This will confirm ownership of your Dyson appliance in the event of an insurance loss,
and enable us to contact you if necessary.
LIMITED 5 YEAR GUARANTEE
TERMS AND CONDITIONS OF THE DYSON 5 YEAR LIMITED GUARANTEE.
WHAT IS COVERED
•
The repair or replacement of your Dyson appliance (at Dyson’s discretion) if it is found
to be defective due to faulty materials, workmanship or function within 5 years of
purchase or delivery (if any part is no longer available or out of manufacture Dyson
will replace it with a functional replacement part).
•
Use of the Dyson appliance in country of purchase only.
WHAT IS NOT COVERED
Dyson does not guarantee the repair or replacement of a product as a result of:
•
Accidental damage, faults caused by negligent use or care, misuse, neglect, careless
operation or handling of the appliance which is not in accordance with the Dyson
Operating Manual.
•
Use of the appliance for anything other than normal domestic household purposes.
•
Use of parts not assembled or installed in accordance with the instructions of Dyson.
•
Use of parts and accessories which are not genuine Dyson components.
•
Faulty installation (except where installed by Dyson).
•
Repairs or alterations carried out by parties other than Dyson or its authorised agents.
•
Blockages – please refer to the Dyson Operating Manual for details of how to look for
and clear blockages.
•
Normal wear and tear (e.g. fuse, etc).
If you are in any doubt as to what is covered by your guarantee, please contact Dyson.
SUMMARY OF COVER
•
The guarantee becomes effective at the date of purchase (or the date of delivery if this
is later).
•
You must provide proof of (both the original and any subsequent) delivery/purchase
before any work can be carried out on your Dyson appliance. Without this proof, any
work carried out will be chargeable. Keep your receipt or delivery note.
•
All work will be carried out by Dyson or its authorised agents.
•
Any parts which are replaced will become the property of Dyson.
•
The repair or replacement of your Dyson appliance under guarantee will not extend
the period of guarantee.
•
The guarantee provides benefits which are additional to and do not affect your
statutory rights as a consumer.
ABOUT YOUR pRIVACY
•
Your information will be held by Dyson Limited and its agents for promotional,
marketing and servicing purposes.
•
If your personal details change, if you change your mind about any of your marketing
preferences or if you have any queries about how we use your information, please
contact Dyson Limited.
•
For more information on how we protect your privacy, please see our privacy policy on
the Dyson website.
DYSON CONTACT DETAILS
Website: www.dyson.com/support
UK:
Dyson Helpline: UK: 0800 298 0298
Open 7am–10pm. 7 days a week.
Email:
askdyson@dyson.co.uk
Address:
Dyson Limited, Tetbury Hill, Malmesbury, Wiltshire SN16 0RP England.
ROI:
Dyson Helpline: ROI: 01 475 7109
Open 7am–10pm. 7 days a week.
Email:
askdyson@dyson.co.uk
Address:
Unit 10, Grants Lane, Greenogue Business Park, Rathcoole, Dublin 24.