6
7
ENGLISH
ENGLISH
•
To stop cooking or warming, press the (19)
button, the
or
symbol will be con-
stantly lighting.
•
Press the (15) button to switch the unit off,
or wait till it switches off automatically.
Note: For the right cooking zone, the order
of control is the same as described above.
Cooking products in two zones
If you need to cook different products, which
require different cooking time or occupy the
whole volume of steam baskets, you have to use
the unit’s both cooking zones.
Note: Pay attention that cooking time in
section with activated delayed start finction
can differ from cooking time of the same
products without delayed start finction.
Cooking homogeneous product
•
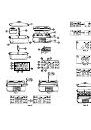
Insert the plug into the socket, you will hear
a sound signal and LCD-display will switch
on, food steamer is ready to operate (pic. 3).
•
Set the required operating modes pressing
the auto cooking modes selection buttons
(18, 20) alternatively.
•
If you need to use food steamer’s whole vol-
ume to cook one product (for instance, veg-
etables), select the corresponding mode for
both zones (pic. 5).
•
After selection the auto cooking mode you
can change the preset cooking time, using
the (16, 17) buttons, while the time symbols
are flashing.
•
Wait till the time symbols and the operat-
ing modes symbols stop flashing and press
the (19) button to start cooking process.
Cooking process will start in both zones
simultaneously.
Note:
If you pressed the (19) button before
the time indicator stopped flashing, cook-
ing will start only in one zone.
Cooking heterogeneous products
•
Insert the plug into the socket, you will
hear a sound signal and the LCD-display
will switch on, the food steamer is ready to
operate (pic. 3).
•
Set the required operating modes pressing
the auto cooking modes selection buttons
(18, 20) alternatively.
•
After selecting the auto cooking mode for
any cooking zone you can change the pre-
set cooking time, using the (16, 17) buttons,
while the time symbols are flashing.
•
If cooking time is not the same food steam-
er starts cooking the product with longer
cooking time after pressing the (19) button.
The
symbol will be flashing in the zone
where cooking started (pic. 6).
•
When cooking time of both zones will match,
cooking in the second zone will switch on
automatically, and both
symbols will be
flashing (pic. 7).
•
After the cooking time ends you will hear two
sound signals and food steamer will switch
to the warming mode, warming time is - 20
minutes (the
symbol will be flashing
on the LCD-display).
•
After warming is finished you will hear 5
sound signals, in a minute you will hear a
sound signal and food steamer will switch
off.
Warming products
•
Use the (18, 20) buttons to select the warm-
ing mode - the
symbol, and then use
the buttons (16, 17) to set the required
warming time from 1 to 99 minutes.
•
To switch off the warming process press the
(19) button, the
symbol will be con-
stantly lighting.
•
Press the (15) button to switch the unit off or
wait until it switches off automatically.
•
After warming is finished you will hear 5
sound signals, in a minute you will hear
a sound signal and the food steamer will
switch off.
Cooking by time
•
Insert the plug into the socket, you will hear
a sound signal and the LCD-display will
switch on, food steamer is ready to oper-
ate (pic. 3).
•
Press the button (18) (if you need to cook
products in the basket whole volume, repeat
all the procedures for the other zone), use
the (16, 17) buttons to set cooking time.
•
After setting cooking time press the (19)
button to start cooking products, digits
(remaining time till cooking finish) and the
symbol will flash on the LCD-display.
Note:
If you pressed the (19) button after
the time indicator stopped flashing, cooking
starts in both zones at once.
•
After the preset time ends you will hear two
sound signals and the unit will switch to the
warming mode, warming time is - 20 min-
utes (the
symbol will be flashing on
the LCD-display).
•
After warming is finished you will hear 5
sound signals, in a minute you will hear a
sound signal and food steamer will switch
off.
No water indication
If the water level drops below the “MIN” mark,
you will hear sound signals, and the
symbol
will be flashing on the LCD-display.
Fill the water tank with cold water till the “МАХ”
mark.
–
You can fill the water tank with water in two
ways: through the water inlet (9) (pic. 1) or
pouring water directly into the water tank
(pic. 2).
For dishes with long cooking time:
–
Control water level during cooking.
–
If necessary add water through the water
inlet (9), without removing the steam bas-
kets.
Note: If no water is added during one min-
ute, the unit will switch off automatically.
automatic switching off
If you have not used the food steamer during
one minute it will switch off automatically.
Before switching off you will hear a sound sig-
nal. You can stop cooking process during opera-
tion, by pressing the (19) button, and press the
(15) button to switch off the food steamer.
Cooking eggs (pic. 9)
•
Fill the water tank with water.
•
Set the tray (7).
•
Set one steam basket (4 or 6) on the tray (7).
•
Place eggs in the sockets on steam basket
bottom and cover it with the lid (1).
•
Insert the plug into the socket.
•
Switch food steamer on by pressing the (15)
button, the LCD-display (11) will light up and
you will hear a sound signal.
•
Consequently pressing the buttons (18, 20)
select the eggs cooking mode (21) for food
steamer’s both zones. Use the (16, 17) but-
tons to set cooking time.
•
Press the (19) button to start cooking.
Note:
If you pressed the (19) button after the
time indicator stopped flashing, cooking will
start in both zones at once.
Cooking rice (pic. 10)
•
Fill the water tank with water.
•
Set the tray (7).
•
Set one steam basket (4 or 6) on the tray (7).
•
Place the rice bowl (2) on the steam basket.
•
Place one cup of rice into the bowl (2) and
add 1,5 cups of water. Maximal quantity of
rice should not exceed 250 g.
•
Cover the basket (4 or 6) with lid (1).
•
Insert the plug into the socket.
•
Switch food steamer on by pressing the (15)
button, the LCD-display (11) will light up and
you will hear a sound signal.
•
Select the corresponding cooking mode by
pressing the (18, 20) buttons alternatively.
Use the (16, 17) buttons to set cooking time.
•
Press the (19) button to start cooking.
Note:
If you pressed the (19) button after the
time indicator stopped flashing, cooking will
start in both zones at once.
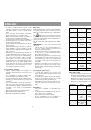
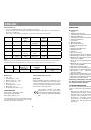
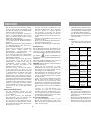
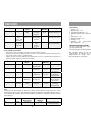
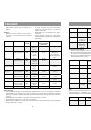
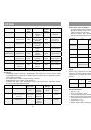
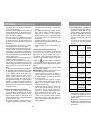
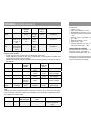
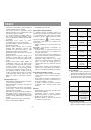
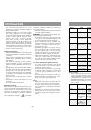
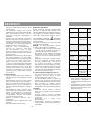
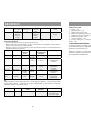
Useful tips and recommendations
•
Food cooking time indicated in the tables
for reference purposes only, it may vary
according to food size, its initial temperature
& volume as well as personal taste. As you
become more familiar with the food steamer
you can select the desired cooking time by
yourself.
•
If you use several steam baskets simultane-
ously, put meat, poultry or fish into the lower
one, so that the extracted liquid does not
flow on food in other steam baskets.
•
One layer of products is cooked quicker than
several layers, that is why it is necessary to
increase the cooking time according to food
volume.