53
Camera
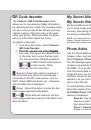
QR Code decoder
The
Camera > QR Code Decoder
option
allows you to conveniently obtain information
by capturing the bar-codes. For example, when
you see a movie post on the streets, you may
capture a photo of the bar-code on the post
using your phone. When decoded, the photo
tells you information about the movie.
To capture a bar-code:
1. From the main menu, select
Camera
>
QR Code Decoder
.
2. Point the camera lens at the targeted
Point the camera lens at the targeted
argeted
bar-code, then press the capture button
or the enter key to scan the bar-code.
You may press the left/right navigation
key to select QR Code Decoder options
and
on the screen. When
selected, the icon turns blue.
(Service): Select this option to capture a
bar-code, and your phone is automatically
connected to the QR code service, such as
WAP, vCard, SMS and Email, etc.; otherwise,
only the QR code is displayed.
(Save) : Select this option to save the bar-
code image captured to My Album.
and
: When both are selected, the bar-
code image captured is saved to My Album and
then decoded.
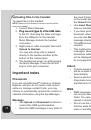
My Secret Album
My Secret Video
My Secret Album and My Secret Video allow
you to store image and video files safely and
securely, preventing unwanted viewers from
accessing confidential media files.
NOte
: The default password is 1234. Refer to the Settings
chapter, Change Password section of this user guide for
information about changing passwords.
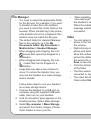
Photo Artist
Use the Photo Artist option to edit your captured
images, video, and audio files.
Select
Camera > Photo Artist
and press
OK
.
The File Manager appears, showing the amount
of space occupied by the phone memory and
the DRM. You can start choosing image files
from the stored data to be edited; select an
image file from one of the handset’s folders
and then choose to automatically resize it or to
prepare it so you can later use it as your LCD
clip or sub LCD clip.
To automatically resize the picture:
Select the picture then choose
Auto Resize
to Fit Main Panel > OK > Options
. A list of
options is displayed.
Save as
: Use the keypad to enter the
name you wish to save the file under,
then press the left soft key
and choose
Done
or
Cancel
to save or discard the
image, or choose
Input Method
to select