Инструкция для Master B 18 EPR

(скачивание инструкции бесплатно)
Формат файла: PDF
Доступность: Бесплатно как и все руководства на сайте. Без регистрации и SMS.
Дополнительно: Чтение инструкции онлайн
background image


12 

GB

 IMPORTANT!!!  Carefully read  this service manual before 

you start to use, repair or clean the heater. Improper use of the 
appliance may cause serious injuries, burns, electric shock or fire.  


2.


Safety instructions. 

The appliance has been designed for heating closed areas such as 
e.g. warehouses, shops and houses. Models with power: 2; 3; 3,3; 
kW are not designed to work in greenhouses and on buildings site. It 
complies with  the Directive  No. 2006/95/EC and 2004/108/EC 
including the harmonised standards No EN 60335-1:2004, EN 
60335-2-30:2007.  

WARNING! Do not place the heater directly under the wall outlet. 
Do not touch internal components of the heater.


This appliance is not intended for use by persons (including children) 
with reduced physical, sensory or mental capabilities, or lack of 
experience and knowledge, unless they have been given supervision or 
instruction concerning use of the appliance by a person responsible for 
their safety. Children should be supervised to ensure that they do not 
play with the appliance. 

-

Do not cover the heater when it is operating. The appliance 

may get overheated. 

The heater should be kept at a safe distance from flammable 
materials. The minimum safety distance should not be inferior to 0.5 
m, otherwise you run the risk of starting the fire.  

Do not use the heater in dusty spaces or rooms where gasoline, 
solvents, paints or other volatile and inflammable materials are 
stored  in order to avoid the risk of explosion. 

The heater should not be used close to the curtains or other textiles 
in order to avoid the risk of fire. 

Be particularly cautious when using the heater in the rooms 
frequented by children or animals.  

The heater should be supplied from a source meeting the 
requirements specified on the rating plate. 

Use only a feeder cable including the earth lead in order to avoid 
electric shock in emergency situations. 

Do not unplug the heater by pulling the wire out of the wall socket. 
The appliance should cool down through the ventilation effect. 

Unplug the heater when not used in order to avoid accidental 
damages. 

Before you dismantle the casing check if the feeder cable has been 
pulled out of the wall socket. Internal components may be live.   

2.


Unpacking and transport. 

Open the package and take the heater out including all the safety 
locks installed for the period of transport.  

Should the appliance seem damaged, notify immediately the seller 
of the same. 

Transport the heater using the handle No. 1 shown in Figs. 1 page 2. 

The heater should be transported in original package including the 
safety locks. 

5.


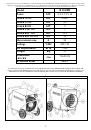
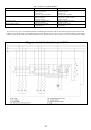
Description of individual components. 

See Figs. 1, Page. 2. 
 1) Handle 


 8)   Wheel. 

2) Tuba air outlet                    9)   Base foot. 
3) Motor with fan 

10)  Hiting element. 

4) Switch             


5) Casing 


6)Thermostat external socked  
7) Plug 
6.


Switching on. 

WARNING !!!: Carefully read  this service manual before you start 

to use the heater. The instructions contained herein will allow you 
to use the appliance in a safe manner.   

Make sure the power supply cable has not been damaged. If the supply 
cord is damaged, it must be replaced by the manufacturer, its service 
agent or similarly qualified persons in order to avoid a hazard.


 Moreover, check if the technical parameters of power supply source 
comply with the requirements specified on the rating plate. 

Place the appliance in its upright position. Make sure the switch is in 
its "0" position shown in Fig. 4. Connect the heater to the power 
supply source. Turn the switch and leave it for 5 seconds in the 
positions as follows:  

Fan only: Figs. 2,3 swith A turn on 

1

st

 degree of heating: Figs. 2,3 swith C turn on 

2

nd

 degree of heating: Figs. 2,3 swith B,C turn on 

3

nd

 degree of heating: Figs. 2,3 swith B,C,D turn on 


5.


Switching off. 

Turn the switch to its "0" position. Once the heating is off, leave the 
fan operating for 3 minutes.   

11.


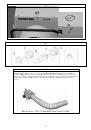
Work with the hose distributing hot air. 

 The appliance is adapted to work with a hot air hose distributor up                             
100 

o

C. The hose distributing hot air of Ø 305mm  and max 15m 

length shold be connected to the outlet. After connection make sure 
that the hose is patent and not folded to let the air flow property. 
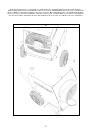
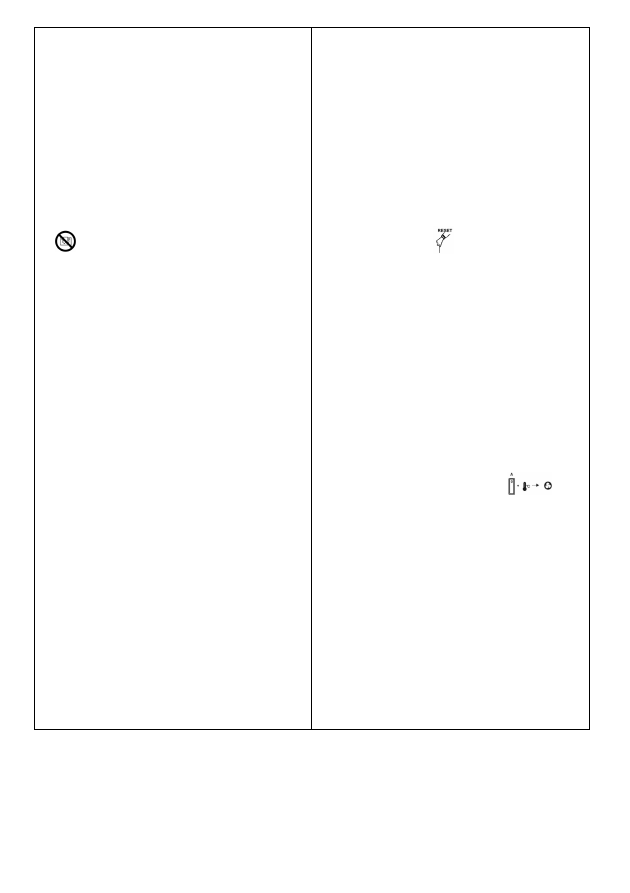
12.


Thermal circuit breaker 

The appliance has been equipped with an integrated thermal circuit 
breaker ensuring high safety level. The breaker will automatically 
switch the power supply off once a limit temperature is exceeded.  
Should it happen, let the appliance cool down and only then, look for 
the reason of the problem. Next push the "RESET" button (Fig. 5) 
with a pointed tip in order to unlock the thermal circuit breaker. If the 
heater does not operate, contact the seller or approved service centre.   

13.


Out-of-season storage.   

Should the  appliance remain idle for  a  long  period  of  time,  clean 
it before shoving by blowing the inside with compressed air. The 
heater should be kept in a dry and clean place. Before you start using 
it again make sure the power supply cable  has not been damaged. In 
the case of any doubts contact the seller or approved service centre.   

14.


Functional inspection. 

The appliance should be checked at least once a year by competent 
service personnel approved by the manufacturer. Any inspections 
or repairs should be conducted by competent personnel only. 

15.


    External thermostat 
The appliance may work with external thermostat. In case of 
propen function of external thermostat (achievement of set 
temperature) it disconnect heating elements and a fan  (the fan 

works a switch A is set in a position nr 1 fig 3 

). 

Heating without room termostat 

    The unit runs under continuous duty. 

- Connect the supplied bridge circuit plug 2 fig 6 to the thermostat 

socket 1 fig 6  of the unit. 

-Put the switches into the desired position  
-WARNING!!! For optimum unit operation, the device should not be 

operated at an ambient temperature above 25 °C. 
Heating with room thermostat 

The unit runs fully automatically and is dependent on set 
temperatures. 

- Remove the bridge circuit plug 2. fig 6 
- Connect thermostat plug 3  fig 6 of the room thermostat (accessories) 

to the thermostat socked 1. fig 6 

- Put room thermostat 4. fig 6  in a suitable place. The thermostat 

sensor may not be exposed directly to the hot air current and not 
fixed directly on a cold surface.  

- Pre-select desired room temperture on the room thermostat. 
- Put the switches (fig 2,3).into the desired position. 


1
2
3
4
5
6
7
8
9
10
11
12
13
14
15
16
17
18
19
20
21
22
23
24
25
26
27
28
Оглавление инструкции
  • Страница 1 из 29
    B 18 EPR BG CZ DE EE ES FR GB HR HU IT LT LV PL RO RU SK Eлектрически отоплител Elektrické ohřívače vzduchu Elektrisches heizlüftgerät Elektrilised kütteseadmed Generador eléctrico de aire caliente Générateur électrique d’air chaud Electric air heater Električni grijači Elektromos fűtőkészülékek
  • Страница 2 из 29
    BG ТЕХНИЧЕСКИ ДАНИ / CZ TECHNICKÉ ÚDAJE / DE TECHNISCHE DATEN / EE TEHNILISED ANDMED/ ES ESPECIFICACIONES TÉCNICAS / FR DONNÉES TECHNIQUES / GB TECHNICAL DATA / HR TEHNIČKI PODACI / HU MŰSZAKI ADATOK / IT DATI TECNICI /LT TECHNINIAI DUOMENYS / LV TEHNISKIE DATI / PL DANE TECHNICZNE / RO INFORMAŢII
  • Страница 3 из 29
    2 3 3
  • Страница 4 из 29
    BG ПЪРВО МОНТИРАНЕ НА СЪОРЪЖЕНИЕТО/ CZ PRVNÍ MONTÁŽ ZAŘÍZENÍ / DE ERSTE MONTAGE DES GETRÄTS / EE SEADME ESMANE PAIGALDUS/ ES PRIMERO ARRANQUE APARATO / FR PREMIÈRE INSTALLATION DE L’APPAREIL /GB FIRST ASSEMBLY OF THE DEVICE / HR PRVA MONTAŽA UREDJAJA / HU A BERENDEZÉS ELSŐ ÖSSZESZERELÉSE/ IT PRIMO
  • Страница 5 из 29
    5 6 7 BG Маркуч, разпространяващ горещ въздух / CZ Hadice rozvádějící teplý vzduch/ DE Schlauch für die Warmluftverteilung / EE Sisseveetav soojaõhu torust voolik/ ES TUBE / FR Distribution d’air chaud / GB Hot air distribution / HR Cijev koji distriburira topli zrak/ HU Meleglevegő elosztó kígyó/
  • Страница 6 из 29
    BG Също така трябва да се провери, дали техническите параметри на източника на напрежение отговарят на техническите данни от инструкция или на данните от табличката с техническите данни върху устройството. ВАЖНО!!! Преди употреба, ремонт или поддръжка, моля внимателно да се запознаете със
  • Страница 7 из 29
    Přístroj umístněte do stojící polohy. Ujistěte se, zda vypínač je v poloze „0“ obr. 4. Zapněte spotřebič do zásuvky Přepínání: •Pouze ventilátor – obr. 2, 3. vypínač A zapnutý (poloha „1”) •I. stupeň ohřevu – obr. 2, 3. vypínač C zapnutý (poloha „1”) nebo C,D •II. stupeň ohřevu – obr. 2, 3. vypínač
  • Страница 8 из 29
    Stellen Sie das Gerät auf eine ebene Unterlage. Prüfen Sie, ob der Schalter sich in der „0” Position befindet Abb. 4. Verbinden Sie das Stromversorgungskabel mit dem Stromnetz. Den Schalter auf entsprechende Position stellen: •Nur Ventilator – Abb. 2, 3. der Schalter A eingeschaltet (Position „1”)
  • Страница 9 из 29
    •Ainult ventilaator – joonis 2, 3. lüliti A sisse lülitatud (positsioon „1”); •I soojendamise aste – joonis 2, 3. lüliti C sisse lülitatud (positsioon „1”) või C, D; •II soojendamise aste – joonis 2, 3. lülitid B, C sisse lülitatud (positsioon „1”); •III soojendamise aste – joonis 2, 3. lülitid B,
  • Страница 10 из 29
    ES ¡¡¡IMPORTANTE!!! Se ruega leer detenidamente el contenido de este manual de instrucciones antes de encender, reparar o limpiar el aparato. La utilización incorrecta de la estufa puede provocar heridas graves, quemaduras, descarga eléctrica o incendio. Hay que asegurarse también de que los
  • Страница 11 из 29
    En outre, veuillez contrôler les paramètres techniques de la source d’alimentation électrique sont en accord avec les conditions spécifiées dans la plaquette des charactéristiques techniques. Placer l’appareil droit, sur une surface plane. Veuillez vérifier que l’interrupteur soit sur position "0"
  • Страница 12 из 29
    Moreover, check if the technical parameters of power supply source comply with the requirements specified on the rating plate. Place the appliance in its upright position. Make sure the switch is in its "0" position shown in Fig. 4. Connect the heater to the power supply source. Turn the switch and
  • Страница 13 из 29
    HR BITNO! Molimo upoznajte se sa instrukcijom prije uključenja, popravke ili čišćenja uređaja. Nepravilna uporaba električnog grijača zraka može biti povodom teških povreda, opekotina, strujnih udara ili biti povodom požara. 1. Instrukcija bezbjednosti Ovaj uređaj je predviđen za uporabu u
  • Страница 14 из 29
    HU FIGYELMEZTETÉS!!! A berendezés üzembehelyezése, javítása vagy tisztítása előtt kérjük alaposan áttanulmányozni az utasítás szövegét. A léghevítő szabálytalan használata komoly sérüléseket, égéseket, áramütést okozhat vagy tűzesetet idézhet elő. 1. Biztonsági utasítások. A berendezés csak zárt
  • Страница 15 из 29
    Inoltre, verificare che i parametri tecnici dell’alimentazione sono conformi ai requisiti specificati sulla targhetta esposta. Posizionare l’apparecchio in posizione verticale e diritta. Assicuratevi che l’interruttore sia in posizione "0" come da Fig. 4. Collegare il generatore d’aria calda alla
  • Страница 16 из 29
    LT ARBU !!! Prieš montuodami, naudodami ar valydami šildytuvą, atidžiai perskaitykite instrukcijas. Neatsargus oro šildytuvo naudojimas gali tapti sunkios traumos dėl nudegimų, gaisro ar elektros smūgio priežastis. 1. Saugumo nurodymai. Šis įrenginys yra skirtas uždaroms patalpoms, kaip antai
  • Страница 17 из 29
    LV SVARĪGI!!! Lūdzu rūpīgi izlasiet instrukciju pirms iekārtas iedarbināšanas, remonta, vai tīrīšanas. Nepareiza gaisa sildītāja lietošana var izraisīt nopietnus ievainojumus, apdegumus, elektriskā šoka radītas traumas vai arī var kļūt par iemeslu ugunsgrēkam. 1. Drošības instrukcija. Šī iekārta ir
  • Страница 18 из 29
    Należy również upewnić się, czy parametry elektryczne źródła zasilania odpowiadają danym technicznym z instrukcji lub danym figurującym na tabliczce znamionowej urządzenia. Ustawić urządzenie w pozycji stojącej. Sprawdzić, czy rozłączniki są w pozycjach „0” rys.2,3. Podłączyć urządzenie do sieci
  • Страница 19 из 29
    RO IMPORTANT!!! Recomandăm citirea în mod amănunţit a textului instrucţiei înainte de punerea în funcţiune, repararea sau curăţirea dispozitivului. Folosirea necorespunzătoare a încălzitorului de aer poate cauza răniri grave, opăriri, elecrocutări sau poate cauza incendii. 1. Instrucţie de
  • Страница 20 из 29
    RU ВНИМАНИЕ!!! Просим внимательно прочитать содержание инструкции перед запуском, ремонтом или чисткой устройства. Неправильное использование подогревателя воздуха может привести к серьезным ранам, ожогам, поражению электрическим током или может быть причиной пожара. 1. Инструкция по технике
  • Страница 21 из 29
    SK DÔLEŽITÉ!!! Pred zapnutím, opravou alebo čistením spotrebiča sa dôkladne zoznámte oboznámte s týmtoobsahom návodom na použitie. Nesprávne zaobchádzanie so spotrebičom môže spôsobiť ťažké poranenia, popáleniny, úrazy elektrickým prúdom alebo môže zapríčiniť požiar. 1. Bezpečnostné pokyny. Tento
  • Страница 22 из 29
    Тип на аварията Двигателят работи, но нагревателят не нагрява Двигателят не работи, но нагревателите нагряват Устройството не работи Малък приток на въздух ZÁVADA Motor pracuje, ale spotřebič nehřeje. Motor nepracuje, ale tělíska hřejou Spotřebič nepracuje Omezené proudění vzduchu BG 11.РЕШАВАНЕ НА
  • Страница 23 из 29
    PROBLEME Le moteur fonctionne mais ne chauffe pas. Le moteur ne marche pas mais les resistances sont chaudes. L’appareil ne fonctionne pas du tout. Le flux d’air est reduit. PROBLEM The motor operates while the appliance does not heat. The motor does not operate while the heating elements are hot.
  • Страница 24 из 29
    PROBLEMA Variklis dirba, bet įrenginys nešildo. Variklis nedirba, bet kaitinimo elementai sušyla Visas įrenginys neveikia Sumažėjęs oro srautas BOJĀJUMA VEIDS Motors strādā, bet ierīce nesilda Motors nestrādā, bet sildelementi silst Visa ierīce nestrādā Samazināta gaisa caurplūsma RODZAJ USTERKI
  • Страница 25 из 29
    PORUCHA Motor pracuje, ale spotrebič nehreje Motor nepracuje, ale výhrevné špirály hrejú Spotrebič nepracuje Menšie prúdenie vzduchu SK 11. ODSTRAŇOVANIE PROBLÉMOV PRÍČINA Zapla sa tepelná poistka Poškodený termostat Poškodené relé Poškodené výhrevných špirály Poškodený motor Blokáda ventilátora
  • Страница 26 из 29
    BG ДЕКЛАРАЦИЯ ЗА СЪВМЕСТИМОСТ ЕС CZ EC PROHLÁŠENÍ O SHODĚ DE EG- KONFORMITÄTSERKLÄRUNG EE EÜ CE SERTIFIKAAT ES DECLARACIÓN DE CONFORMIDAD FR DÉCLARATION CE DE CONFORMITÉ GB EC DECLARATION OF CONFORMITY HR EC DEKLARACIJA O SUKLADNOSTI HU EK MEGFELELŐSÉGI NYILATKOZAT IT DICHIARAZIONE DI CONFORMITÀ CE
  • Страница 27 из 29
    BG - Изхвърляне на вашия стар уред - Когато този символ на задраскана кофа за боклук е поставен върху дадено изделие, това означава, че изделието попада под разпоредбите на Европейска директива 2002/96/EC. - Всички електрически и елекронни изделия трябва да се изхвърлят отделно от битовите
  • Страница 28 из 29
    LT - Informacija apie panaudotos elektrinés įrangos šalinimą - Panaudotą elektrinę ir elektroninę įrangą laikyti su kitomis atliekomis vartotojams draudžiama pagal Europos Sajungos Direktyvą 2002/96/EC. - Šis ženklas, pavaizduotas ant įrenginio, informuoja, kad tai yra elektriné arba elektroniné
  • Страница 29 из 29