Pr e p a r i n g Yo u r M u l t i - Fu n c t i o n Pr i n t e r
9
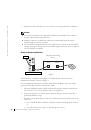
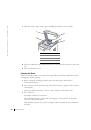
Setting the Time and Date
The time and date are printed on all faxes.
NOTE:
It may be necessary to reset the correct time and date
if loss of power to the
multi-function printer occurs.
1
Press <Menu> until “
Printer Setup
” appears on the top line of the display.
2
Press the scroll button ( or ) to display “
Date & Time
” on the bottom line and
press <Select>.
3
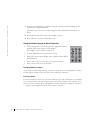
Enter the correct time and date using the number keypad.
You can also use the scroll button ( or ) to move the cursor under the digit you want
to correct and enter a new number.
4
To set a 12-hour format, press the
or the
button and select “
AM
” or “
PM
”.
To set a 24-hour format, press <Menu> until “
Printer Setup
” appears on the
display. Press the scroll button ( or ) to display “
Clock Mode
” and press
<Select>. Then select the 24-hour format using the scroll button ( or ) and press
<Select>.
5
Press <Select> when the time and date on the display is correct.
NOTE:
The multi-function printer beeps and does not allow you to proceed to the next step if a
wrong number is entered.
Storing a Number for Speed Dialing
1
Press <Phone Book> on the operator panel.
2
Press <Phone Book> or the scroll button ( or ) to display “
Store&Edit
” on the
bottom line of the display. Press <Select>.
3
Press <Select>
when “
Speed Dials
” appears on the display.
4
Enter a one, two or three-digit speed dial number between 0 and 199, using the
number keypad and press <Select>.
Or select the location by pressing the scroll button ( or ) and then press <Select>.
If a number is already stored in the location you chose, the display shows the number
to allow you to change it. To start over with another speed-dial number, press
<Return>.
5
Enter the number you want to store using the number keypad and press <Select>.
 1
1
 2
2
 3
3
 4
4
 5
5
 6
6
 7
7
 8
8
 9
9
 10
10
 11
11
 12
12
 13
13
 14
14
 15
15
 16
16
 17
17
 18
18
 19
19
 20
20
 21
21
 22
22
 23
23
 24
24
 25
25
 26
26
 27
27
 28
28
 29
29
 30
30
 31
31
 32
32
 33
33
 34
34
 35
35
 36
36
 37
37
 38
38
 39
39
 40
40
 41
41
 42
42
 43
43
 44
44
 45
45
 46
46
 47
47
 48
48
 49
49
 50
50
 51
51
 52
52
 53
53
 54
54
 55
55
 56
56
 57
57
 58
58
 59
59
 60
60
 61
61
 62
62
 63
63
 64
64
 65
65
 66
66
 67
67
 68
68
 69
69
 70
70
 71
71
 72
72
 73
73
 74
74
 75
75
 76
76
 77
77
 78
78
 79
79
 80
80
 81
81
 82
82
 83
83
 84
84
 85
85
 86
86
 87
87
 88
88
 89
89
 90
90
 91
91
 92
92
 93
93
 94
94
 95
95
 96
96
 97
97
 98
98
 99
99
 100
100
 101
101
 102
102
 103
103
 104
104
 105
105
 106
106
 107
107
 108
108
 109
109
 110
110
 111
111
 112
112
 113
113
 114
114
 115
115
 116
116
 117
117
 118
118
 119
119
 120
120
 121
121
 122
122
 123
123
 124
124
 125
125
 126
126
 127
127
 128
128
 129
129
 130
130
 131
131
 132
132
 133
133
 134
134
Инструкции и руководства похожие на DELL 1600n