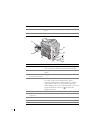
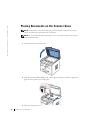
Pr e p a r i n g Yo u r M u l t i - Fu n c t i o n Pr i n t e r
1 3
4
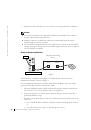
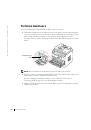
Ping the multi-function printer and verify that it responds. For example, at a
command prompt on a network computer, type
ping
followed by the new printer IP
address (for example, 192.168.0.11):
ping xxx.xxx.xxx.xxx
If the multi-function printer is active on the network, you will receive a reply.
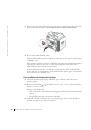
5
If your multi-function printer doesn’t respond, or if the IP address is not what you
expected:
a
Insert the Drivers and Utilities CD into your computer.
b
Launch the Drivers and Utilities CD: click Start
→
Run and browse your CD drive
(for example, type D:\ where D is the drive letter of your CD).
c
Select SETUP.EXE, and then click OK.
d
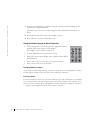
When the Drivers and Utilities CD screen appears, click Set IP Address Utility.
e
Select your multi-function printer from the Configure Print Servers list, and then
click TCP/IP Settings.
f
Make the necessary changes, and then click OK.
g
Click Close.
h
Print and check the network setup page to verify your changes.
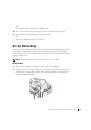
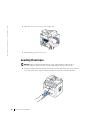
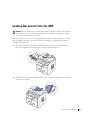
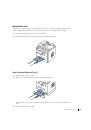
Run the Installation Software
1
Insert the Drivers and Utilities CD into your computer.
If setup does not start automatically:
•
Launch the
Drivers and Utilities
CD: click
Start
→
Run
and browse your CD
drive (for
example, type D:\ where D is the drive letter of your CD).
•
Select SETUP.EXE, and then click OK.
2
When the
Drivers and Utilities
CD screen appears, click
Network Installation (Install
the printer for use on a network).
3-1
For local installation:
•
Select
Local Installation (
Install printer on this computer or server)
.
3-2
For remote installation:
•
Select Remote Installation (Install printer on remote computers or servers).
•
Enter your Administrator user name and password, and then click
OK
.
•
Manually enter or browse for the clients or servers and click
Add
.
•
When you are finished adding remote computers, click Next.
 1
1
 2
2
 3
3
 4
4
 5
5
 6
6
 7
7
 8
8
 9
9
 10
10
 11
11
 12
12
 13
13
 14
14
 15
15
 16
16
 17
17
 18
18
 19
19
 20
20
 21
21
 22
22
 23
23
 24
24
 25
25
 26
26
 27
27
 28
28
 29
29
 30
30
 31
31
 32
32
 33
33
 34
34
 35
35
 36
36
 37
37
 38
38
 39
39
 40
40
 41
41
 42
42
 43
43
 44
44
 45
45
 46
46
 47
47
 48
48
 49
49
 50
50
 51
51
 52
52
 53
53
 54
54
 55
55
 56
56
 57
57
 58
58
 59
59
 60
60
 61
61
 62
62
 63
63
 64
64
 65
65
 66
66
 67
67
 68
68
 69
69
 70
70
 71
71
 72
72
 73
73
 74
74
 75
75
 76
76
 77
77
 78
78
 79
79
 80
80
 81
81
 82
82
 83
83
 84
84
 85
85
 86
86
 87
87
 88
88
 89
89
 90
90
 91
91
 92
92
 93
93
 94
94
 95
95
 96
96
 97
97
 98
98
 99
99
 100
100
 101
101
 102
102
 103
103
 104
104
 105
105
 106
106
 107
107
 108
108
 109
109
 110
110
 111
111
 112
112
 113
113
 114
114
 115
115
 116
116
 117
117
 118
118
 119
119
 120
120
 121
121
 122
122
 123
123
 124
124
 125
125
 126
126
 127
127
 128
128
 129
129
 130
130
 131
131
 132
132
 133
133
 134
134
Инструкции и руководства похожие на DELL 1600n