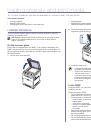
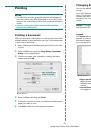
Getting started
|
21
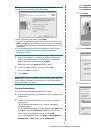
1.
Press
Menu
(
)
until
System Setup
appears on the bottom line of the
display and press
OK
.
2.
Press
OK
when
Machine Setup
appears.
3.
Press the left/right arrow until
Default Mode
appears and press
OK
.
4.
Press the left/right arrow until the default mode you want appears and
press
OK
.
5.
Press
Stop/Clear
(
)
to return to Ready mode.
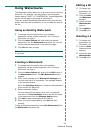
Setting sounds
You can control the following sounds:
•
Key Sound:
Turns the key sound on or off. With this option set to
On
,
a
tone sounds each time a key is pressed.
•
Alarm Sound:
Turns the alarm sound on or off. With this option set to
On
,
an alarm tone sounds when an error occurs or fax communication
ends.
•
Speaker:
Turns on or off the sounds from the telephone line through
the speaker, such as a dial tone or a fax tone. With this option set to
Comm.
which means “Common,” the speaker is on until the remote
printer answers.
•
Ringer:
Adjusts the ringer volume. For the ringer volume, you can
select
Off
,
Low
,
Mid
, and
High
.
Speaker, ringer, key sound, and alarm sound
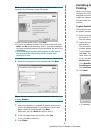
1.
Press
Menu
(
)
until
System Setup
appears on the bottom line of
the display and press
OK
.
2.
Press the left/right arrow until
Sound/Volume
appears and press
OK
.
3.
Press the left/right arrow until the sound option you want appears
and press
OK
.
4.
Press the left/right arrow until the desired status or volume for the
sound you have selected appears and press
OK
.
5.
If necessary, repeat steps 3 through 5 to set other sounds.
6.
Press
Stop/Clear (
)
to return to Ready mode.
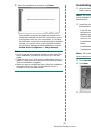
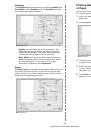
Speaker volume
1.
Press
On Hook Dial
( )
. A dial tone sounds from the speaker.
2.
Press the left/right arrow until you hear the volume you want.
3.
Press
Stop/Clear
(
)
to save the change and return to Ready
mode.
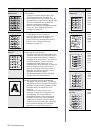
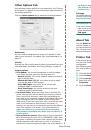
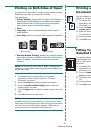
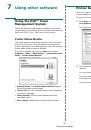
Entering characters using the number keypad
As you perform various tasks, you may need to enter names and numbers.
For example, when you set up your printer, you enter your name or your
company’s name, and the fax number. When you store fax numbers or
email addresses in memory, you may also enter the corresponding names.
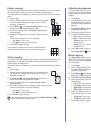
Entering alphanumeric characters
1.
When you are prompted to enter a letter, locate the button labeled
with the character you want. Press the button until the correct letter
appears on the display.
For example, to enter the letter
O
, press
6
, labeled with
MNO
.
Each time you press
6
, the display shows a different letter,
M
,
N
,
O
,
m, n, o
and finally
6
.
You can enter special characters, such as space, plus sign, and etc.
For details, see the below section.
2.
To enter additional letters, repeat step 1.
If the next letter is printed on the same button, move the cursor by
pressing the
right
left/right arrow button and then press the button
labeled with the letter you want. The cursor will move to the right and
the next letter will appear on the display.
You can enter a space by pressing
1
twice.
3.
When you have finished entering letters, press
OK
.
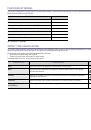
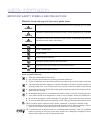
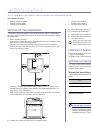
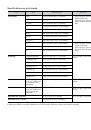
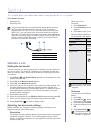
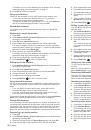
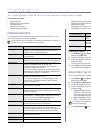
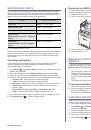
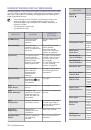
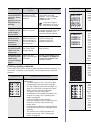
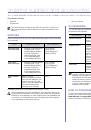
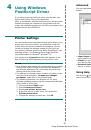
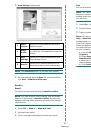
Keypad letters and numbers
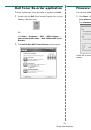
Correcting numbers or names
If you make a mistake while entering a number or name, press the left
left/right arrow button to delete the last digit or character. Then enter the
correct number or character.
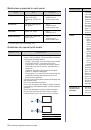
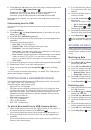
Inserting a pause
With some telephone systems, you must dial an access code (9, for
example) and listen for a second dial tone. In such cases, you must
insert a pause in the telephone number. You can insert a pause while
you are setting up speed buttons or speed dial numbers.
To insert a pause, press
Redial/Pause
at the appropriate place while
entering the telephone number. A - appears on the display at the
corresponding location.
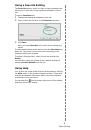
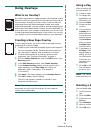
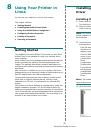
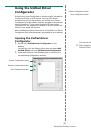
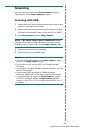
Using the save modes
Power Save mode
Power Save mode allows your printer to reduce power consumption
when it is not in actual use. You can turn this mode on and select a
length of time for which the printer waits after a job is printed before it
switches to a reduced power state.
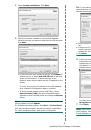
1.
Press
Menu
(
)
until
System Setup
appears on the bottom line of
the display and press
OK
.
2.
Press
OK
when
Machine Setup
appears.
3.
Press the left/right arrow until
Power Save
appears and press
OK
.
4.
Press the left/right arrow until the time setting you want appears and
press
OK
.
5.
Press
Stop/Clear
(
)
to return to Ready mode.
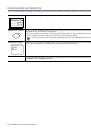
You can adjust the volume level using
On Hook Dial
( )
.
You can adjust the speaker volume only when the telephone line is
connected.
KEY
ASSIGNED NUMBERS, LETTERS, OR CHARACTERS
1
1 Space
2
A B C a b c 2
3
D E F d e f 3
4
G H I g h i 4
5
J K L j k l 5
6
M N O m n o 6
7
P Q R S p q r s 7
8
T U V t u v 8
9
W X Y Z w x y z 9
0
+ - , . ‘ / * # & @ 0
 1
1
 2
2
 3
3
 4
4
 5
5
 6
6
 7
7
 8
8
 9
9
 10
10
 11
11
 12
12
 13
13
 14
14
 15
15
 16
16
 17
17
 18
18
 19
19
 20
20
 21
21
 22
22
 23
23
 24
24
 25
25
 26
26
 27
27
 28
28
 29
29
 30
30
 31
31
 32
32
 33
33
 34
34
 35
35
 36
36
 37
37
 38
38
 39
39
 40
40
 41
41
 42
42
 43
43
 44
44
 45
45
 46
46
 47
47
 48
48
 49
49
 50
50
 51
51
 52
52
 53
53
 54
54
 55
55
 56
56
 57
57
 58
58
 59
59
 60
60
 61
61
 62
62
 63
63
 64
64
 65
65
 66
66
 67
67
 68
68
 69
69
 70
70
 71
71
 72
72
 73
73
 74
74
 75
75
 76
76
 77
77
 78
78
 79
79
 80
80
 81
81
 82
82
 83
83
 84
84
 85
85
 86
86
 87
87
 88
88
 89
89
 90
90
 91
91
 92
92
 93
93
 94
94
 95
95
 96
96
 97
97
 98
98
 99
99
 100
100
 101
101
 102
102
 103
103
 104
104
 105
105
 106
106
 107
107
 108
108
 109
109
 110
110
 111
111
 112
112
 113
113
 114
114
 115
115
 116
116
 117
117
 118
118
 119
119
 120
120
 121
121
 122
122
 123
123
 124
124
 125
125
 126
126
 127
127
 128
128
 129
129
 130
130
 131
131
 132
132
 133
133
 134
134
 135
135
 136
136
 137
137
 138
138
 139
139
 140
140
 141
141
Инструкции и руководства похожие на DELL 2145cn