Troubleshooting
|
73
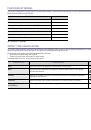
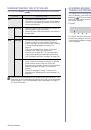
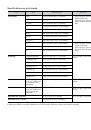
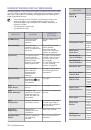
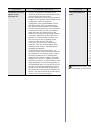
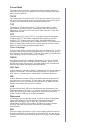
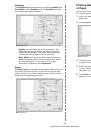
SOLVING OTHER PROBLEMS
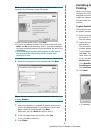
The following chart lists some conditions that may occur and the
recommended solutions. Follow the suggested solutions until the problem is
corrected. If the problem persists, call for service.
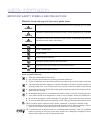
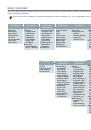
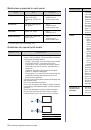
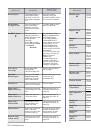
Paper feeding
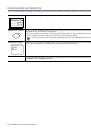
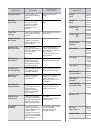
Send Error
(Wrong Config)
There is a problem on
the network interface
card.
Configure your network
interface card correctly.
Toner Empty
T
The color toner
cartridge has run out.
The printer stops
printing.
Press
OK
to toggle
the message to
Stop
,
Continue
or
Black
Only
.
W
Stop
X
If the black
toner cartridge
is empty,
Black Only
message does
not appear.
You can select the
option among
Stop
,
Continue
or
Black Only
with the left/right arrow.
If you select
Stop
by
pressing
OK
on the
control panel, the printer
stops printing. If you
select
Continue
, the
printer keeps printing,
but the quality cannot be
guaranteed.
If you select
Black Only
,
the printer prints the data
in black. In this case, the
mono printing feature is
preset in the printer
properties.
When you copy, the
Black Start
button will
be activated only with
this condition.
If you do not select any,
the printer will work as
Stop
is selected.
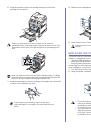
Replace the color toner
cartridge with a new one
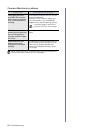
Toner Exhausted
T
The lifespan of the
color toner cartridge
which the arrow
indicates is reached.
This message appears
when the toner is
completely empty, and
your printer stops
printing. Replace the
corresponding toner
cartridge with a Dell-
genuine cartridge (see
Toner Low
T
The corresponding
color toner cartridge is
almost empty.
If you do not
want this
message to
appear, see
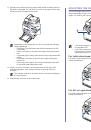
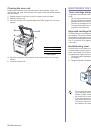
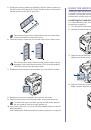
Take out the toner
cartridge and thoroughly
shake it. By doing this,
you can temporarily
reestablish printing
operations.
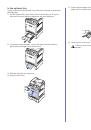
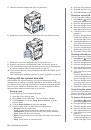
Tray 2
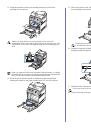
Paper jam 0
Paper has jammed In
the paper feed area.
Clear the jam (see "In
Updating Data
Please Wait...
This message
appears when there is
a change in the
system setting or
when you back up a
data.
Do not turn the power off
when this message is
showing. Changes may
not be saved and datas
can be lost.
MESSAGE
MEANING
SUGGESTED
SOLUTIONS
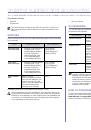
CONDITION
SUGGESTED SOLUTIONS
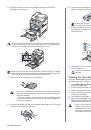
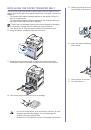
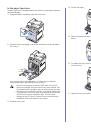
Paper is jammed
during printing.
Clear the paper jam (see "Tips for avoiding paper
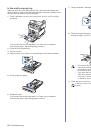
Paper sticks
together.
•
Ensure there is not too much paper in the tray.
The tray can hold up to 250 sheets of paper,
depending on the thickness of your paper.
•
Ensure that you are using the correct type of
paper (see "Setting the paper size and type" on
page 30).
•
Remove paper from the tray and flex or fan the
paper.
•
Humid conditions may cause some paper to
stick together.
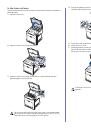
Multiple sheets of
paper do not feed.
•
Different types of paper may be stacked in the
tray. Load paper of only one type, size, and
weight.
•
If multiple sheets have caused a paper jam,
clear the paper jam (see "Tips for avoiding
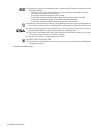
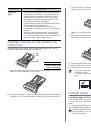
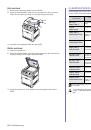
Paper does not feed
into the printer.
•
Remove any obstructions from inside the
printer.
•
Paper has not been loaded correctly. Remove
paper from the tray and reload it correctly.
•
There is too much paper in the tray. Remove
excess paper from the tray.
•
The paper is too thick. Use only paper that
meets the specifications required by the printer
(see "Selecting print media" on page 24).
•
If an original does not feed into the printer, the
DADF rubber pad may require to be replaced
(see "Replacing the DADF rubber pad" on
page 62).
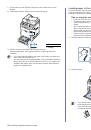
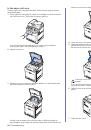
The paper keeps
jamming.
•
There is too much paper in the tray. Remove
excess paper from the tray. If you are printing
on special materials, use the multi-purpose tray.
•
An incorrect type of paper is being used. Use
only paper that meets the specifications
required by the printer (see "Selecting print
•
There may be debris inside the printer. Open
the front cover and remove the debris.
•
If an original does not feed into the printer, the
DADF rubber pad may require to be replaced
(see "Replacing the DADF rubber pad" on
page 62).
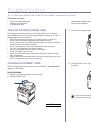
Envelopes skew or
fail to feed correctly.
Ensure the paper guides are against both sides of
the envelopes.
 1
1
 2
2
 3
3
 4
4
 5
5
 6
6
 7
7
 8
8
 9
9
 10
10
 11
11
 12
12
 13
13
 14
14
 15
15
 16
16
 17
17
 18
18
 19
19
 20
20
 21
21
 22
22
 23
23
 24
24
 25
25
 26
26
 27
27
 28
28
 29
29
 30
30
 31
31
 32
32
 33
33
 34
34
 35
35
 36
36
 37
37
 38
38
 39
39
 40
40
 41
41
 42
42
 43
43
 44
44
 45
45
 46
46
 47
47
 48
48
 49
49
 50
50
 51
51
 52
52
 53
53
 54
54
 55
55
 56
56
 57
57
 58
58
 59
59
 60
60
 61
61
 62
62
 63
63
 64
64
 65
65
 66
66
 67
67
 68
68
 69
69
 70
70
 71
71
 72
72
 73
73
 74
74
 75
75
 76
76
 77
77
 78
78
 79
79
 80
80
 81
81
 82
82
 83
83
 84
84
 85
85
 86
86
 87
87
 88
88
 89
89
 90
90
 91
91
 92
92
 93
93
 94
94
 95
95
 96
96
 97
97
 98
98
 99
99
 100
100
 101
101
 102
102
 103
103
 104
104
 105
105
 106
106
 107
107
 108
108
 109
109
 110
110
 111
111
 112
112
 113
113
 114
114
 115
115
 116
116
 117
117
 118
118
 119
119
 120
120
 121
121
 122
122
 123
123
 124
124
 125
125
 126
126
 127
127
 128
128
 129
129
 130
130
 131
131
 132
132
 133
133
 134
134
 135
135
 136
136
 137
137
 138
138
 139
139
 140
140
 141
141
Инструкции и руководства похожие на DELL 2145cn