G
ETTING
S
ET
U
P
:
S
CENARIO
O
NE
– I
N
T
HE
S
TUDIO
3 • 4
B
IG
T
IME
C
ONNECTIONS
With bigger setups including a mixer and a multi-track recorder, or with new
fangled setups like computer-based and stand-alone Digital Audio Workstations,
you’ve got a couple choices. If you’re a MIDI computer user, you’ll also want to
check out the
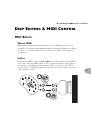
Deep Editing & MIDI Control
chapter to learn about the
complete MIDI control available with the POD, including the SoundDiver editor/
librarian program that’s included on the POD Tools CD.
First Time’s a Charm
Make sure the POD A.I.R. switch
is set to
DIRECT
. The “normal” thing to do
is plug your guitar into POD, and then connect your POD’s +4 dBu stereo TRS 1/4"
left and right outputs to the inputs of your system (the POD outputs are also
perfectly happy connecting to -10 dBV and unbalanced equipment). POD will
process your guitar as you play, and you can print that processing to tape (or disk) as
you make your tracks. For most situations, you may find this is perfect.
Changing History
But there is another option that can give you the exciting ability to go back in time
and change your amp and effect settings weeks after you’ve recorded your guitar
tracks, bringing you flexibility and creative control during mixdown that you could
never get with a traditional guitar amplification system. It’s like this: the simple
setup just described in the preceding paragraph is basically like taking a reverb,
running your vocal mic’s preamp into it, and printing the reverb-processed sound to
your recorder’s track. Now you’ve got that vocal performance, with that reverb
setting, on tape (or disk). The more often used studio setup is to record the vocal to
your recorder’s track dry, using an effect send on your mixer’s tape return channel to
send the vocal to the reverb to audition the effect processing as you record your
track. Then, when it’s time to mix, you can make final decisions about the verb to
insure that it’s fitting in with the rest of your tracks. You can use a completely
different verb if you want to, or no verb at all – all your possibilities are open. You
can use POD like this – in an effect send/return set up – and get great advantages of
flexibility for your guitar tracks. Here’s how this configuration works, plus other
hook-up details:
6