C
REATING
& S
TORING
S
OUNDS
:
C
USTOMIZING
A
MP
M
ODELS
& E
FFECTS
6 • 6
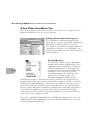
knobs. This way, when you turn the
Amp Models
knob to the Rectifier position,
you’ll get your personal Rectifier, with all the controls in the list above set for your
very own version of the Rectifier. Same thing for the
Effects
– your Chorus,
Tremolo, etc. is always just one knob click away.
So where is stuff going to be saved, exactly? If you’re customizing the Amp Model,
then you’ll be saving to the knob position of the selected Amp Model. For
instance, if your sound uses the Rectifier, and you do the Customized Save of the
Amp settings, you will now get those settings whenever you turn the knob to the
Rectifier position. Alternatively, if your sound uses the Small Tweed, then doing
the Customized Save will save your settings there. Your POD will choose the
correct place to store the information regardless of the present physical position of the
Amp Models encoder – so don’t worry, you can’t accidentally copy your Modern
HiGain settings to the Small Tweed position. Same deal goes for the effects; your
POD knows whether you’re using Tremolo or Rotary Speaker or whatever, and will
save to that knob position.
So what if you’re not sure which Amp Model or effect you are using right now, and
want to find out before you make your Customization? That’s easy, too:
Just press (and keep holding) the
Save
button and turn the
Amp Models
or
Effects
knob. Once you have them in the right position, both the arrows for the
tuning indicator will light up. The
Tap
light will also light solid if your Amp
Model is part of the second “layer” of models (17-32).
So, now that you know exactly what you’re getting yourself into, lets get to it: