Deep Editing & MIDI Control:
S
TEP
-B
Y
-S
TEP
WITH
S
OUND
D
IVER
8•10
S
TEP
-B
Y
-S
TEP
WITH
S
OUND
D
IVER
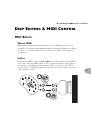
Step 1 -
Hook your POD up to your computer’s MIDI interface. Use both the MIDI
IN and MIDI OUT connections for bi-directional communication (so POD can talk
to your computer, and the computer can talk to POD). Remember that POD’s OUT
connects to the computer’s IN, and the computer’s OUT connects to POD’s IN. Make
sure POD is powered on.
Step 2 -
Install the SoundDiver software on your computer. We’ve included
SoundDiver installers on the accompanying CD. We also strongly recommend that
you surf the Support pages at www.line6.com to check for an updated version of the
SoundDiver installer. Run the SoundDiver installer to get SoundDiver installed on
your machine. Now, with your POD hooked up to the computer via MIDI and
powered on, launch the newly-installed SoundDiver software.
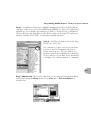
Step 3 -
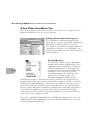
First you’ll see the “splash screen” with Emagic’s contact info, including
information on upgrading to the full version of the SoundDiver software. You’ll then
get a dialogue box to select English or German (SoundDiver is made by Emagic, a
German company).
Step 4 (Macintosh) -
Then you’ll configure your ports; make sure you are plugged
into the right port on your mac (Modem, Printer, or USB) and that you’ve checked
the box for this port before hitting the OK button in the Preferences dialogue box.
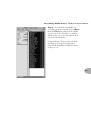
Step 4 (Windows) -
SoundDiver will now probably give you a series of dialogue
boxes to OK regarding MIDI ports. These will say something like “Port XXXX no
longer exists,” and will include an
OK
button. Typically, you’ll get two dialogues
referring to SoundBlaster ports, and eight referring to Unitor ports (the Unitor is a
particular MIDI interface). Go ahead and OK all these dialogue boxes, and then
SoundDiver should give you the dialogue box we’re about to describe in step 5....