C
REATING
& S
TORING
S
OUNDS
:
U
SING
THE
C
HANNEL
P
ROGRAM
M
EMORIES
6 • 1
C
REATING
& S
TORING
S
OUNDS
U
SING
THE
M
ANUAL
M
ODE
F
EATURES
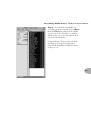
When you are using your POD in Manual Mode, all of the controls are active and
the sound of POD always reflects the knob settings. Sounds just like any ordinary
guitar amp or pedal, doesn’t it? Who says technology is threatening? You know
you’re in Manual Mode, by the way, whenever the
Manual
button
is lit (but
you probably already figured out that part). Play with the knobs until you get a
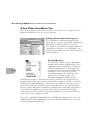
sound that you really like. At this point, you can either follow tradition and put
tiny little pieces of tape on POD or mess it all up with grease pencil to mark your
favorite settings, or you can take a bold step into new technology and save your
sound to one of POD’s memory locations. Which we’re about to tell you how to do
in the next section of the manual, appropriately titled…
U
SING
THE
C
HANNEL
P
ROGRAM
M
EMORIES
So, there you are with a sound that you really like – wouldn’t it be nice to be able
to call it up any time you want it? That’s simple once you have it stored into one of
the 36 POD channel memory locations. How do you do it? Just press the
Save
button
. It will start to flash. Press the
Up
and
Down
buttons and you will
see that you are switching through memory locations A, B, C, and D in each of
POD’s nine numbered banks. Pick one to store your sound in, and press that
Save
button a second time. The light will stop flashing, and the sound is stored at the
location you chose, replacing the sound that was stored there before. Doesn’t get
much simpler than that. After the sound is stored, you can bring it back any old
time by simply pressing the
Up
and
Down
buttons to call up the location where
you stored it. (See
Chapter 7
to learn how to do all this with your feet on the
Floor Board). If you decide that you don’t want to store the sound after you’ve got
all the lights blinking, pressing
Tap
or
Manual
or
Tuner
or
Noise Gate
or
MIDI
9
21
10