Q
UICK
S
TART
G
UIDE
:
“M
ANUAL
? I
DON
’
T
NEED
NO
STINKING
MANUAL
!”
1 • 1
Q
UICK
S
TART
G
UIDE
or:
“M
ANUAL
? I
DON
’
T
NEED
NO
STINKING
MANUAL
!”
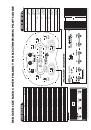
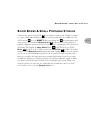
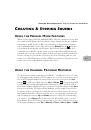
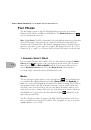
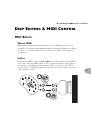
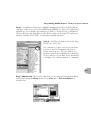
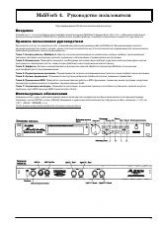
1.
Turn the POD O
UTPUT
L
EVEL
control all the way down to zero.
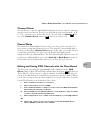
2.
Plug the POD L
EFT
and R
IGHT
O
UTPUTS
into your recorder or
mixer’s input, or plug the left output into your guitar amplifier’s
input. Or connect headphones to the PHONES jack on your POD.
2.
If you’re plugged into a guitar amp, set A.I.R. switch to ‘AMP.’
Otherwise, set it to ‘DIRECT.’
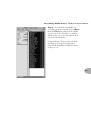
3.
Plug the power adapter into the POD P
OWER
C
ONNECTOR
, then
plug the other end into an AC wall socket.
4.
Connect your guitar to the POD I
NPUT
J
ACK
.
5.
Flip the P
OWER
switch near the POD power connector to fire up.
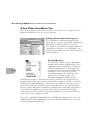
6.
Select an A
MP
M
ODEL
.
7.
Set the C
HAN
V
OL
to max and the B
ASS
, M
ID
, and T
REBLE
to your
heart’s desire. O
UTPUT
L
EVEL
sets the output level (duh).
8.
Pick an E
FFECTS
setting and adjust the R
EVERB
L
EVEL
and E
FFECTS
T
WEAK
so you’re happy with the sound. Tap the T
AP
T
EMPO
B
UTTON
to set the speed of the selected effect.
9.
Browse pre-programmed settings using the UP/DOWN arrows.
You can press the M
ANUAL
button for a “Manual Override” that
gives you where-the-knobs-are-is-how-it-sounds operation.
10.
What number 10? You’re already up and running!
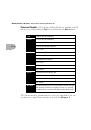
But wait, before you go any further, flip to the inside back cover of this manual and
notice that it folds out. The idea is to have this handy pictorial reference always
opened out while you’re thumbing through the manual. If you photocopy the back
of it, you’ll have a handy template for making a note of your favorite POD
settings. Now then, before you run off....
R
EGISTER
AND
GET
GREAT
FREE
STUFF
!
Included in this manual is a handy, postage-paid card for you to send back to us to
register your purchase, and let us know a little about yourself. It is
very important